
This has been written in collaboration with BMCC’s Early Childhood Education Department as part of CUNY’s Computer-Integrated Teacher Education (CITE) Project. For more information on the project and more, visit this CITE website.
Continue reading “Introduction to Scratch Jr: Crab Dance Animation”Category: Blog
Introduction to Scratch: Turtle Game
This has been written in collaboration with BMCC’s Early Childhood Education Department as part of CUNY’s Computer-Integrated Teacher Education (CITE) Project. For more information on the project and more, visit this CITE website.
Continue reading “Introduction to Scratch: Turtle Game”Laser Etched Keychain Workshop
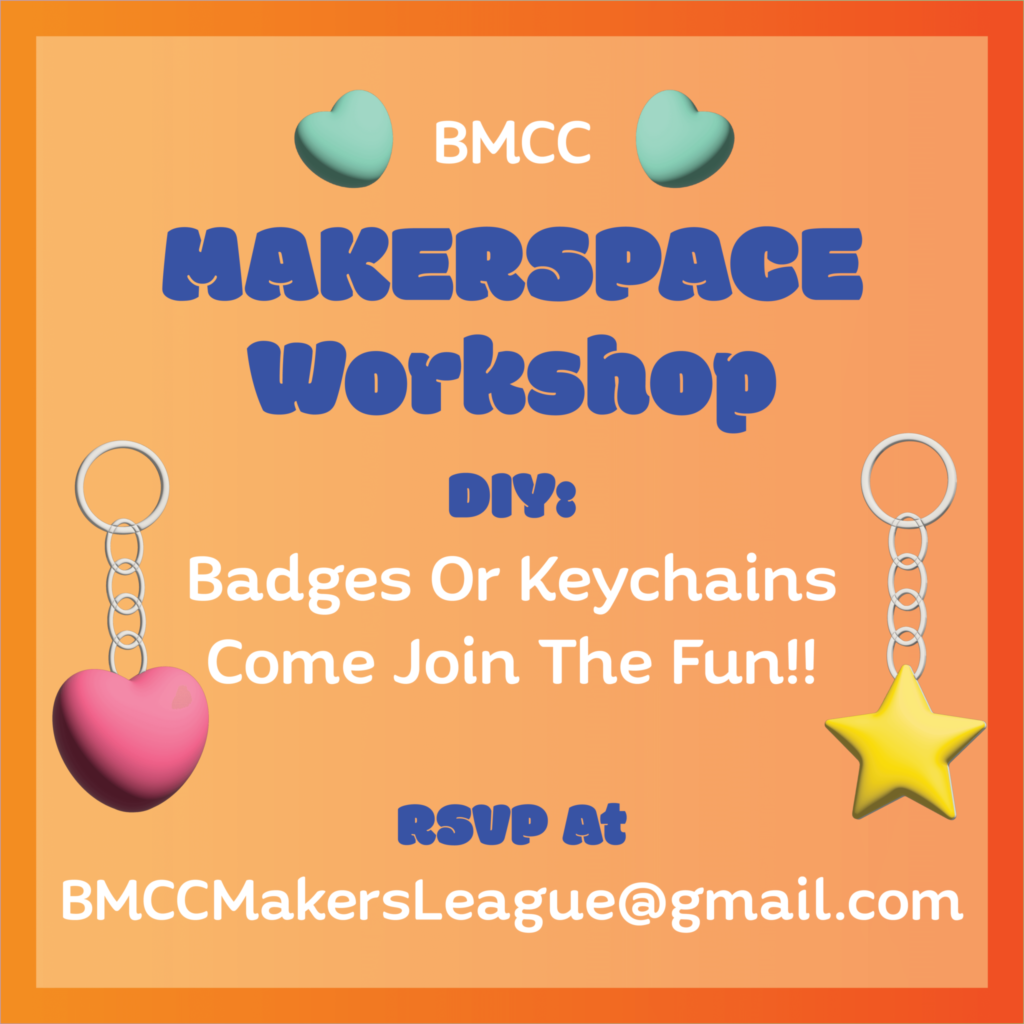
Hi All– join us on April 19th for workshop! Learn how to use Inkscape to create a laser etched pin badge or keychain!
That will be In the Makerspace (Room S608 in the 199 Chambers Street Building) Wednesday, April 19th, 2023 from 2:00 PM – 4:00 PM
RSVP by emailing bmccmakersleague@gmail.com With the email title “Makerspace Workshop RSVP“.
See you there!
ECE 110 – Self Portrait Shape Activity (Inkscape)
For this project you will create a self portrait made of simple geometric shapes and break it down into individual elements.
Continue reading “ECE 110 – Self Portrait Shape Activity (Inkscape)”
ECE 110 – Self Portrait Shape Activity (Illustrator)
For this project you will create a self portrait made of simple geometric shapes and break it down into individual elements.
Continue reading “ECE 110 – Self Portrait Shape Activity (Illustrator)”
We’re Back!
We hope the summer has treated you well!
We are glad to inform you that the Makerspace will be reopening Wednesday, September 1st, 2021! Our planned schedule for the Fall semester is Mondays, Wednesdays, & Fridays, 10 AM – 3PM
If you are new to the BMCC Makerspace, you can find useful information (including available equipment, opening hours, tutorials etc.) on the rest of our website.
You are welcome to stop by at any time during opening hours – whether it’ll be your first time in the space or you were a “regular” before the pandemic.
Please note that we will be limiting occupancy to five people to help maintain social distancing for the time being.
If you have a project in mind and want to ensure you’ll be able to use a specific tool at a specific time, please email Kar, the lab manager (krosen@bmcc.cuny.edu) to reserve your spot. You can also email Kar and Anna Pinkas, the Makerspace director (apinkas@bmcc.cuny.edu) with any questions, ideas for individual or class projects etc. – we are always excited to hear from you.
Please stay in touch and stay informed about future events by checking back here on the Blog and following us on Instagram.
We look forward to the coming semester, and are excited to help you bring your ideas to life in-person again!
Things I Found on The Internet: Earth

Things I Found on the Internet will be an ongoing blog series highlighting cool things found on the internet that aren’t maker related, but might be enjoyable or good references or examples of design to experience.
Today’s Theme Is: Earth Exploration! We started out in the depths of space, but now we’ve landed back on on our home planet to explore. From the deepest seas, to the highest mountains, learning how they were made as well as understanding climate change and disasters– through comparison videos, interactive data visualization, and more!

From the furthest depths of deep space we go to the depths of our very oceans– which are less explored than space!
Another one of Neal’s works should also be highlighted– The Deep Sea is a scrolling adventure from the surface of the ocean to the bottom of the Challenger Deep– the deepest known place in the ocean. In between you learn some neat facts and see many different kinds of weird and wonderful creatures that live under the surface!
For more sea expiration, we have a video from Tech Insider and another from RealLifeLore exploring the depths of our seas! Natural World Facts has a 16 minute video exploration of our oceans and a site for further exploration.
Xavier Bourry created a simple Ocean Simulator for Google Experiments. Monokai created the Deep Sea Stress, where you create a deep sea creature. David Li lets us play with wave physics.
NASA has a game geared towards kids that helps understand ocean currents. For adults, games like Beyond Blue and Abzu recreate the experience of ocean exploration. (Beyond Blue and Abzu need to be purchased.)
If video infographics are your thing, MetalBall Studios and Red Side are at it again with tsunami comparisons. Reigarw Comparisons has a good one, and Mahma Comparisons uses the Statue of Liberty and the rest of lower Manhattan as a reference.

We return back on land to explore the tallest mountains– some of them quite literally out of this world!
Red Side has a comparison of some of the tallest mountains on Earth, compared with Olympus Mons on Mars.
Metal Ball Studios here again comparing some mountains on other planets and moons in our solar system! Even cooler is a visualization of just how deep the inside of our planet is!
Brain Chicken’s version adds a little more information on Olympus Mons, but is more or less similar to the other two.

The history of our planet’s geology and its plate tectonics are tied to one another, so instead of keeping them separate, I put them together. Our planet is a dynamic one, which has helped us harbor life, but also some of our most devastating disasters– if the tsunami comparisons above have proven anything. The ground beneath us has moved for millions of years before us and will continue to do so on a very slow and long scale.
ChronoZoom explores scales from the universal, to our geologic, biologic, and even human timescales! This is a joint venture made between Microsoft, The University of California Berkeley, and Lomonosov Moscow State University.
The University of Alberta has an interactive tool on the Geologic Time Scale for their Dino 101 Coursera Course (It’s not technically geology related, it’s a free course so if you’re into paleontology it might be worth checking out!)
Deeptime shows our geologic time scale as a 12 hour clock. The longer you stay on the page, it will calculate those seconds/minutes into years compared on the geologic time scale. The actual hands of the clock itself shows your current time. (I thought that was neat.)
eduMedia’s Geologic Clock is a little more interactive, though some of the elements are subscription locked.
Ancient Earth Globe lets you explore how the Earth looked from 750 million years ago to today. You can also search for a city and it will show you where that place was in your chosen time.
GPlates is software to help visualize and and simulate plate tectonics. You can down load it for free and explore it on your own, or explore some other simulations created by others.
Earth Viewer is another interactive visualization that shows the geology of the planet throughout its history.
The Smithsonian Magazine has a interactive page showing the history of the earth in a few select snapshots.
New York Times has an animated infographic on continental drift.
Christopher Scotese’s Paleomap Project‘s Quicktime and Flash animations were my go-to back in the day, but sadly in 2021 is a bit of an early 2000s internet relic. Luckily his simulations are now videos on YouTube!
Algol creates a 11 minute time-lapse of the geologic time scale.
While not educational, but available for purchase is this World Creator engine, a tool in creating your own worlds!

Created by plate tectonics, vulcanism is the phenomena of molten rock eruptions. This isn’t just on Earth, geology shows it has happened on most of our terrestrial planets– and even on the moon Io! (Titan and Pluto have a similar phenomena called cryovulcanism which is ice or liquid gases like methane instead of rock!)
The US Geologic Survey keeps an eye out on volcanic hazards on the what is known as the “Ring of Fire”, a rift that covers a large swathe of the northern Pacific ocean.
National Geographic has a interactive infographic of Earth’s Major Volcanoes.
Our World in Data has a infographic covering significant volcanic activity from 1750 BCE to 2007 CE.
Apparently many designers like to revisit old infographics and improve upon them. Rachael Dottle updated another infographic showing the volcanoes that have erupted since 1880. Here is the original infographic from Lazaro Gamio.
Robert Curtis takes one of his friends’ Danny Bradley’s static infographic on volcanoes active since Krakatoa (1883) and makes it interactive.
For videos, Reigarw Comparisons shows the comparative power of these volcanoes on YouTube, and Mahma Comparisons shows the largest eruptions.
While not available for the public I came across this Volcano Simulator directed for educators and museums to show eruptions in real time from the safety of virtual reality.

On a more serious note; our planet’s changing climate is a a concerning and important issue. Not just for us, but for everything on the planet itself. All the same, many of creators have made informative and interactive ways to understanding this phenemenon.
NASA has a Climate Time Machine, where you can see the changes of our planet over time, depending on the entry. Things like the Arctic ice minimum from 1979 to 2020, global temperatures, and more.
Earth is a global map of different, wind, water, and air conditions, that uses real time data, or data going back as far as 1981.
The Climate Impact Lab creates a map shows temperature changes from 1981 to predictions beyond 2020 to 2099 in the US and some countries around the globe.
Bloomberg Green has a interactive infographic, comparing the ability to estimate how we can slow global warming, depending on what actions you device to make.
Future Cities is an interactive map showing the predicted temperature rise in specific cities. What Will the Climate Feel Like in 60 Years? is a similar interactive map made by the University of Maryland– but with a specific date of 60 years from now, assuming things do not change before then.
The LA Times has a simple interactive game focusing on beach erosion, Christina Tarquini uses Chrome Experiments to explore the ocean in Diving into an Acidifying Ocean.

Natural disasters are part and parcel of our existence on a dynamic planet with a tectonic activity, an atmosphere and oceans full of currents that create our climate and weather. Keeping an eye and tracking patterns and preparation is the only way to live with them, and their consequences.
While these are more geared for children, these interactive disaster preparation games are worth checking out! (Unfortunately I had found several that are Shockwave/Flash based and won’t work in 2021). Others were like paid seminar style projects for professional, which important, doesn’t help us
The Smithsonian has created Disaster Detector to teach you how to analyze and predict disasters to hep better prepare. The above link is flash based; but they have a version for iOS devices.
Ready.gov’s Disaster Master is more like an interactive comic covering all kinds of disaster preparation.
Classic Reload, has restored an old DOS era game Firestorm, which is a forest fire simulator. Interactivate has Fire!!, among other interactive activities (under their Learner tab).
The United Nations created Stop Disasters to understand the risks disasters pose and how to prepare with a limited set of resources.
For video comparisons, we have Latos Charts showing off every earthquake that has occurred from 1900 to 2019.
Mahna Comparisons shows the largest magnitude earthquakes ever measured.
Reigarw Comparisons has some on wildfires, earthquakes, tornadoes, and hurricanes.
Red Side has one on tornadoes and hurricanes as well.
That’s all I have for now! Next time, we’ll be taking a look into the life and biology– real and speculative!
Check Us out on the CETLS Blog!
Hi everyone! The Makerspace was asked by the Center for Excellence in Teaching, Learning, and Scholarship (CETLS) to write a blog post on their site highlighting what the Makerspace can do to help improve interdisciplinary learning.
You can visit the First Part and Second Part here!

Things I Found on the Internet: Space & Spacetime

Things I Found on the Internet will be an ongoing blog series highlighting cool things found on the internet that aren’t maker related, but might be enjoyable or good references or examples of design to experience.
Today’s Theme Is: Space and Spacetime! These are interactive visualizations, games, and videos that are both entertaining and informative about space and spacetime itself.

The observable universe is really, really big. 93 billion light years! It means light from that edge would take 93 billion years to each our eyes! (How can that be if our galaxy is only 13.8 billion years old? The simple answer is because the universe has been expanding since the big bang– if you’re more curious about I recommend looking into general relativity.)
The following are some interactive data visualizations and videos that can help visualize and put in perspective just how big everything is!
The Scale of the Universe by Cary and Michael Huang has been around since the days of Flash, it’s one of my personal favorites to use as a fun and playful way of data visualization. Travel from theoretical quantum planck length to the span of the observable universe!
Neal Agarwal has created The Size of Space with more updated information and a more mobile friendly design. Start off with the size of a human and travel to the scale of the observable universe!
In a similar vein, Josh Worth created If the Moon Were Only 1 Pixel is a side scrolling experience that shows relative distances and sizes of our Solar System’s planets (and some of its moons and dwarf planets).
Nikon hosts its own scale, called Universcale. They allow you to explore each entry and share facts from protons to the known universe!
YouTube has a host of comparison videos! Metal Ball Studios have created videos comparing the size of comets, asteroids, moons, exoplanets, stars, and galaxies!
Honorable mention for Red Side, which uses Starkiller Base from Star Wars as a reference in theirs, and also dedicating 20 minutes to universal comparison.
Harry Evett and Times Infinity are more updated, being made in 2020 and 2021 respectively.

Spacetime is the concept that time is as much as dimension as length/width/height. It helps explains some effects of things traveling faster than light. Which at this moment, I will recommend PBS’ Space Time YouTube channel for more equally mind blowing information about spacetime and our universe.
This section covers some neat data visualization on the history of our universe.
NASA has a static chart to view, which is great, but not so interactive.
The 2019 Nobel Prize in Physics has created a little interactive data visualization and video explaining the current theory of the history of of our universe.
The Cosmic Calendar is a way to understand our universe’s history broken down to the scale of one year. (We only arrive on the last few seconds of of December 31st to put it in perspective.) An unknown person (or persons) put together the Cosmic Calendar in Google Calendars .
Melodysheep has created a beautiful 13 minute video timelapsing from the Big Bang to today. He’s followed up with a 25 minute video from now to the current theory of the end of universe. (Don’t panic! It won’t be for another sexdecillion years– that’s 1 with 96 zeroes.)
(Semi-related–I also recommend his Symphony of Science and Terra Lumina projects if you enjoy music.)
If you’re short on time, Bright Side breaks it down real quick with eight minute videos on the Beginning and End of the Universe. (Though I do recommend melodysheep’s more.)

Explore the universe from the comfort of your computer! In this section, I will share some simulators and video “tours” of the universe. Some of the simulators are free, some will have to be purchased, and I’ll let you know which.
Deep Space Map is a little older and made by stitching photos together and limited to a few cosmic objects, but I appreciate it’s early web feel. It’s reminiscent of the original Google Sky– which you can still explore.
You can also explore the original Google Moon and Google Mars, sites they had before they integrated it all into Google Maps. The benefit to this is you can explore other terrestrial planets (Venus, Mercury, Mars), and some of the solar system’s moons, and even inside the International Space Station! To see this feature you just need to keep zooming out on Earth until a lar on the left side of the user interface appears.
100,000 Stars is a Chrome Experiment made by Google Data Arts Team to explore beyond our solar system to the edge of our own Milky Way! It humorously warns Scientific accuracy is not guaranteed. Please do not use this visualization for interstellar navigation.
Michael Chang’s One Million Stars works in a similar fashion, but with the Online Star Registry. So if you registered a star in someone’s name, you can find it!
The Sky Live is a real time planetarium showing you what the sky is like from a position on Earth. (You can set to where you want!) This is more akin to the newer Google Sky Map app for mobile devices. (There’s plenty of planetarium apps on Google and iOS so take a look!)
Space Engine is a paid simulator game, but older versions are free. It is not available for Mac and Linux machines, though.
Universe Sandbox is just as it is as described. Using the known laws of physics of our own universe, you can create (or destroy) your own universe! Or travel and explore our own! It is available on PC, Mac, Linux, and several VR systems!
Or if you want to go open source, there’s a few. Celestia is a free space simulator that can work on PC, as well as macOS, iOS, and Android. There’s also a site for addons created by other you can add to improve your experience (like adding an Imperial Star Destroyer just because).
Open Space was created by the American Museum of Natural History with several universities as a open source data visualization software of the observable universe. It is still in Beta, but you can still play around with it.
Partiview is another open source data visualization tool created by the University of Illinois Urbana-Champaign. It states it is a tool for “4D assets”, meaning most of its usage is as space simulator.
AMNH has a Digital Universe section, where you can see their mapping efforts in either of these software.
If you’d rather just watch, Cater Emmart, Director of astrovisiulization at AMNH’S Hayden Planetarium has created a guided tour of the known universe. Or a quick little six minute tour with their actual Planetarium software.
(Bonus: Not educational but popped up when I was looking for Celestia, there’s a mobile app called Solar Smash. It’s less about exploring the solar system and more on wrecking it. I had a bit of fun exploring it that I couldn’t help sharing.)
Next time, we return from our cosmic journey to explore the deepest oceans and highest mountains of our own planet!
Vinyl Cutting & You!

This is an ongoing blog post series covering tools in the makerspace one can purchase for their at-home making needs.
This is an educational post and I have not been sponsored by any of these companies in any way.
I personally think vinyl cutters are and often slept on machines in the Makerspace. Sure, it cannot cut wood or acrylic, or even leather in some of the cases of these machines, but it is fast and just as effective as the laser cutter with all kinds of paper without the fire hazard. (And unlike a laser cutter– it can cut vinyl without releasing toxic gas!) And price wise, they are more affordable than some of the smaller laser engravers I mentioned in my last post, like Cubiio and Laserpecker.
A vinyl cutter is another type of CNC (Computer Numerical Control) machine, much like the 3D printer, laser cutter, and other machines like mills and lathes! While a 3D printer has its nozzle, the laser cutter its laser, the mill its drill bits, the vinyl cutter uses blades (and other tools) to cut and score materials.
These machines are used very often in the DIY community in creating papercraft, cards and invitations, paper decorations, and even vinyl stickers and tee shirts! Some of these machines also have other accessories that can plot calligraphy with markers, and with some they can be bundled with a heat press or one can purchase it extra.
(You can in the case of iron ons still use an iron too! Presses make sure the heat is evenly distributed and make for a better press in my opinion, but in a pinch an iron is just fine!)
Unlike some of the other machines mentioned in my previous posts, some of these vinyl cutters have a good fortune of being able to be easily purchased in store as opposed to online only. Michael’s Crafts usually has a few aisles dedicated to Cricut or Silhouette machines.
This isn’t entirely a comprehensive list, but my search has led me to very little compared to some of the other machines. The prices listed are the starting price– accessories, addons, and shipping is not considered. So be mindful if you’re budgeting!
Some Things to Consider:

Some of these machines come with a proprietary software to design and export. If you plan on learning how to design in them, that’s great, but be advised you may be limited, as they aren’t entirely all that great or sophisticated as say, a design program. I prefer using another vector editing software like Adobe Illustrator, CorelDraw or Inkscape first and importing it to the proprietary software to print it.
Inkscape is free, and open source, and used among the DIY community in tandem with their cutter’s software, so there’s bound to be plenty of tutorials and guides online for you!
Also be aware of what machine you get and what blade you need to use. You will need to replace the blade frequently. How frequently is determined by how often it is used and with what material. Working with thicker materials might need more frequent replacement. Working with cardstock very frequently may need a replacement every 3-5 months. We replace our blades usually every semester or so. Make sure to do a test cut before each job to check the blade. If it doesn’t cut through even something like paper– it might be dull and need to be replaced.
As each machine can only use their own brand of blade, make sure what you purchase is the right thing! You can use a Silhouette blade on a Cricut, try as you might!
Craft Vinyl Cutters:

Photo by Kira auf der Heide on Unsplash
Cricut: Cricut has several machines: the tiny (and adorable looking) Joy, to the Explore Air, to the workhorse Maker. All three have the ability to cut, score, and plot with a marker for calligraphic elements.
The Joy is small but excellent for starters or people who are casual dabblers. It operates through a bluetooth connection instead of a wired connection and can be used on your mobile device or computer. Reviews say it isn’t great for very intricate designs or thick materials. But at $180 USD, it is a nice starter machine.
The Explore Air at a glance uses a dial any you manually set the material you use (with a custom option for newer materials/setting in the design space), and a slot for the older Cricut cartridges. Like the Maker, it has a dual tool slot, meaning it can do two actions at once, ie. cut and score. It also has a “Fast Mode” increasing the speed of the cut for certain materials. At $250 USD is it also a good starter machine for someone who is more than a casual DIYer. This can be used over a bluetooth connection or if using a computer, can be plugged in directly with a USB cable.
The Maker is what we use in our Makerspace. As I said before, it is a workhorse, and can work with thin cardboard and leather. It has a dual tool slot, and a wide array of tools to use, some you may need to purchase on your own. But the adaptive tool system includes blades, scoring tools and wheels and embossing devices for a wide array of projects. Adjusting your material and tools are done in the proprietary software. At $400 USD it is a bit of an investment, but frankly in my opinion a worthy one.
Other Cricut accessories heat presses for their iron-ons, as well as mats to use the presses on. They also have a wide array of materials made for their machines to use from iron vinyl to pleather.
Cricut’s proprietary software, Cricut Design Space, is a browser based application. It has some preselect designs, and more to purchase, or you can import your own designs. It can be used offline too.
Silhouette: These are probably the most direct competitors to Cricut. The Cameo 4 is their basic standard machine. It too, has a dual too housing for multiple actions. Unlike the earlier model of the Cameo (like we have), the newer version you can cut on the mat, or if your material is on a roll, it can be set up in a roll feeder. It does come with a few blades and accessories to start with, but you will need to purchase others at need and over time. At $300 USD it does beat out the Cricut Maker in price, but not by much.
The Cameo Plus, is exactly the Cameo 4, but as a wider workspace (up to 15 inches wide) and according to Silhouette, can cut thicker materials. At $400 USD, it is comparable to the Cricut Maker, but can do designs up to 15 inch wide. The Cameo Pro is just like the Plus, all the same features but with a 24 inch wide workspace. At $500 USD it is high for a craft level machine, but it is starting to dip towards an industrial cutter by terms of size.
The Portrait 3 can work with material up to 8 inches wide, and while not as robust as the Cameo, is likely more closer on par to the Cricut Joy. At $200, it is an excellent beginner machine so long as you keep it to small projects.
The Curio is limited to an 8.5 by 6 inch space, but not only can cut paper and vinyl, it also has embossing capabilities (that can even do metal)! At $250, it is an affordable machine, but I feel its appeal is more if you are more into embossing than cutting.
Like the Maker, these Cameos have many material and tool settings in its proprietary software, Silhouette Studio. It too comes with some free designs and more you can purchase from the, This is an actual application installed on your machine. These can all be used with bluetooth or with a USB connection.
Silhouette has other machines too! The Mint makes rubber stamps and the Alta is a basic 3D printer!
Brother: Brother, as you may or may not know, is a company more known for inkjet printers, and embroidery machines, which is why I was surprised to find out they make vinyl cutters too! Brother machines seem to be more geared toward quilting, but you can cut non fabric materials and even foam.
The ScanNCut SDX125E starts at $400 USD, and allows you to edit on a computer or mobile device wireless, or through a USB connection, or on the screen of the cutter itself. As the name suggests, it scans (at 600 DPI) as well as cuts. It only has the one too housing, but it can autodetect thickness, but only limited to a .1 inch thickness. Brother has its own software called Canvas Workspace, that is similar to Cricut’s Design Studio being web and cloud based.
The SDX85 goes $350 with many of the same capabilities.
CM350E goes for $350 with many of the same capabilities, save the CM350E has a .08 inch thickness limit and only scans at 300 DPI.
At the time of the writing many of these machines are out of stock, or unable to find prices to compare, but it looks like their machines are between $300-$400 USD and have the bonus of a scanner as well as a cutter. However, further research indicates it doesn’t have a great blade force compared to the Maker or Cameo, meaning it may be limiting in material. Perhaps this might be more for those into quilting than anything else.
In Short: There’s a nice handful of machines with pros and cons, some a little more specialized than general use. On top of price, I’d also connoisseur the frequency of use, the materials you wish to work on and whether or not you’re going to do more in the future.
My Pick: The Cricut Maker. Overall it has the best reviews, and the most capabilities in materials to use. They also can be purchased in stores and have a whole slew of materials and add ons you can buy physically in stores and online. The software is something to be desired but if you’re like me, you’re probably using Illustrator/CorelDraw/Inkscape for your designs anyway.
Though I will say for all the material Circuit has…Silhouette has inkjet friendly temporary tattoo paper that actually lasts well. You can use it on the Cricut too, though!
Industrial Cutters/Plotters:

These are the sorts used for signage and large scale projects, I won’t focus too much on them, as I’m sharing them more for educational purposes. Maybe it’s something you plan on investing on in your makerspace because you want to do large scale work. I’m not here to judge, just provide you with some models to check out.
(If you are interested in getting an industrial plotter on a budget, you might be able to find older models on marketplace sites like eBay, Craigslist, or Facebook Marketplace. But I’d still use these sites as your starting point for research.)
Roland: Roland Has a desktop vinyl cutter from the $600 USD STIKA to the $2000 USD DG CAMM-1 GS-24, but also has large size printer/cutters, and other tools like laser engravers! As some of these involve asking for a quote, I’ll safely guess they are $10,000 USD or more.
Graphtec: Again, many of these machines are asking for information for a quote, so I’m going to assume these are $10,000 USD or more. Their F-MARK2 is a cutter for labels/stickers/cards, but can’t find a price. The CE-Lite-50 is a 20 inch wide desktop cutter that has plugin support for vector editing software and Silhouette Studio in their proprietary software. With a $600 price tag, it’s good for an industrial cutter but frankly I’d still veer people towards the craft cutter like the Maker.
USCutter: Hosts several brands like Titan, Mimaki, and PrismCut. These can start at $600 USD desktop machines to $6000 USD industrial cutters or plotters. There are many models to browse through!
In Short: I am out of my element here, so I can’t give any advice. I’ve only had the opportunity to design for a large scale plotter, never operated one. So no “My Pick” here, sorry!
Further Research:

Unlike 3D Printers or Laser Cutters, you don’t nearly have as much of a wide net of choice with a vinyl cutter, which might be for the best. Again, I will say research, research, research! Things to keep in mind when looking for the right vinyl cutter for you:
- Price
- Workspace limits
- Availability of replacement or extra parts
- Material thickness limit
- Size and scale of projects
- Casual or Frequent Use
And with that, I wish you the best!