
Just like the conductive dough guide, there are more things to explore electricity with! This is a fun and simple project you can do alone, or with children. The great thing is that it isn’t cost heavy, and if you don’t want to get a pre-made kit, outside of the LED and alligator clips, everything else can be found at home.
What You Need:
- 4 Lemons
- 4 Zinc Items (galvanized nails, zinc washers or zinc plate)
- 4 Copper Items (pennies or copper plate)
- 5 Alligator Clips (more if you use more than 4 lemons)
- 1 LED (the ones with “legs”)
- Multimeter
- Knife (Optional)

If you don’t have alligator clips, LEDs, or zinc/copper sources readily available, I recommend purchasing a pre-made kit instead. I have seen them online cost between $7-$20 USD. The higher end kits might include clocks, or LCD screens and the like as well. Just search “Lemon Battery Kit” or “Potato Battery Kit”.
You way also add more lemons to the chain, just add one more copper and zinc element and an alligator clip for every lemon.
Why Lemons (or Potatoes)?
Potatoes and Lemons are the most commonly used items for this project, but you can also use other citrus fruits like limes, grapefruit, or oranges. You can also use apples, pineapples, cucumbers, and tomatoes as well!
The reason why is that these fruits and vegetables have the right amount of electrolytes in their composition. As I explained in the squishy circuits guide: an electrolyte is a fluid mixture that conducts electricity, usually because of salts. In this case the electrolytes are a type of acid. These acids are in all different kinds of fruits and vegetables, but the ones named are large enough to set up a decent charge.
Strawberries and other berries are very small and won’t have much charge on their own, but you can experiment and try to see how many you can chain to light up an LED.
You can also use vinegar (acetic acid) and pickles, sauerkraut, or kimchi (lactic acid), and even Coca-Cola (phosphoric acid) or Gatorade (citric acid) too– though it might be slightly messier to set up.
Because of the longevity of the potato, you can keep it as a battery for up to a month, and there’s been research into using potatoes and plantain piths as batteries for places where electricity is difficult to come by. And since it’s organic and decomposes– it’s also eco friendly!
Why Zinc and Copper?
The zinc and copper are conductive metals, meaning an electric current can go through it. If you purchase a food battery kit, you’ll see you’ll have 2 different colored plates for each battery– the silver one is zinc and the orange-brown metal is copper. Copper is a very conductive metal– meaning we can get a decent charge with the limited amount of electrolytes in our food battery.
Zinc coated washers or galvanized nails are good options if you are looking around the house. Pennies are an easily accessible copper source. You can purchase zinc and copper plates, or pre-made kits if you find them more affordable.
The zinc is the key to generating any electric current. The acid dissolves the zinc molecules and expels charged ions into the liquid of the fruit/vegetable, creating the electricity. This is called oxidation. The acid in our electrolyte solution also helps keep that charge to allow it to go through our alligator clips and into our LED.
Some of the pre-made kits, the “copper” looks more like brass to me (it’s more a yellow goldish color)– brass is also a conductive metal, but not as conductive as copper. You can swap it for a penny in a pinch. Aluminum foil is also an option in a pinch, but may not get as great results as a copper/zinc set up.
For more on conductivity and how electricity works, visit our Physical Computing Page!
Setting Up the Battery:
If you are using a fruit– you want your fruit as fresh as possible. Look for very firm lemons. I had VERY firm lemons and even after a week since purchasing were in very good shape.
Press gently on the fruit with your palm and roll it on a flat surface a few times. This helps loosen up the flesh and juice inside the fruit. (If you’ve ever fresh squeezed limes or lemons, you might be familiar with this.) You’ll know when it softens a bit and the lemon juice is coming out.

Place your zinc and copper elements into opposite ends of your lemons. The copper is “power” and the zinc is “ground”

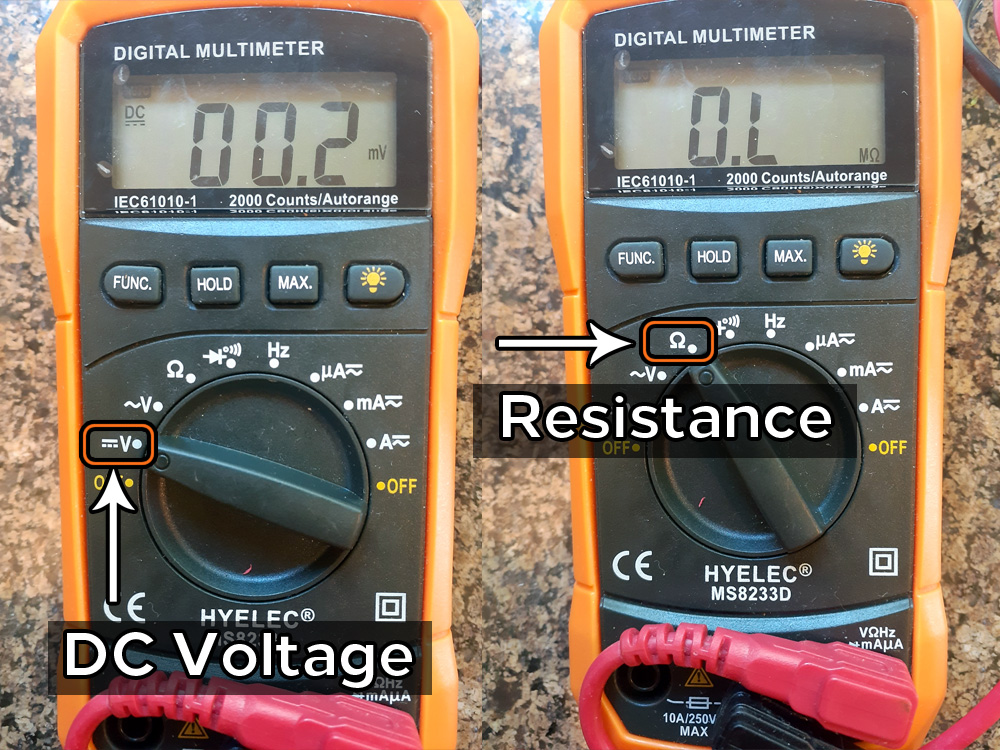
If you have one, take your multimeter and take a reading. Turn on your Multimeter to one of the V settings. One is Alternating Current (AC) Voltage, the other is Direct Current (DC) Voltage. Alternating Current is the current for things you plug into a socket, Direct Current is the current coming from anything that is a battery (like our lemons).
As such, you want the Direct Current option on your multimeter to get a good reading, which looks like a line with three dashes under it. For resistance, you choose that little omega symbol.
Put the red probe onto the copper element and the black probe onto the zinc element.

My lemon is reading 82.7 millivolts (or 0.0827 volts). Not a lot of power. Once we chain it with the other lemons, our voltage will go up.
Furthermore, our resistance is 144.9 kilhohms (144,900 ohms)– which is a fair bit of resistance. Like the voltage, we will expect the resistance to go up as well.

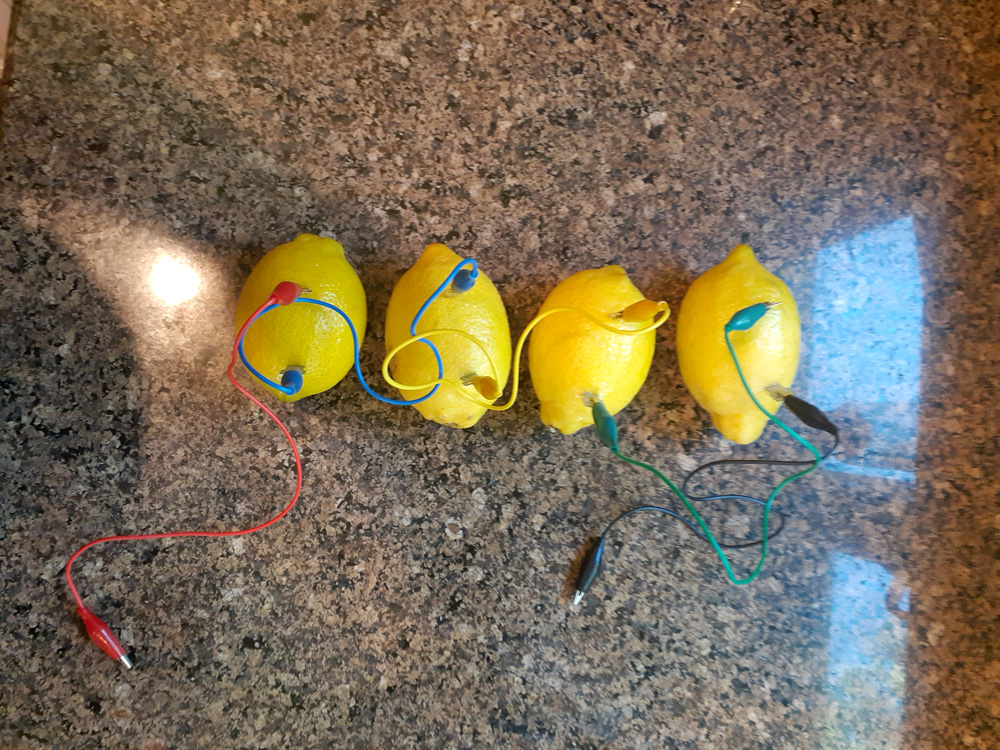
To chain the lemons, attach the alligator clips to your zinc and copper elements. The first copper and last zinc elements will be the ones we attach to the LED. The other 3 clips will be woven power to ground.

Attach one alligator clip to the cathode of the LED, and the other alligator clip to the anode of the LED. The Anode is the longer leg.

Because of how little charge there is in your food item, the LED may not be as bright as it would expect– it will be very faint. Your LED color might also affect it as well, so I’m using some white LEDs for this.

Here it is compared to a LED lit by 2 AA batteries.

Measure it again with the multimeter, you will now see it is 3.47 volts. This is equal to the voltage of some coin cell batteries.
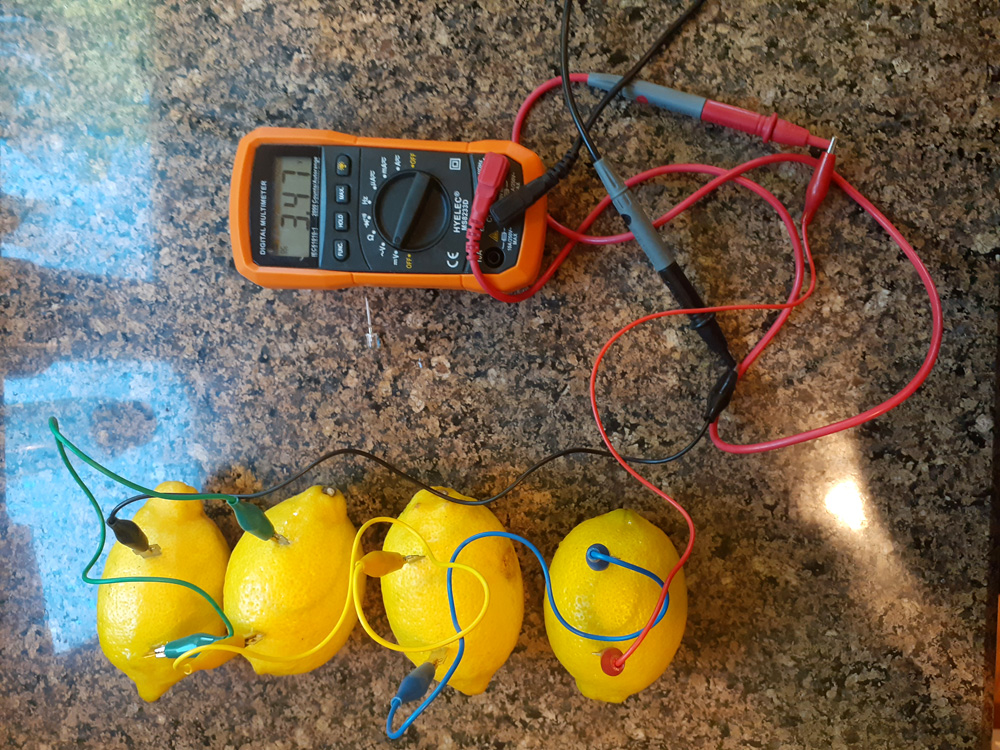
But why is it so faint? Even though we have enough voltage, the lemons also carry a lot of resistance. And so the flow of electrons to the LED is slowed down. Think of it as putting weight on a running hose; the stream will go down to a trickle.

My O.L on my multimeter means “Open Loop”– it is saying the circuit is not closed and the resistance cannot be measured. However, as we have tested it IS a closed loop– otherwise our LED would not light up. I tried several different points and only received the same.
But if we do the math: 144.9 times 4 equals 579.6 kilohms, or 579,600 ohms. That is a lot of resistance compared to the voltage we’re reading from the lemons. With less resistance, the LED would glow brighter.
When you are done, please discard the food. It is no longer safe to eat. If you’d like to test the longevity of the potato, you can store it in a safe space for your experiment, but regardless in the end it’s best to discard it.
As mentioned before, there are many kinds of these food battery kits, some use clock or LCD screens, and other such components. Others encourage to chain food items for a stronger charge– we encourage you to experiment if you’re able to! Happy Experimenting!
Further Exploration:
- Lemon Battery on Wikipedia
- Resistance and Conductivity on Wikipedia
- A Potato Battery Can Light Up a Room For Over a Month on Smithsonian Magazine
- More Info on Potato/Lemon Batteries on Sciencing
- How to generate electricity from a potato? on Environment Buddy
- Lemon Battery Experiment on Science U
- Build a Potato Battery on Steam Powered Family