Overview:
Not everything made in the makerspace is physical; some people may end up using out tools to 3D model, or draw. Illustrating is just as much making as physical computing or laser cutting, you can’t plan your project without sketches, and you can’t laser cut or etch without a design to begin with!
This tutorial is made in mind more to get you comfortable with the program we use to design in the Makerspace without needing to output it, although there will be a walkthrough in preparing it for the laser cutter by making it a pendant that can be made into whatever accessories you desire.
In the digital sense, this emoji can be used as an icon on social media sites, chat programs, or as custom emojis on sites that allow you to do so like Discord or Twtich.
I should also preface that all emojis are uniform, the style changes between platform and what device you’re using. Android emojis look different than Apple’s, and if you’re writing on say a Windows computer, they will appear entirely different than the other two examples.
For Example, let’s look at one of my favorite emojis: the Tyrannosaurus:
(If you want to learn more about various designs of emojis, Emojipedia is a great resource!)
As you can see, there’s a wide stylistic difference from platform to platform. But not to worry! I’m just showing this off to educate you. While you are free to try to emulate the design you like most, since we’re designing for ourselves and do not need to follow any stylistic guidelines. Anything goes!
(But, say if you wanted to recreate your own set of emojis for something, you’d probably want to keep your style consistent.)
Working in Adobe Illustrator:
While we provide links to some open source/free software for use at home, the Makerspace itself has license to use Adobe Illustrator. You may try to follow with the best ability with another program as well, but there might be an additional learning curve. Be patient, and refer to program’s online guide to see what it can/cannot do.
My version of Illustrator is CS5, which is much older than the CC version on our machines in the space. The only difference being my user interface is light colored and may not have as many capabilities as your versions have. All the commands are the same, so don’t feel daunted!
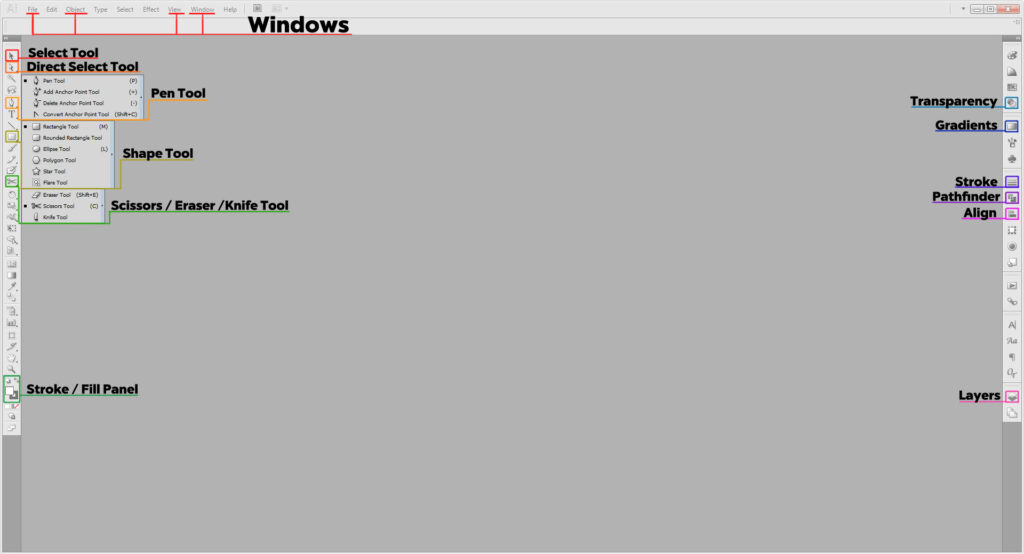
Tools in Illustrator Covered:
- Select Tool (V) is self-explanatory. It selects items, and if grouped, will select the whole group
- Direct Select Tool (A) selects only the item you click on.
- Pen Tool (P) is nice to know for making certain shapes. Holding down the icon opens other options. For more information on those, check out the Stencil Workshop [or the Intermediate/Advanced Illustrator Tutorials].
- Shape Tool draws shapes. Quick Command M for rectangles and L for circles. Holding down the Shape tool in your toolbar will open up more options for other shapes.
- Scissor Tool (C) cuts along a path or point. Good for making custom shapes or removing small parts of shapes. If you don’t see it, the Eraser Tool or Knife Tool may have been used prior. Hold down the icon to reveal it.
- Stroke and Fill (X) allows you to make your shapes filled in solid or just remain outlines, or both. You will need to physically clock on each to set the color. Using D resets your colors to the default white fill and black stroke.
Panels in Illustrator Covered:
If you cannot find these in your workspace go to Window on the top of your main menu. Select the panels as needed.
- Transparency allows you to edit the opacity and blending mode. If you’re familiar with Photoshop, this would be the Layer Panel.
- Gradient allows you to generate a gradient, and edit it further.
- Stroke allows you to change the appearance of your stroke, its thickness, or to make it a dotted line
- Pathfinder merges multiple shapes together in different ways.
- Align helps you center or stagger shapes relative to your artboard.
- Layers shows you every path, shape, our type object you’ve made. You can organize pieces using many different layers, or groups within said layers.
Windows in Illustrator Covered:
- File is where you check your color mode, or output settings.
- Object allows you to further edit, group, or expand your shapes (important for laser cutting prep)
- View allows you make, show, or hide guides and grids.
- Window is where you can access all your panels if they aren’t on your artboard or you accidentally close them.
Shortcuts to Know:
- Ctrl/Cmd + A selects everything
- Shift + Ctrl/Cmd + V pastes an object in place relative to where it was on the previous space; great if you’re moving it to a new file/artboard.
- Ctrl/Cmd + G groups selected items into groups
- Shift + Ctrl/Cmd + G ungroups the group selected
- Cntrl/Cmd + J closes open shapes.
- Ctrl/Cmd + R opens up the rulers on the artboard, allowing you to easily make guides
- Cntrl/Cmd + “ reveals and hides the grid
Making Your Emoji:
While it’s good practice to sketch it out at first, luckily for us, we have the internet and Emojipedia to use a reference on what we want to base our emoji off of.
Another important thing to note is scaleability. A vector image, like the one we make is scaleable, meaning it can be made as large or small as needed quickly and easily. For an emoji we need a small scale (120×120 pixels), but if you wanted to for whatever reason want to print it on a banner it can be scaled up to as large as it needs without it being blurry or pixelated. Likewise if you scaled it down very small it would remain the same without any issues. (If you plan on doing any design work, particularly with regards to print—Illustrator is your friend and it’s worth knowing!)
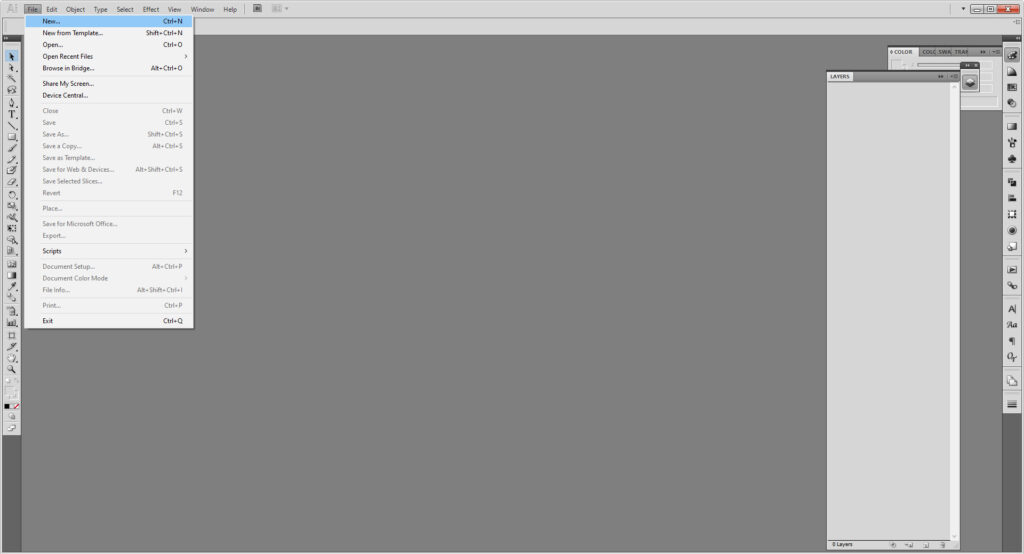
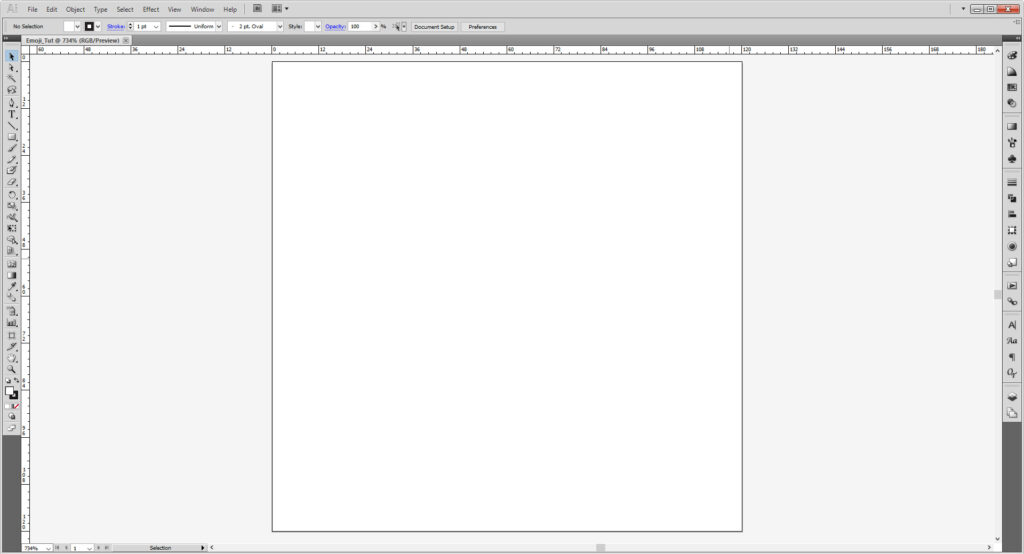
First things first, for File > New. Emojis are small, and following Emojipedia, it looks like the maximum size is 120 by 120 pixels. So that how we’ll set it up.
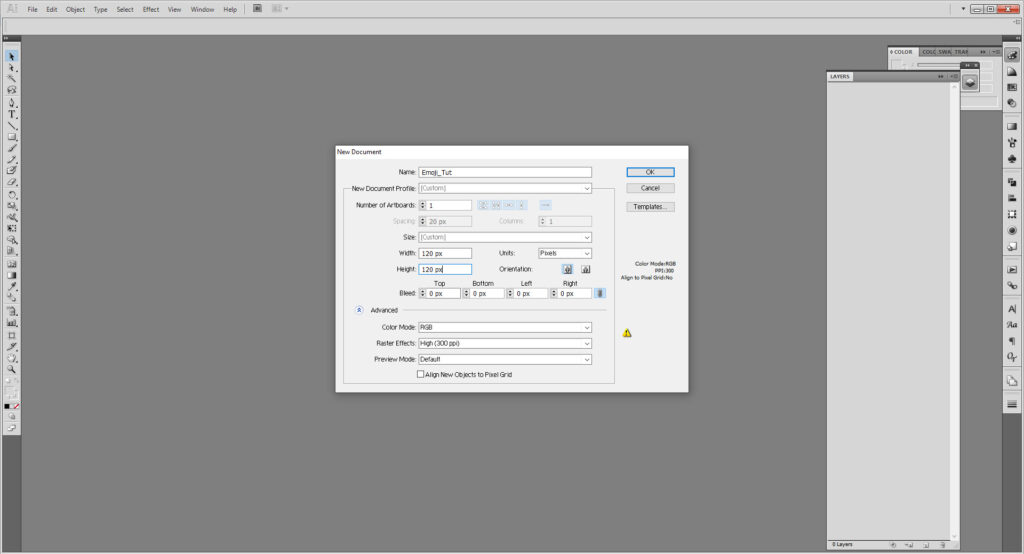
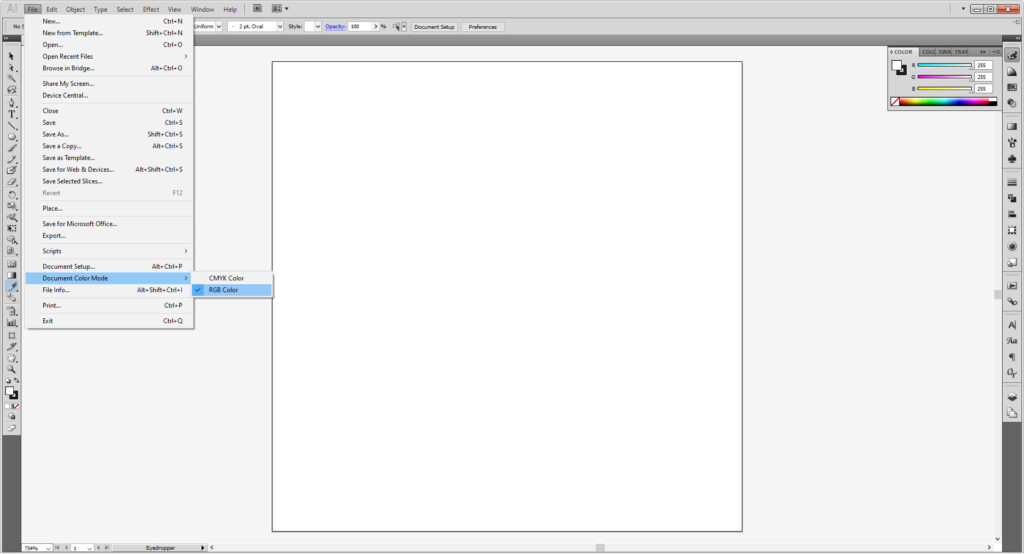
Since it’s not for print, we can use RGB Color. If we were making this for print, CMYK would be preferred (and you can change it at any time by going to File > Document Color Mode ).
You may notice I have rulers out (Cntrl/Cmd + R will reveal them. In case you want guides. If you prefer working on a grid that works too, then you want Cntrl/Cmd + “).
If you had sketched it first or saved the emoji from an online source, then you’ll want to place it into the document. Skip to the next part if you’re making it from scratch.
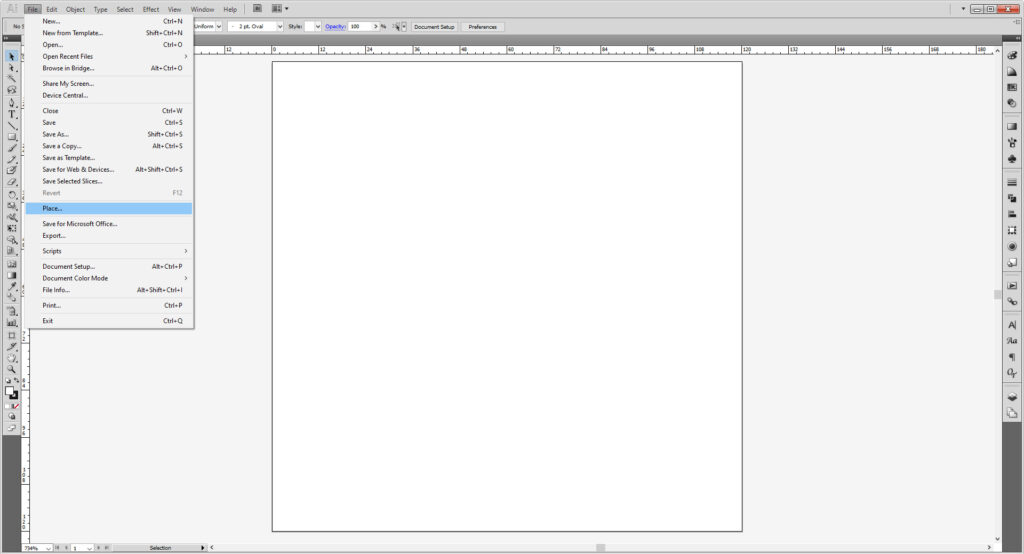
Go to File > Place and find your image. Once you have, select Place for it to appear on the artboard.
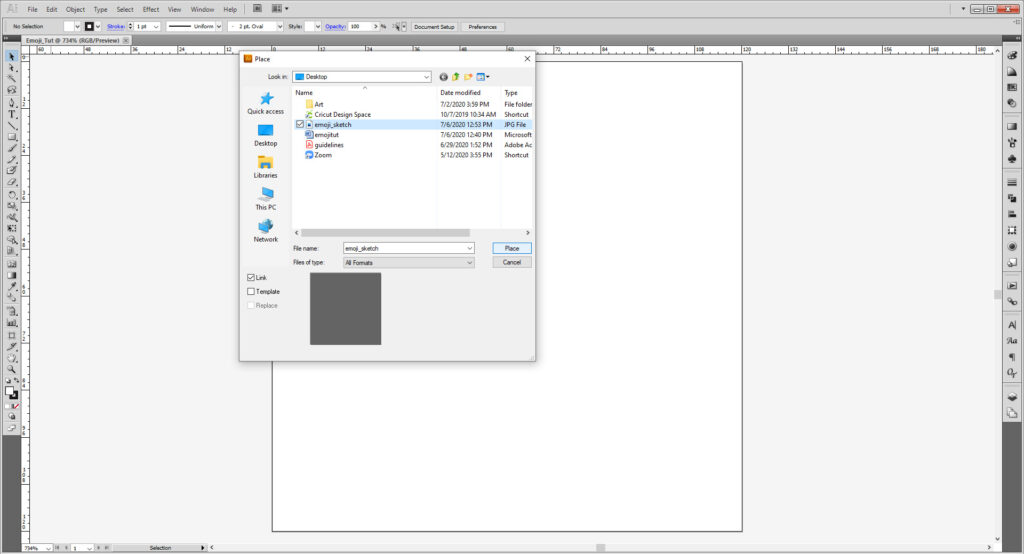
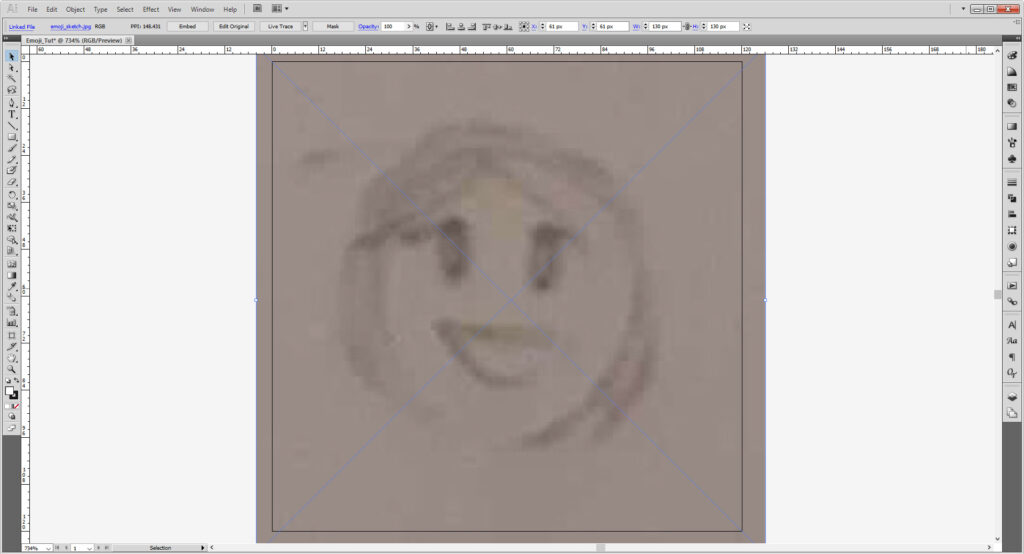
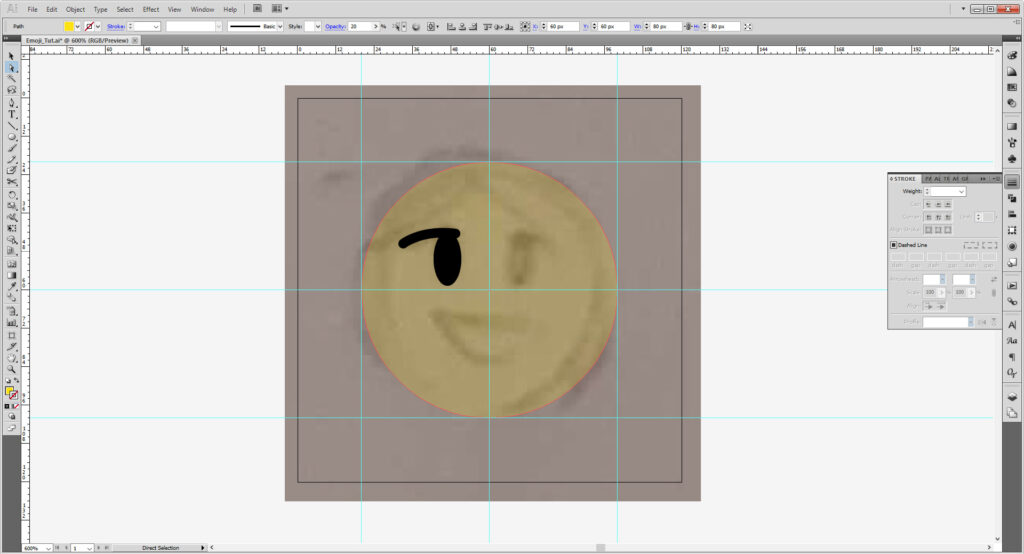
You may need to scale it down as needed. (Your sketches will probably be cleaner than this; mine was done rather quickly on a small corner of an already small sketchbook.)
Next, either lock your layer or the image itself—I prefer a separate layer between my sketch and artwork, but either way is equally valid practice.
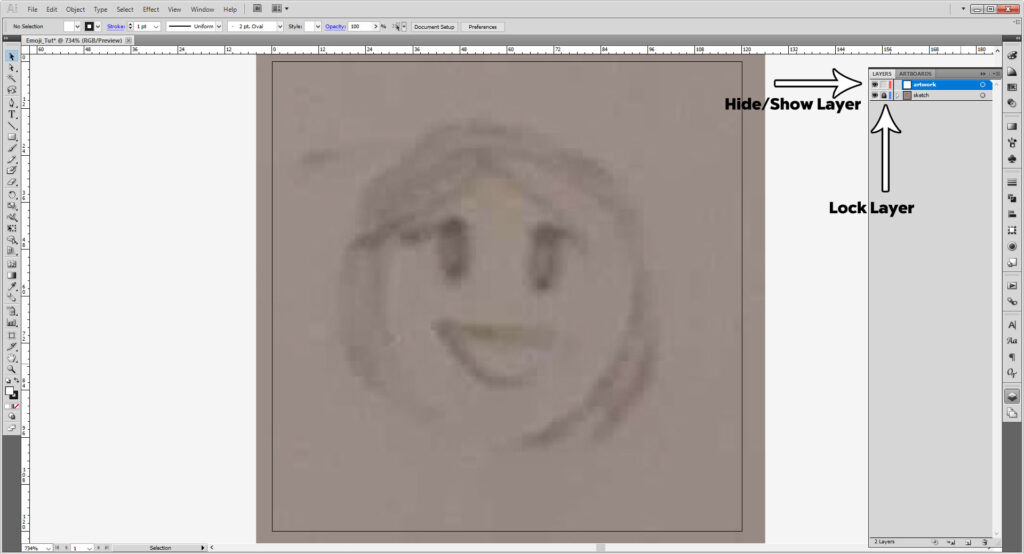
Now we’re ready to start designing. Create an ellipse using the Ellipse Tool (L). There are two methods:
1: You can click and drag to create a circle, holding Shift while doing so will make it nice and even, and use the properties/transform panel or select tool to edit the size as needed.
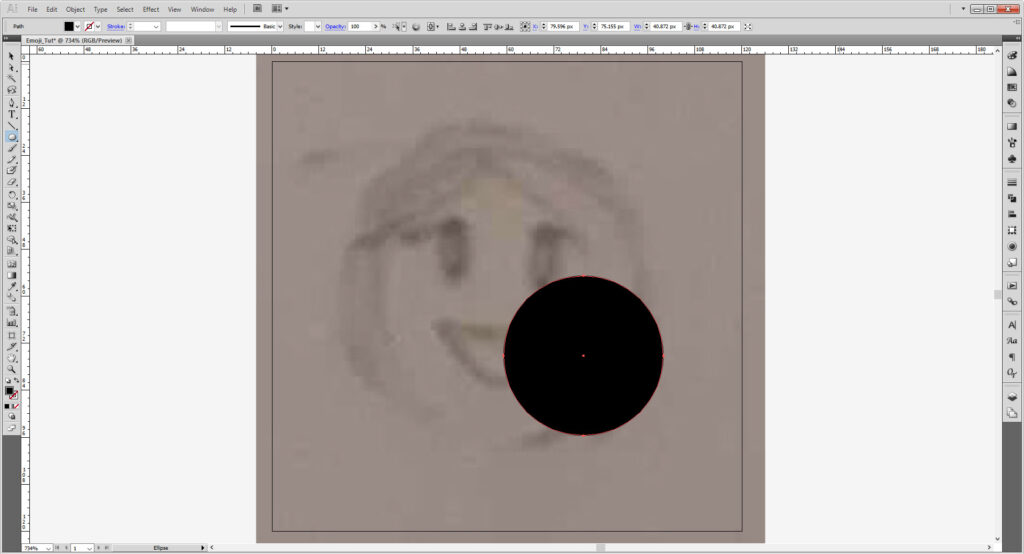
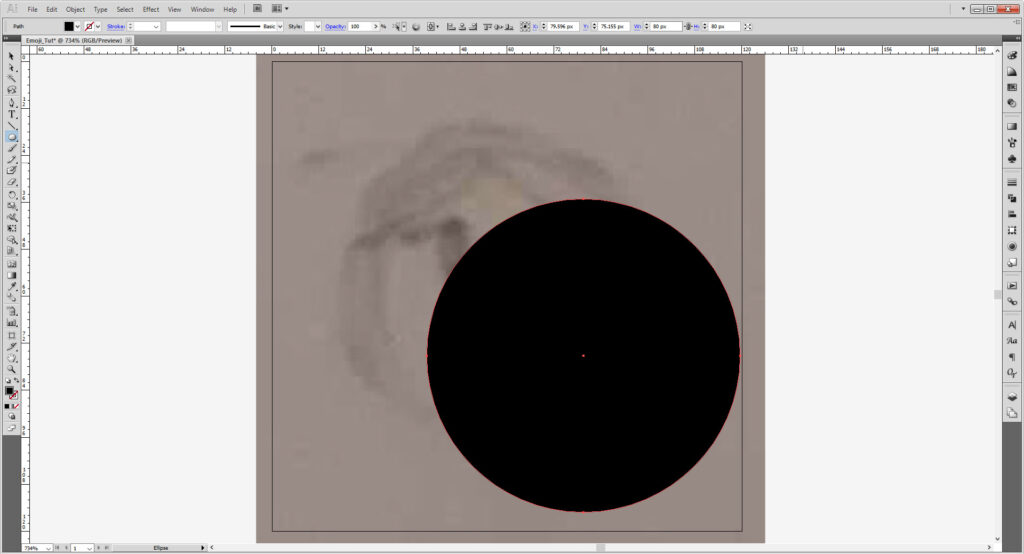
2: Or you can click the abroad and put a specific size you want if you know it. I’m doing 80px by 80px.
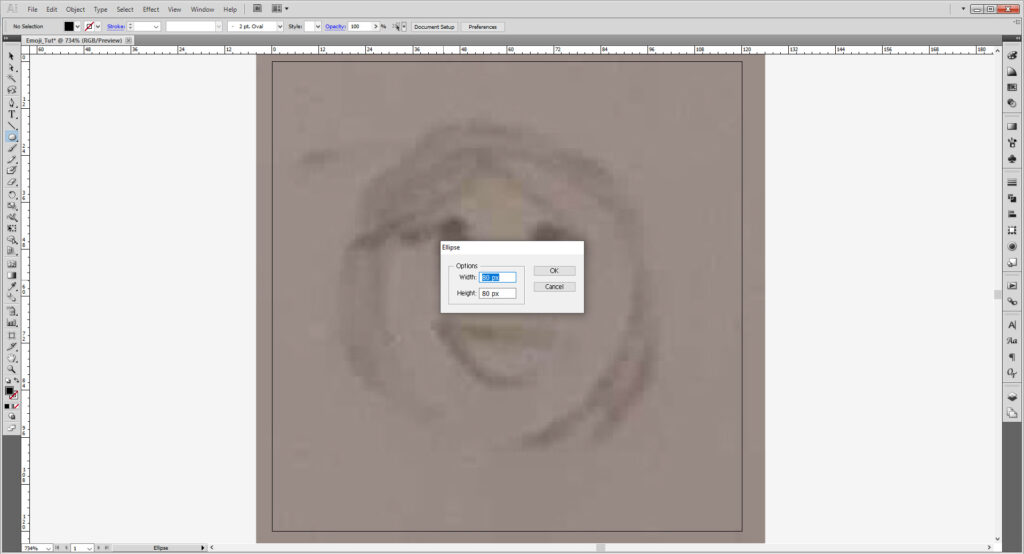
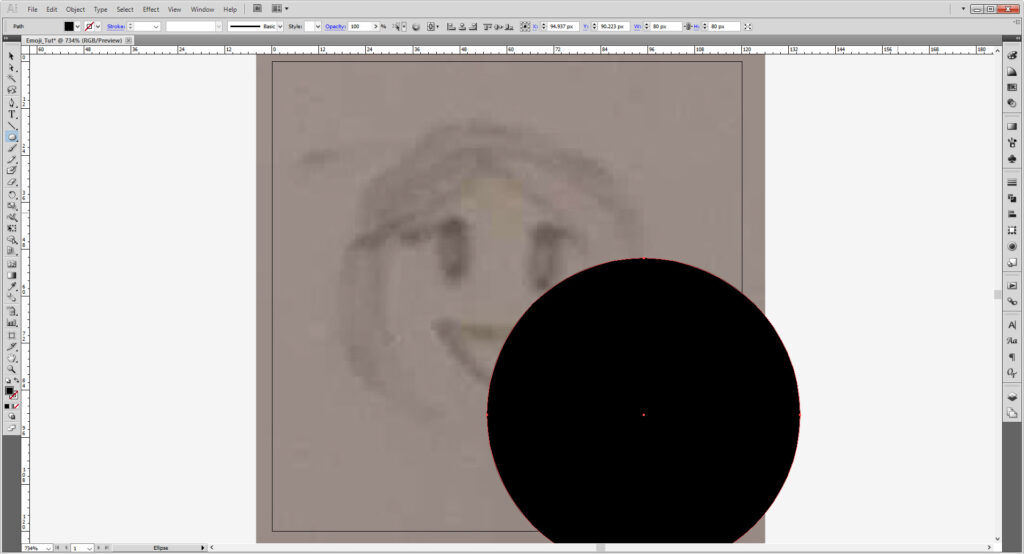
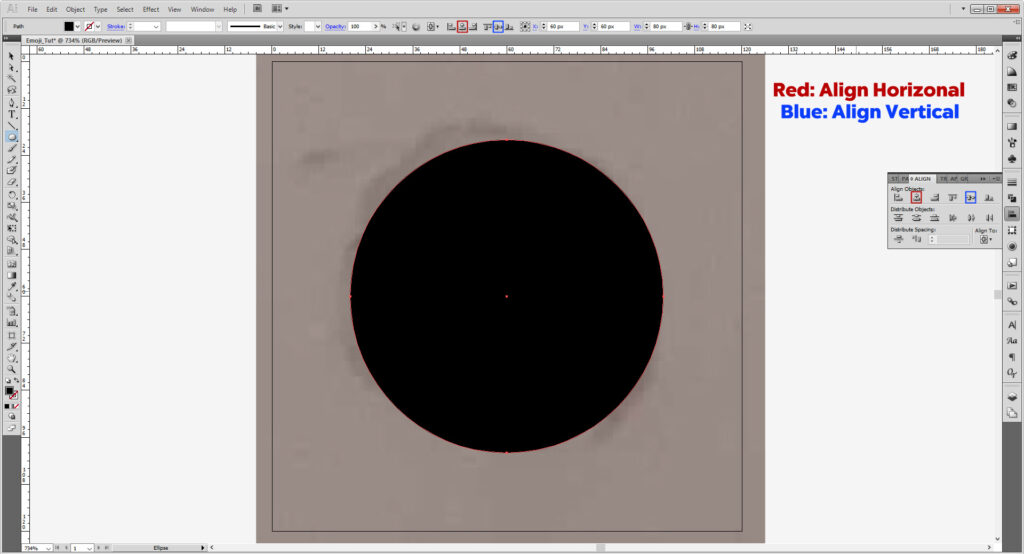
We want it nice and center! Select your ellipse with the Selection Tool and check to see if your align tools are on the properties bar.
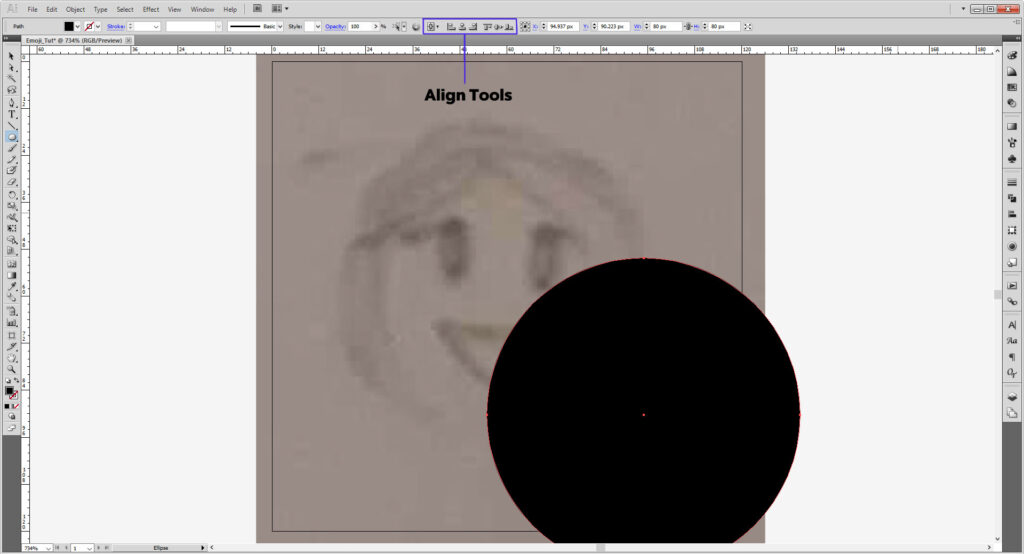
In newer versions it may be in its own panel. Go to Window > Properties if that is the case. You can also use the Align panel (Window > Align) as well.
Make sure your setting says Align to Artboard.
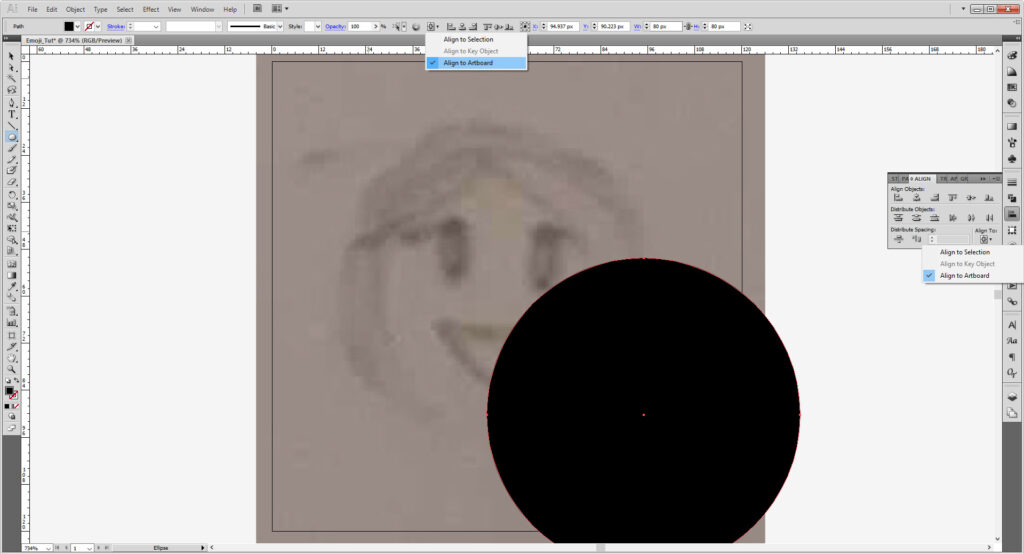
Next you’re going to select Horizontal Align Center and Vertical Align Center so it is perfectly aligned in the center of our board.
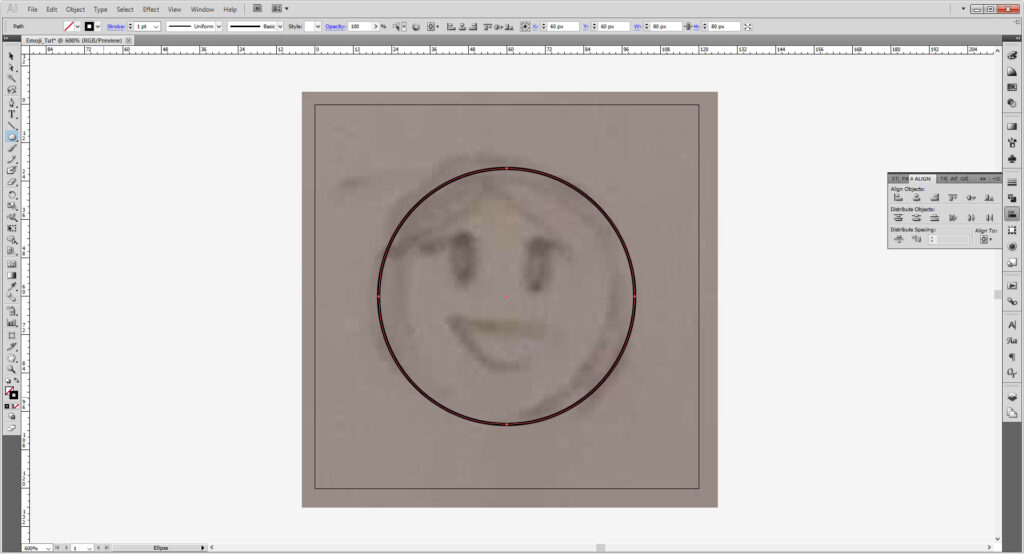
Now you have another two options: turning the fill into a stroke, or changing the color and temporarily lowering the opacity to see your sketch. Both need the Stroke and Fill panel.
For the stroke, simply hit the arrow button above the panel.
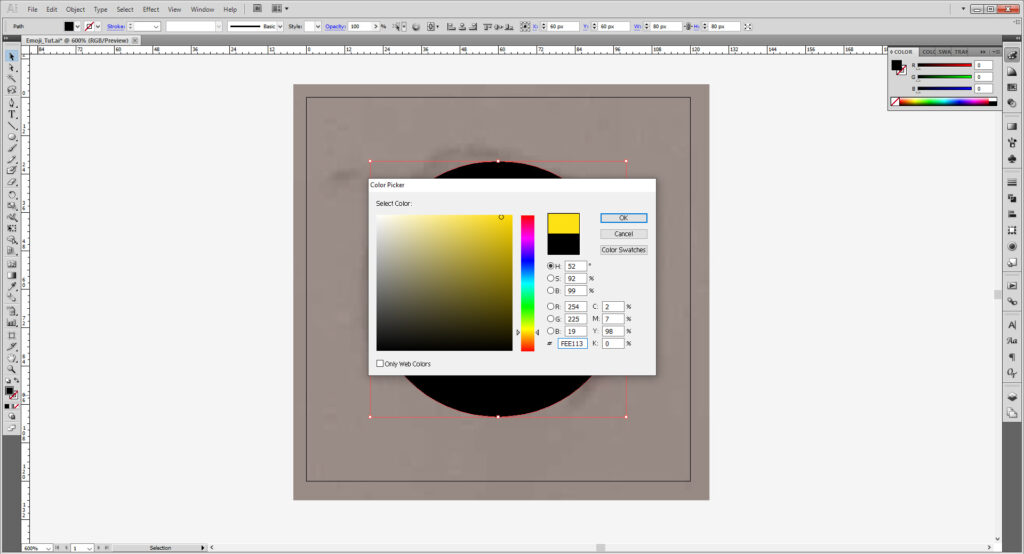
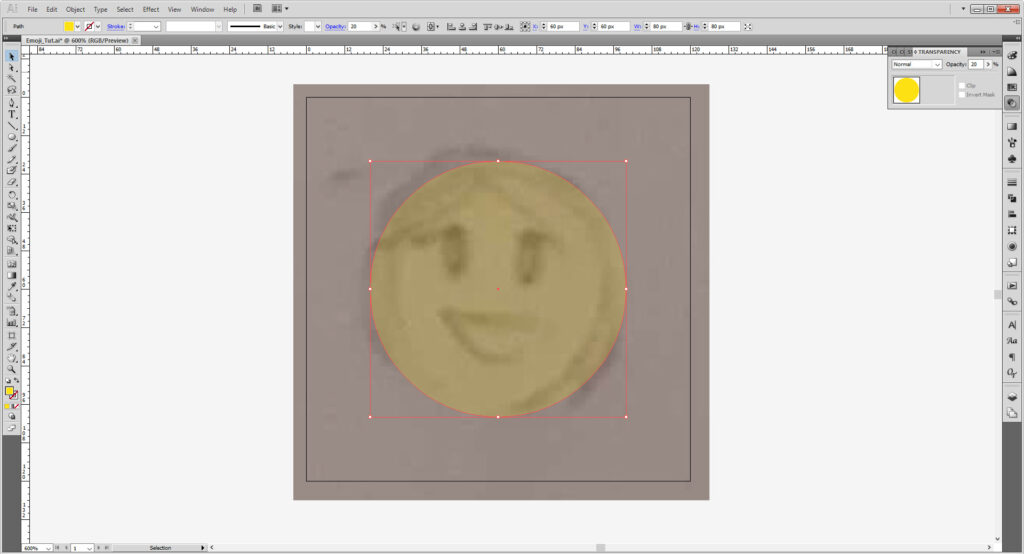
If you prefer to start with your fill, select the color you want the skin to be. I’m going to be using a yellow (#fee113), and in the Transparency panel make the opacity 20% (but anything under 50% works!)
Create a new layer called Guides. Make six guides from clicking and dragging from the rulers. Four guides on each side of the circle, two guides to intersect at the center. If you want to put in the number the coordinates are:
Vertical Guide 1: X: 20px Y: 60.5px
Vertical Guide 2: X: 100px Y: 60.5px
Vertical Guide 3: X: 60px Y: 60px
Horizontal Guide 1: X: 60.5px 20px
Horizontal Guide 2: X: 60.5px Y: 100px
Horizontal Guide 3: X: 60px Y: 60px
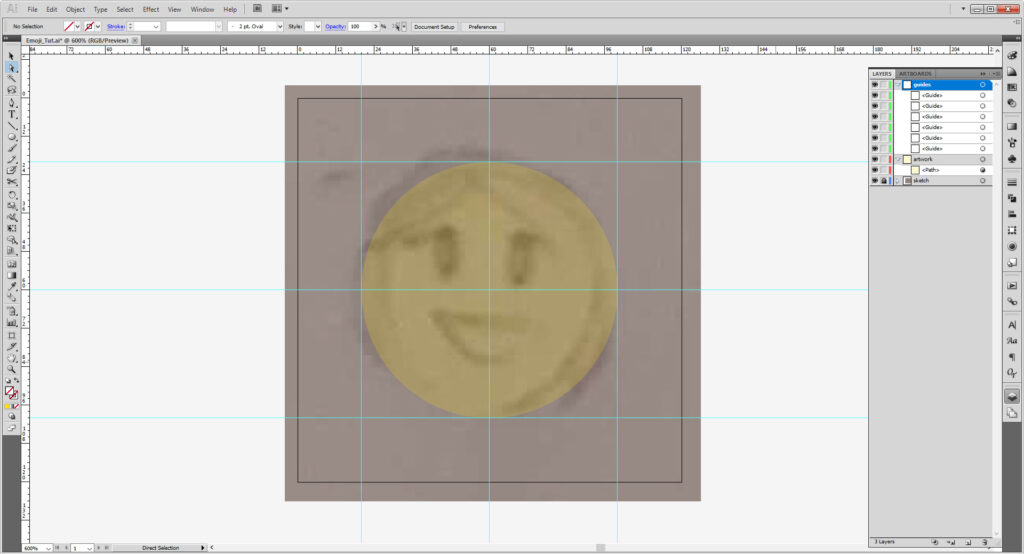
Lock your guides once they’re set up to keep them from being moved.
Select the Pen Tool (P) and make your stroke color black (#000000). Going back to the artwork layer, I’m going to make a slightly arcing path. Then in the stroke panel, I’m going to make it thicker and have rounded ends.
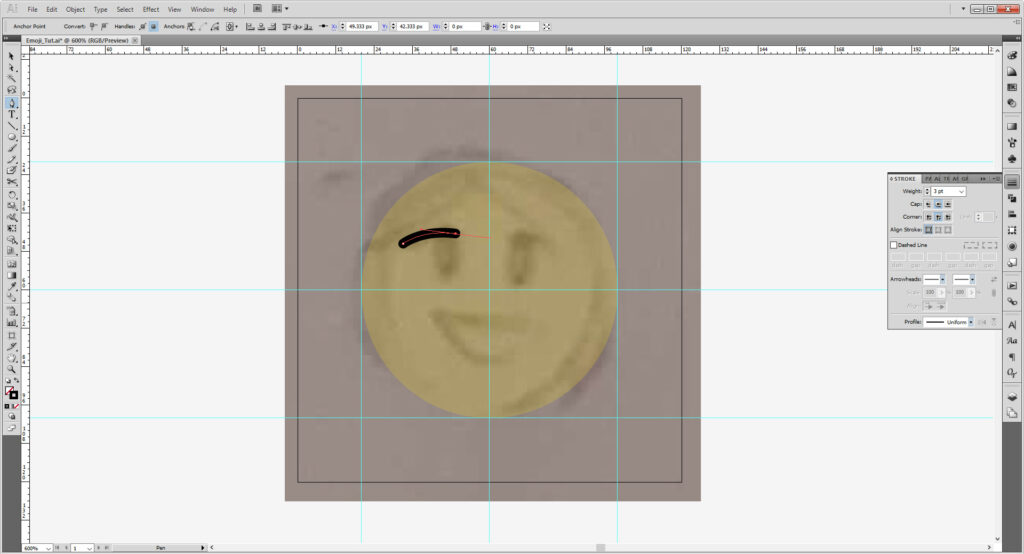
Then using the Ellipse tool, make an oval-like shape.
You can even make it colored! Just move the ellipse below the path in your layers.
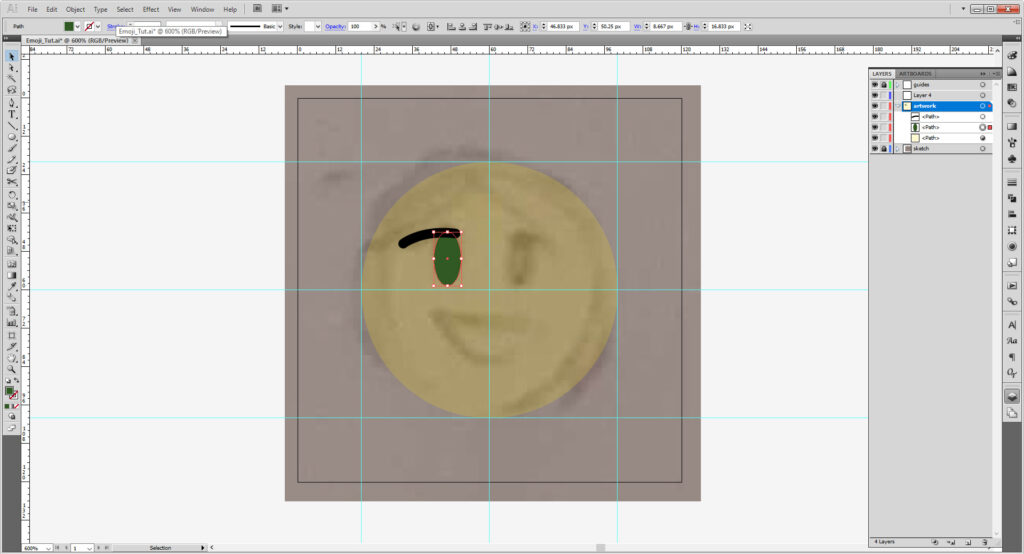
Select them both and hit Cntrl/Cmd + G to group them. Make a copy of them; you can do this by selecting the group, holding down the Alt/Option key and dragging or using the arrow key to move it. You can also copy and paste or select the layer and drag it to the New Layer button in your Layers panel to make a copy. (But the first way is the faster one.)
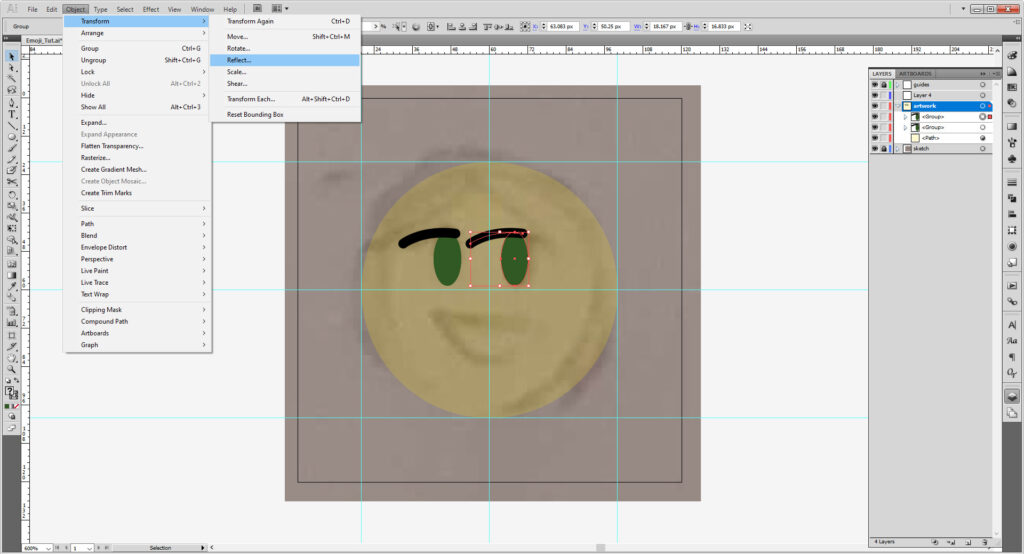
Go to Object > Transform > Reflect and select Vertical. Then hit OK.
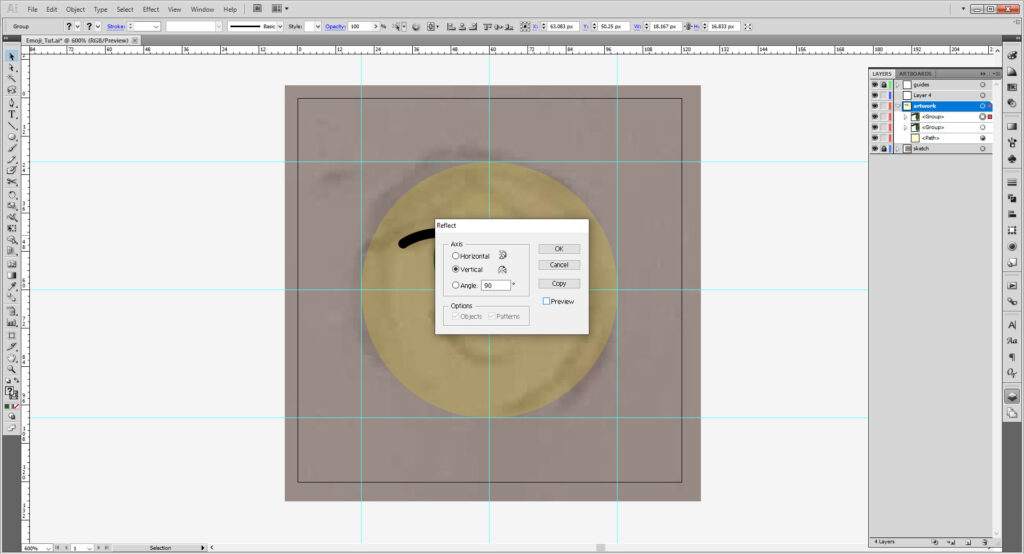
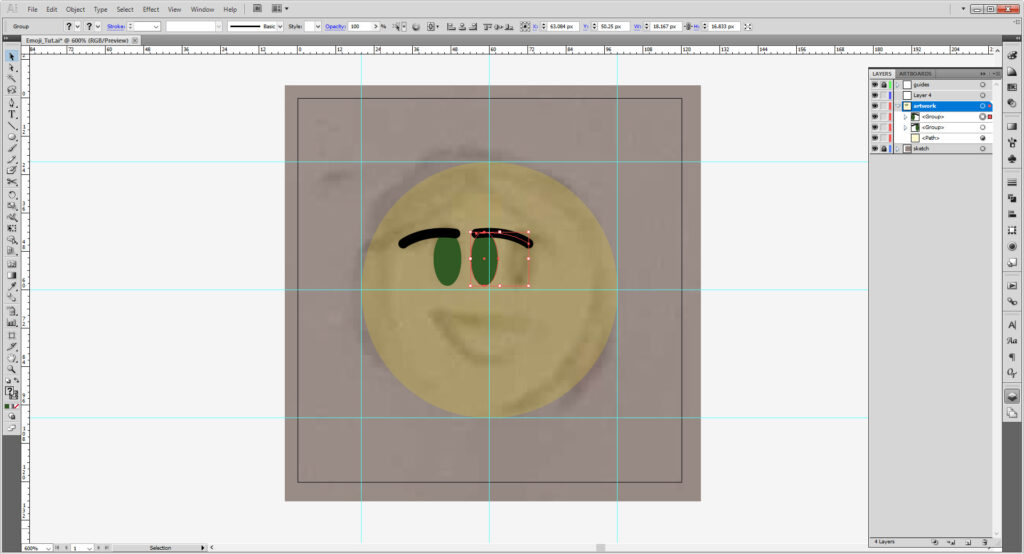
Use the arrow keys to move them over. If you’re a stickler and want to keep them centered, select the two groups and group them into a new group. Then once that is selected, you can use the Align Horizontal to make sure they’re properly centered.
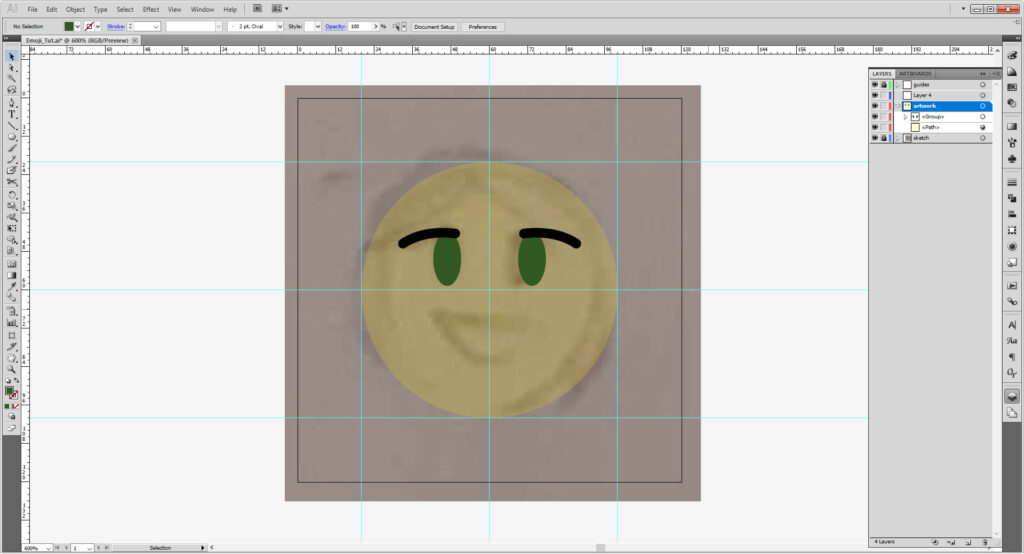
Next we’ll be making a smaller ellipse. I’m doing 40px by 40px.
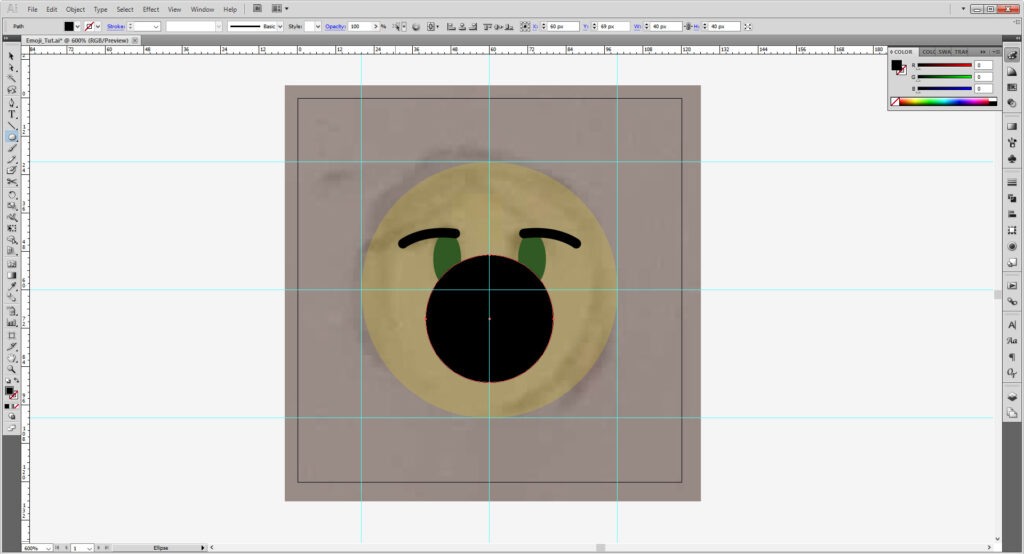
Then with the Scissors Tool (C), I’m going to cut it in half by its side points. Select the top half and delete by hitting Delete or Backspace.
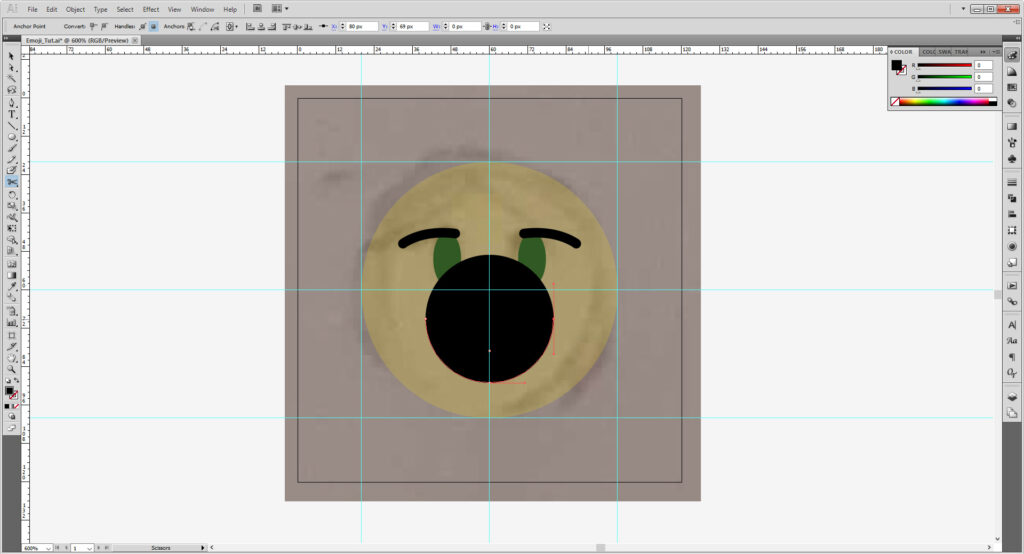
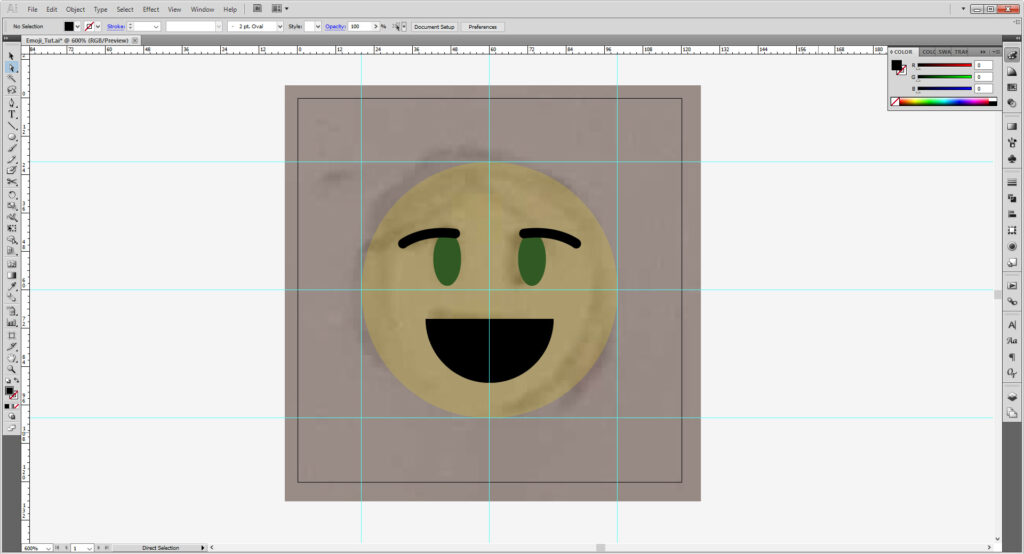
Looks good, but were’ not done yet! The path needs to be closed. Select out semicircle and hit Cntrl/Cmd + J to close the shape.
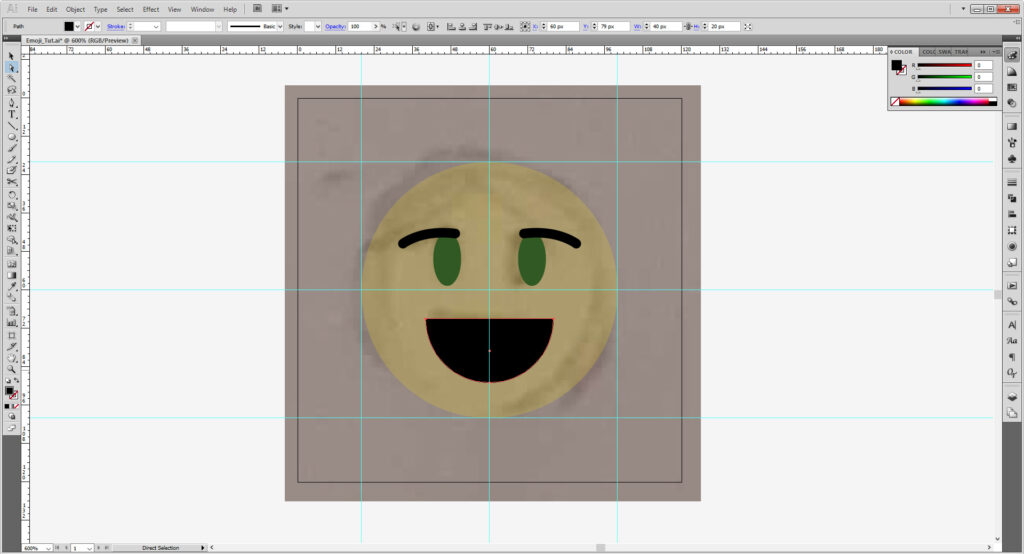
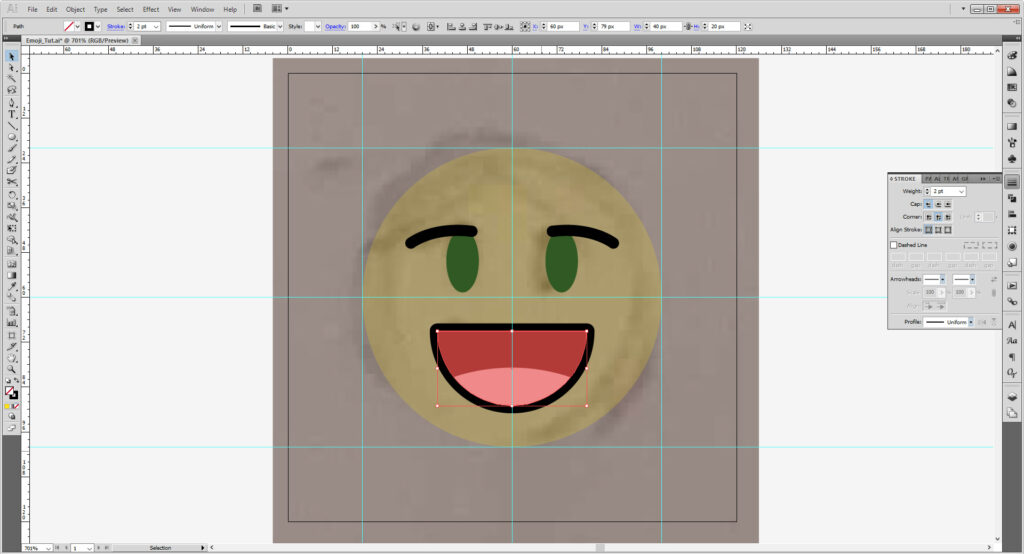
Make two copies of your semicircle. The top one turn to a stroke, and bottom change the fill to #b23b38.
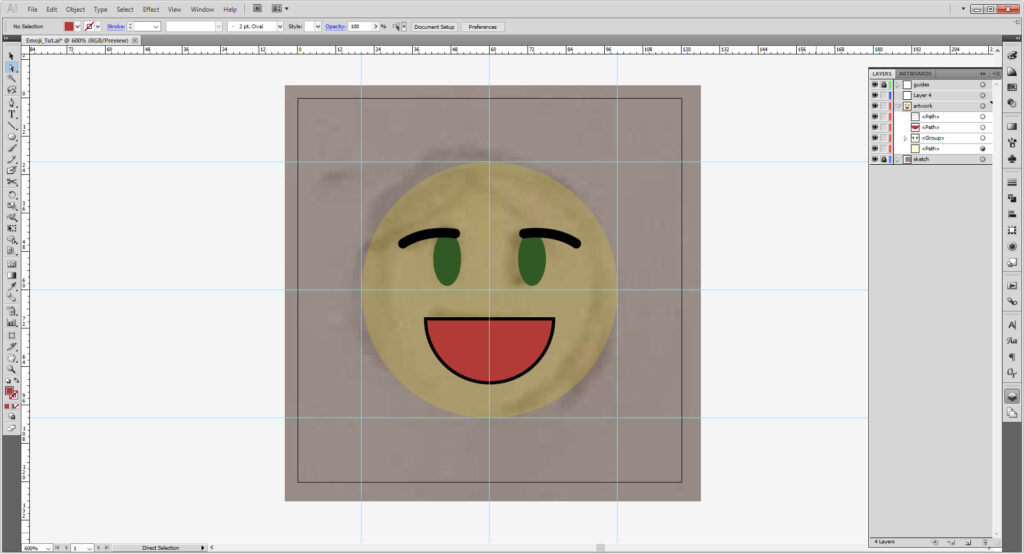
OPTIONAL: Make a third copy of the semicircle and using the guides and scissor tool, cut apart the semicircle to make teeth or a tongue with the pen tool!
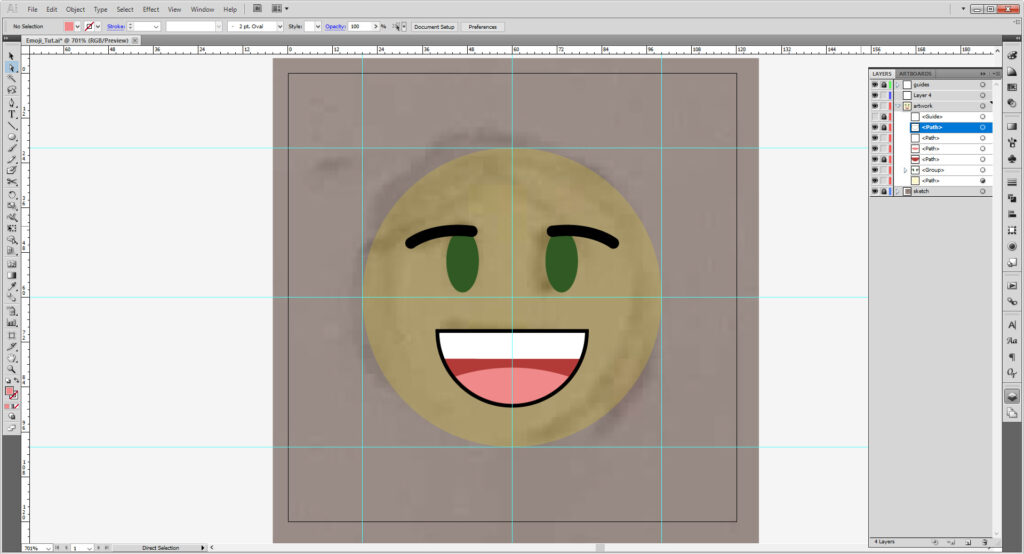
Select the black stroke semicircle, and go to your stroke panel again. Make your edges rounded and your thickness 2pts.
OPTIONAL: I’m making my Emoji to look like me, so I’m adding some hair, just like we did the mouth, I made a copy of the yellow circle and cut it with the scissors tool so the shape stays within the circle, and with the pen tool, made bangs, and a bun with the ellipse tool.
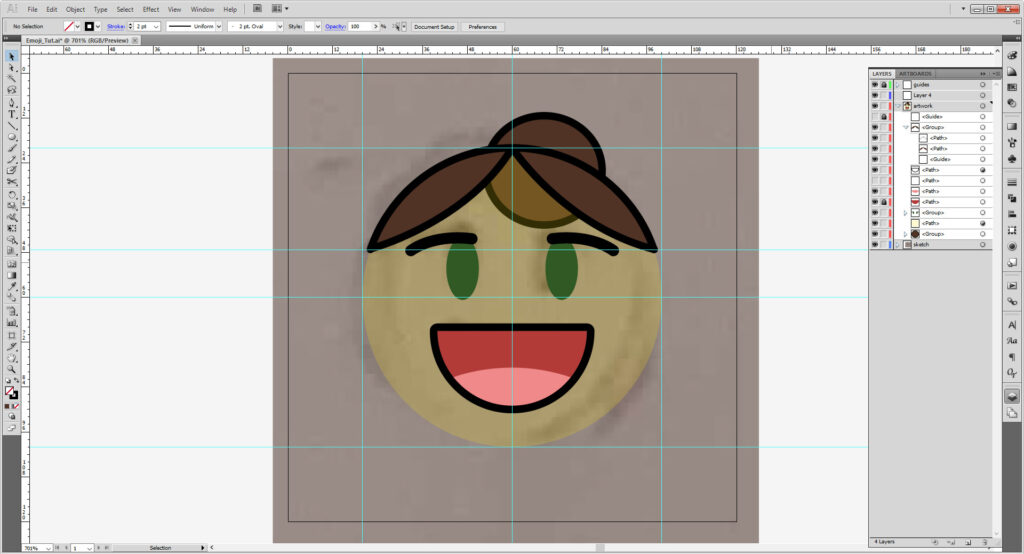
(Don’t worry, once I make the opacity 100% again, it will be hidden.)
When you’ve finished, select your yellow circle and return to the Transparency panel to make your opacity 100%. Copy your circle and set it to black 3pt stroke.
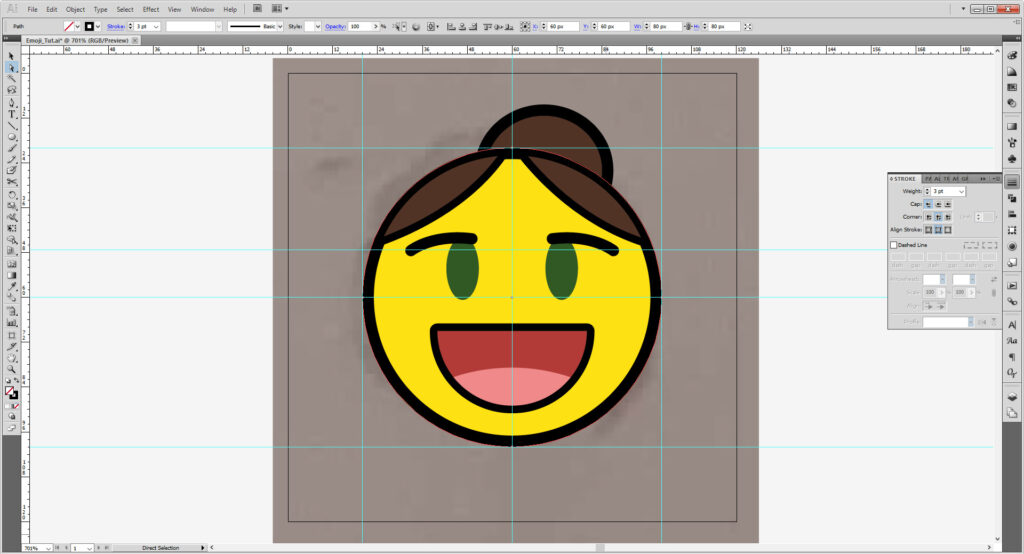
Feel free to experiment with the stroke alignment for the look you desire. You can do that with the rest of your strokes as well! Play with changing the color of the stroke, you may want to opt with a darker yellow for a more lineless look, or forgo all the lines together!
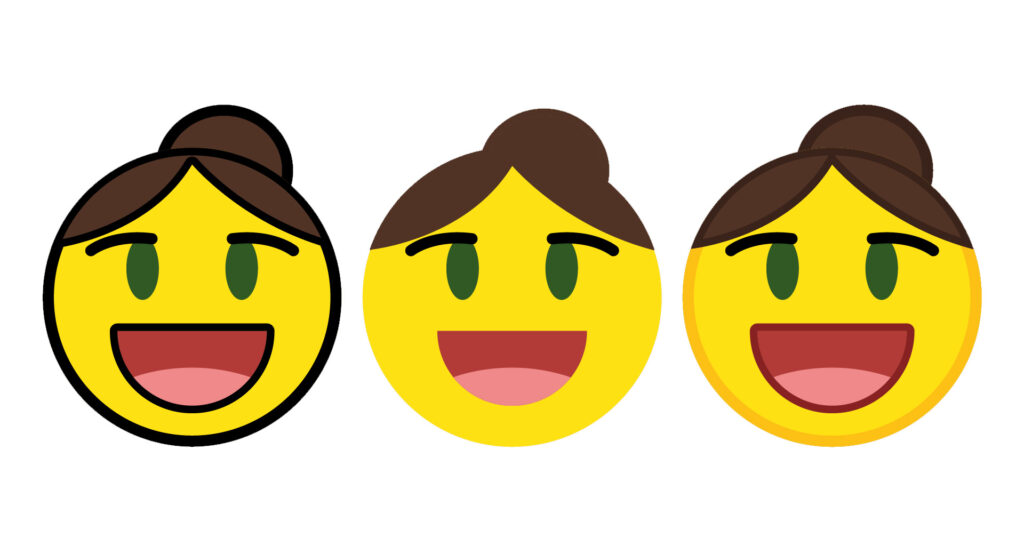
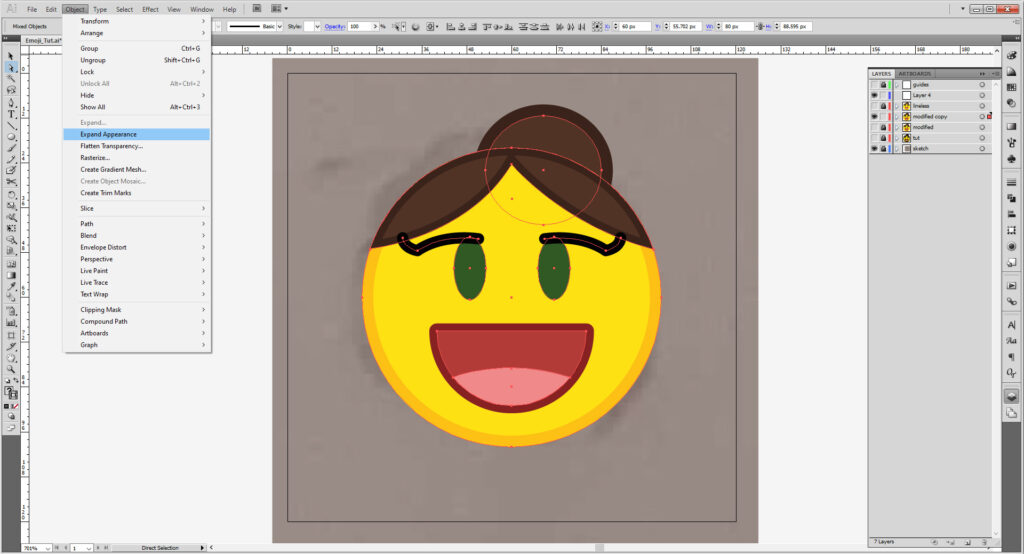
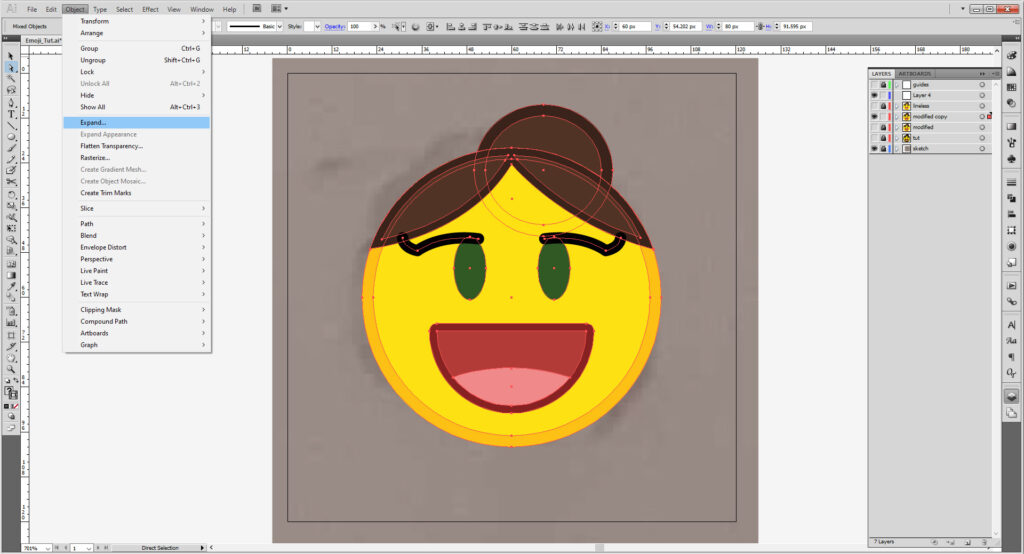
Once you’re satisfied with it, make a copy of the full layer and hide and lock the original. This way you can go back and tweak it later! Make sure everything in your emoji is unlocked. Then go to Object > Expand > Expand Appearance. You may need to repeat this a few times, until you get Object > Expand. Select OK.
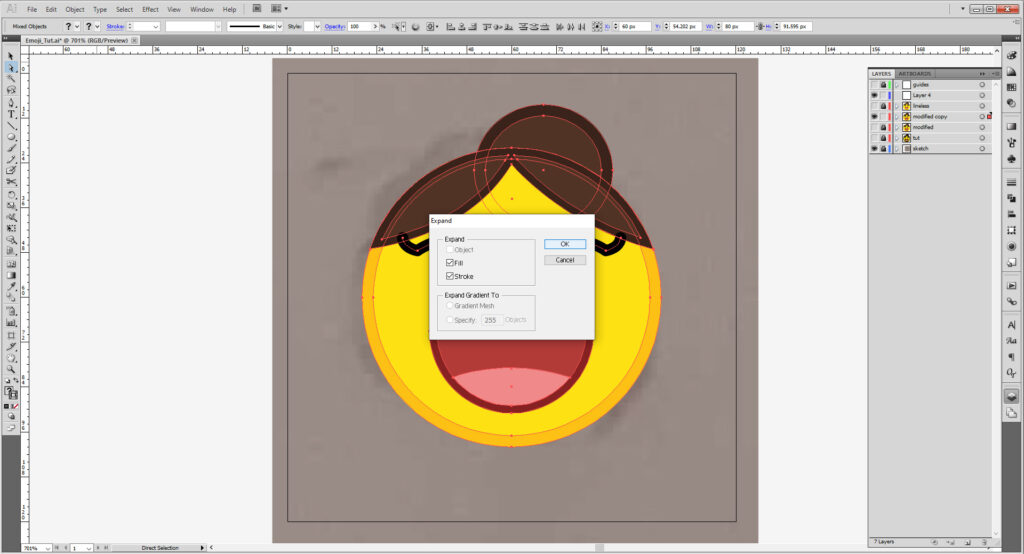
Then go to the Pathfinder panel, and select Merge.
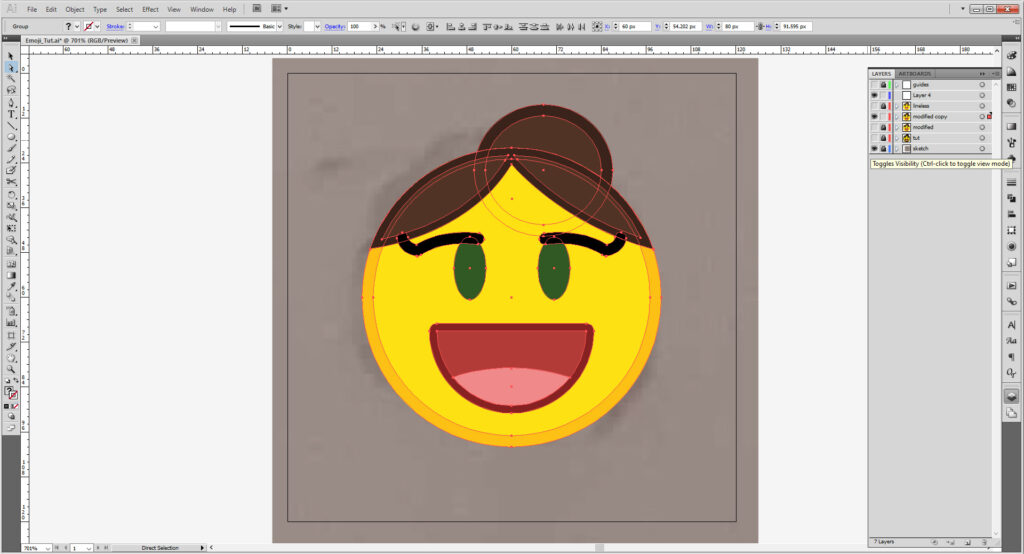
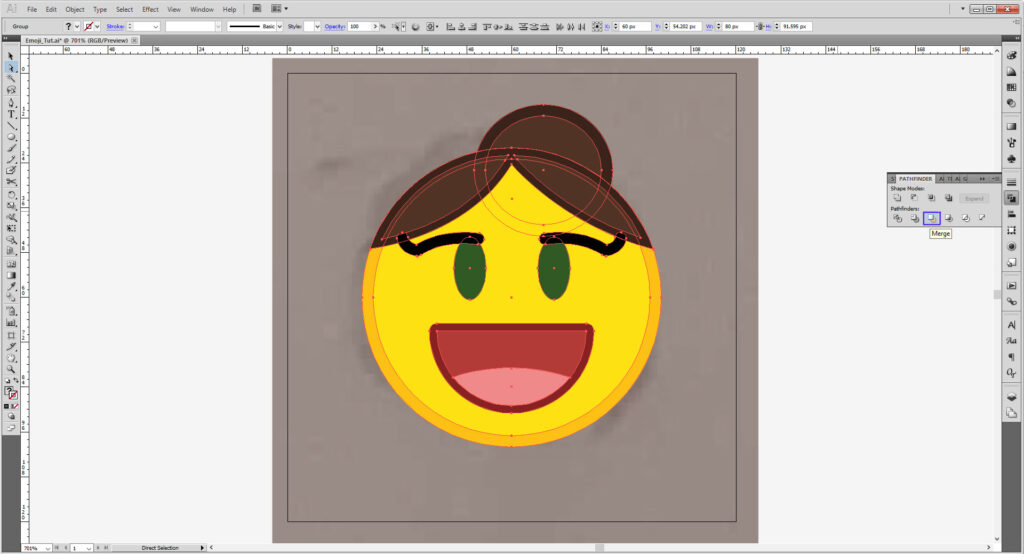
If you have a sketch layer hide it!
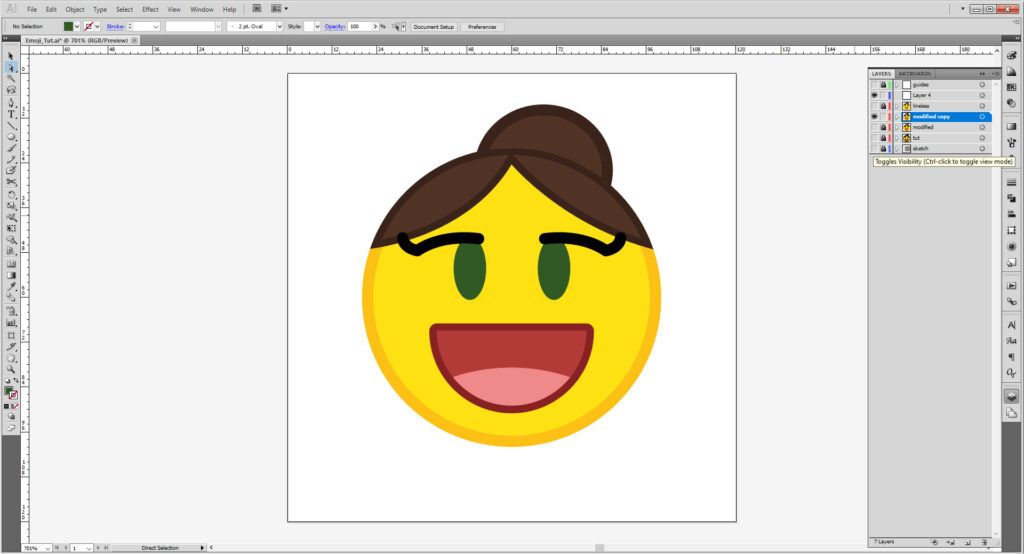
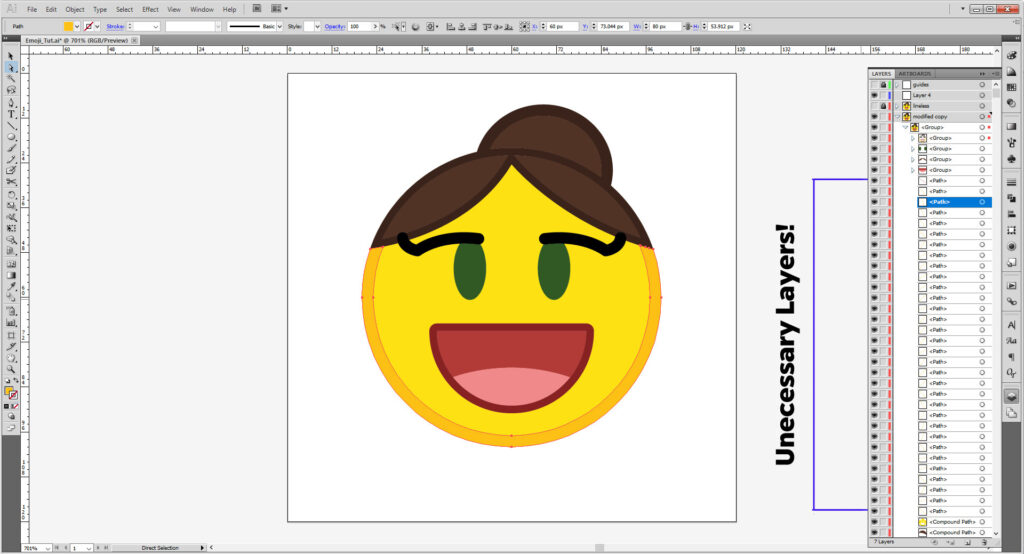
The next part is a bit tedious, but you’ll thank me later. Clean up your artwork group! Many little paths have been generated as part of the merge we did, and they’re not particularly important and wasting space in the group (and the file size). Delete them by selecting the layer and hitting Delete or Backspace. Holding down Shift while selecting the start and end of multiple layers allows you select multiple, which you can drag to the tiny trash can icon in your Layers panel. Either way tidies up.
You may want to regroup subgroups too, but not necessary.
And there we go!
Adding Gradients:
If you want to spice it up with some gradients, read on! Otherwise skip to Saving Your Emoji to export and save.
So when I asked you to tidy up, making this easier is what I had in mind, instead of scrolling through fifty unnecessary layers to find things, we have everything ready to go.
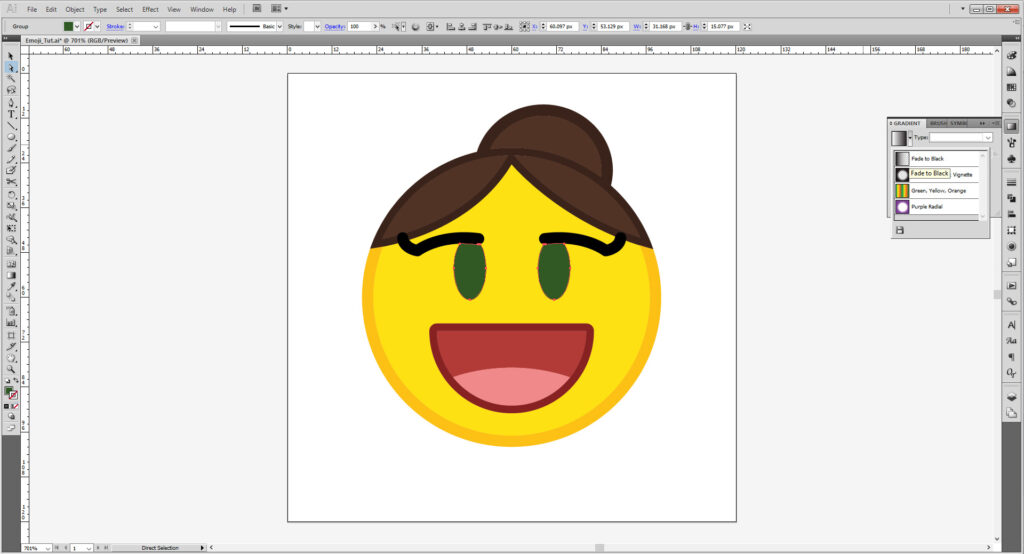
Make a copy of the item you’re planning on making into a gradient, and then go the gradient panel. Select Fade to Black. Change the degree to 90 degrees
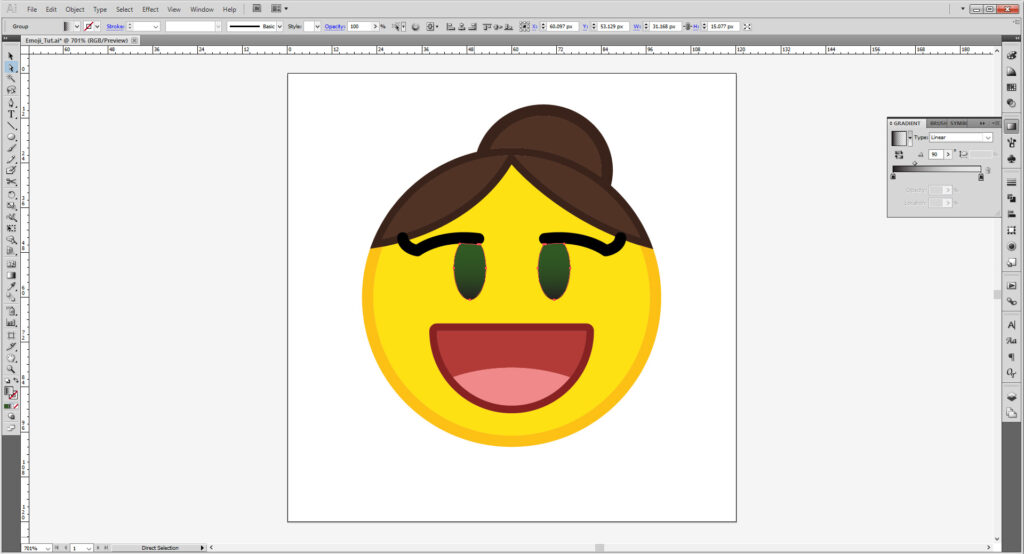
Double click the black square on the slider that will open up the color selector. Then hit the little hamburger menu to select your color type.
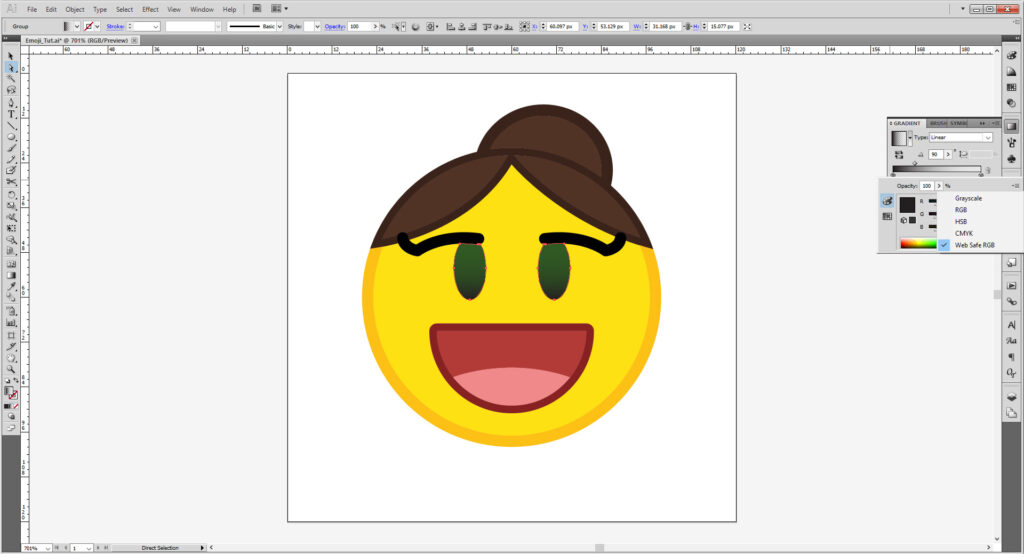
- Grayscale: Self-explanatory, only colors in shades of grey.
- RGB: Sliders that change the Red/Green/Blue level
- HSB: Sliders control Hue/Saturation/Brightness
- CMYK: Sliders control Cyan/Magenta/Yellow/Black
- Web Safe RGB: Input the six character Hex code for the color you need. (I’ve been using hex code throughout the tutorial)
It may be on Grayscale on default, just switch it to any of the others depending on your need. Any of them but CMYK work. If you already have your RGB/HSB/Hex value you can input it, otherwise, just slide the sliders.
Select the object without the gradient a double click the fill. All your information is there. You can change the sliders to generate a lighter/darker color than you need.
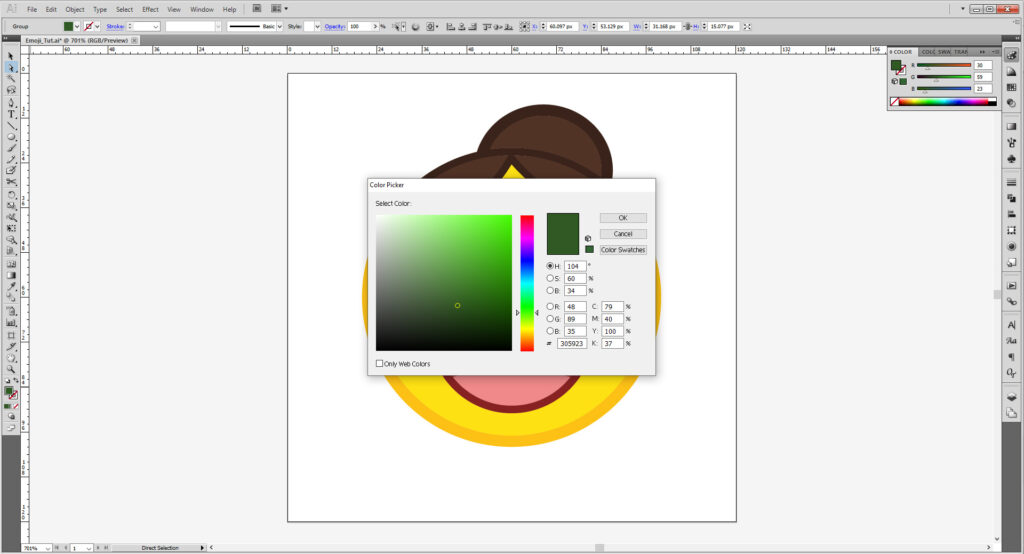
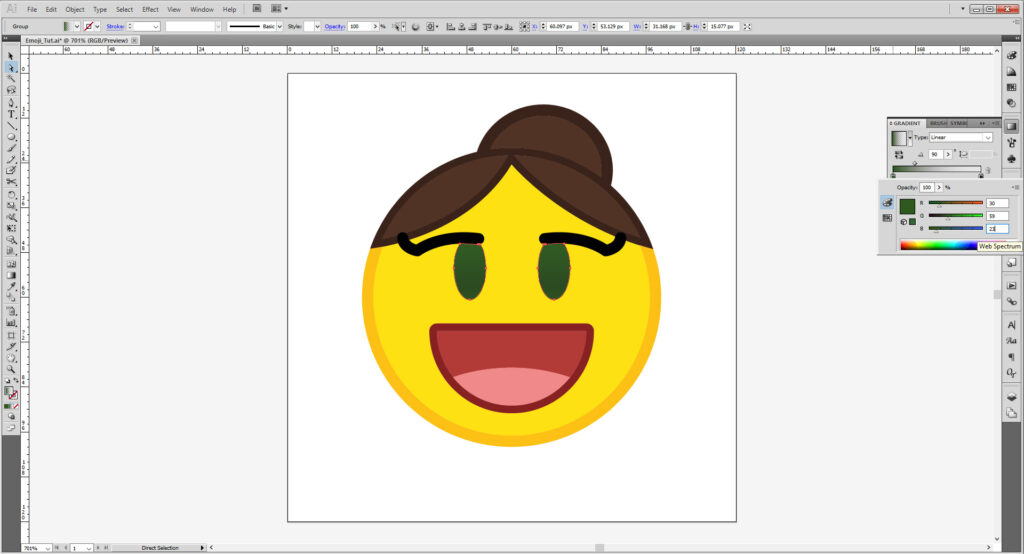
You’ll need to write down the values and manually put them in, unless you’re using some palette site (in our Resources), where you can copy and paste between your browser and Illustrator. Make both squares in the gradient same color for a richer color (otherwise that black will make it slightly greyish).
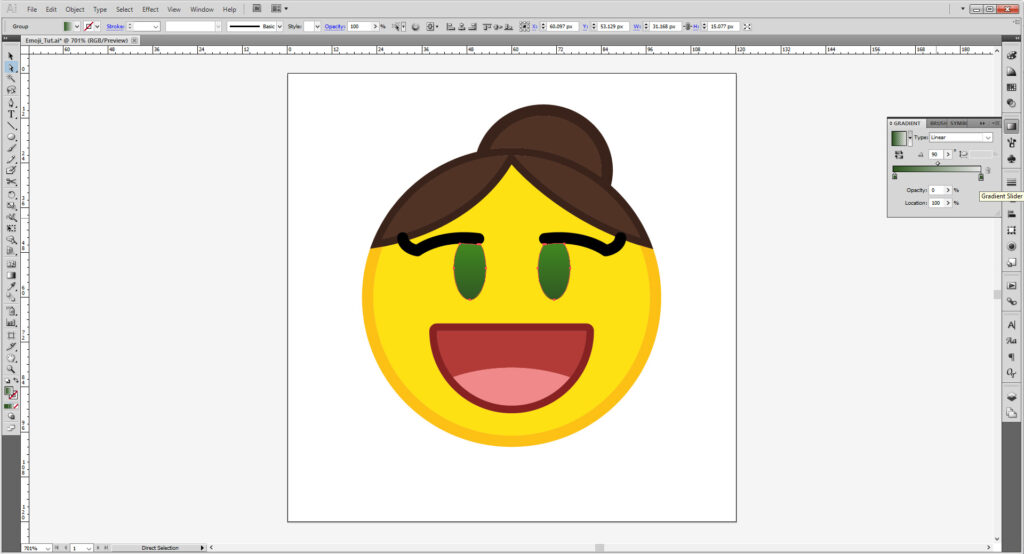
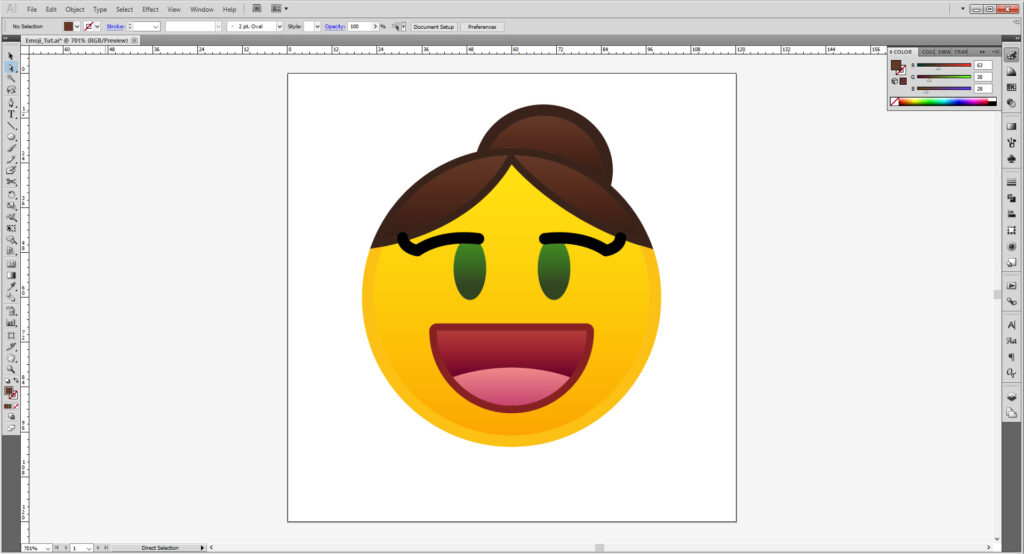
You may want to add other colors as well, and you’re free to play around with your emoji! Once you’re happy, do it for the rest of your “fill” colors.
Saving Your Emoji:
The most important part is to first save it as source file. That way you can fix it or make more based off it later on. For Illustrator, this needs to be an Adobe Illustrator (AI) file. If you’re using another program, then you want to save it as an Encapsulated Postscript (EPS) file.
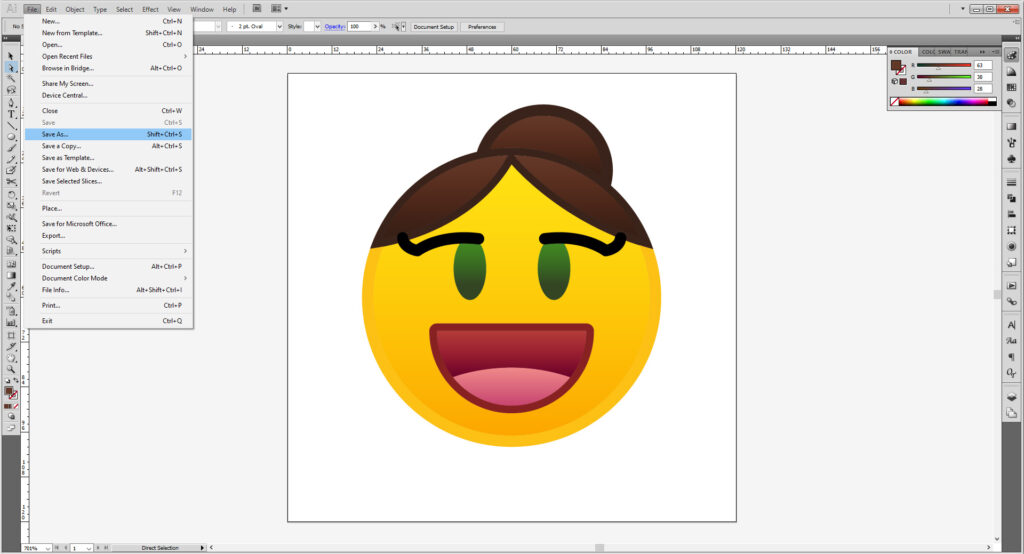
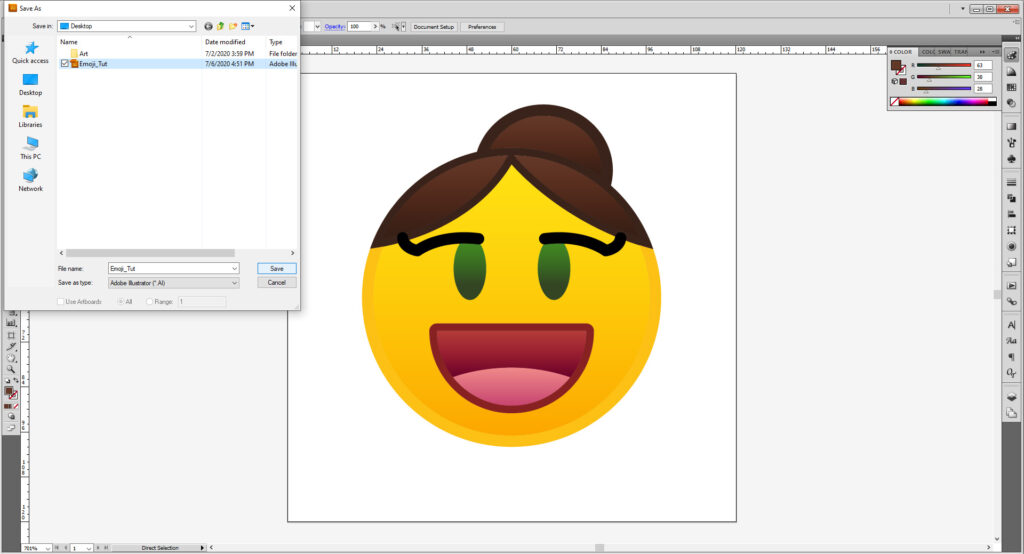
Go to File > Save As and put the name in the dialogue box. Makes sure Adobe Illustrator (*.AI) file is selected. Hit OK.
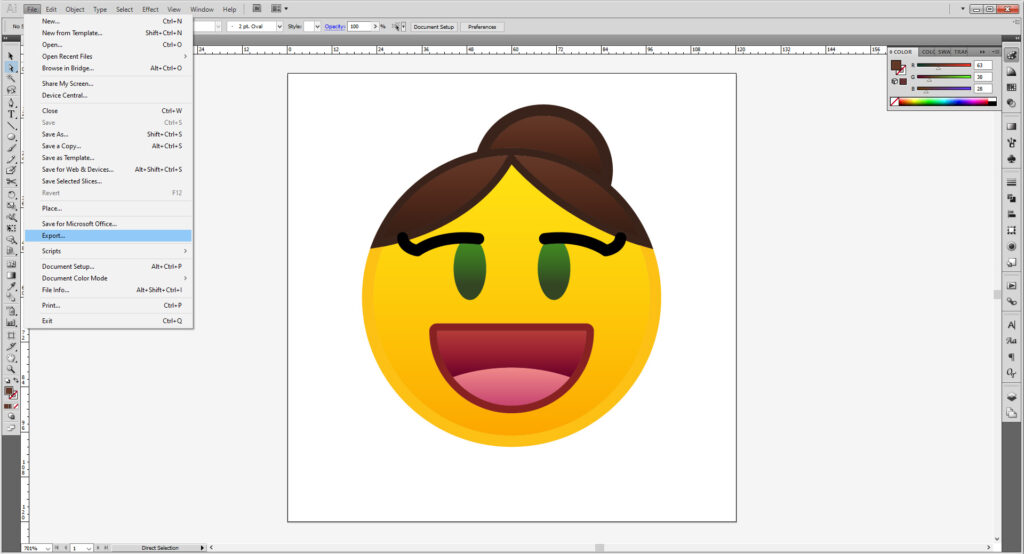
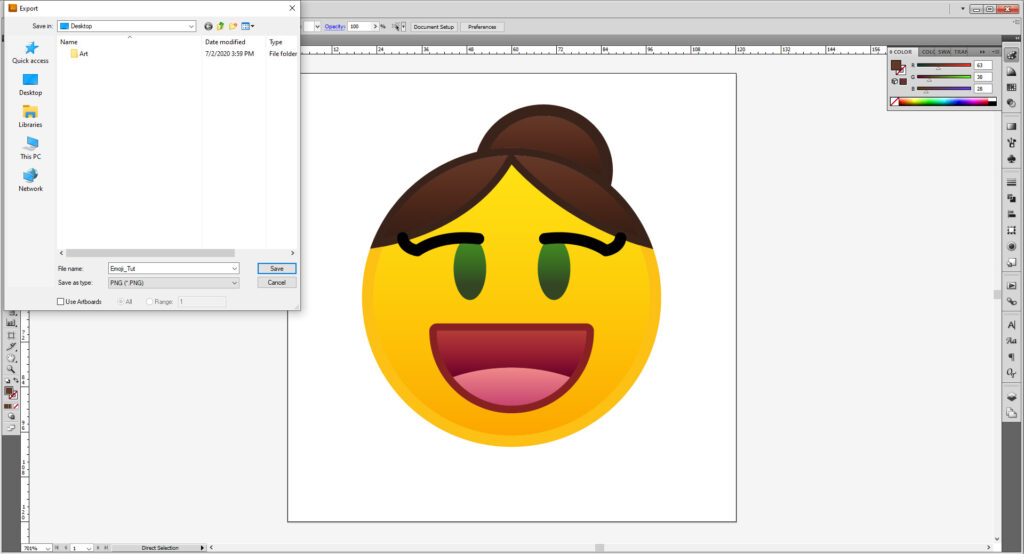
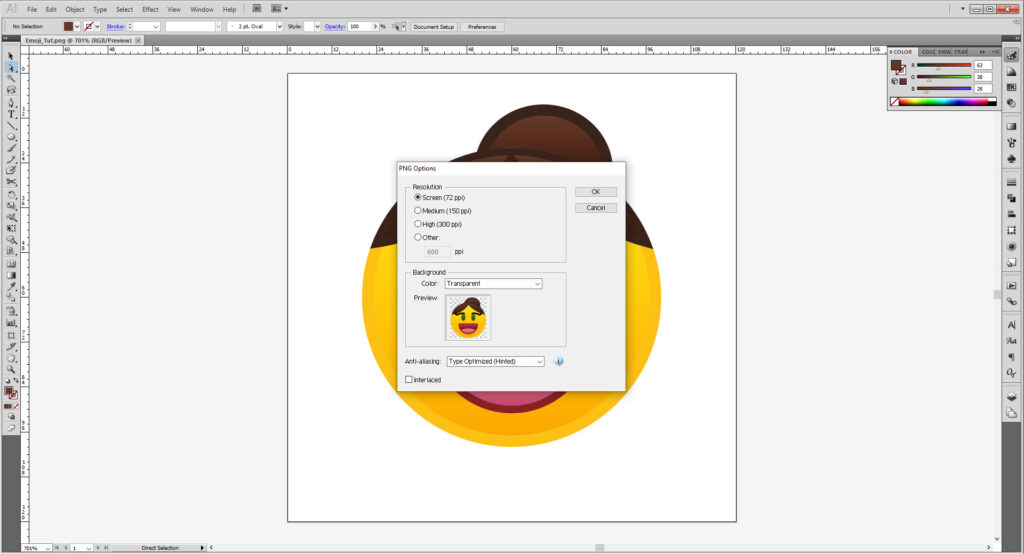
Next you want to export this as a transparent PNG file. Go to File > Export. Put a name in the dialogue box and select NG (*.PNG). If you want to keep the space and 120x120px size, check the box that says Use Artboards, but it’s not necessary. On the next prompt make sure your resolution is Screen (72 ppi) and your image background is transparent.
And you have your own emoji!

Show us what you made! Send it to bmcc.makerspace@gmail.com or reach us at bmcc.makerspace on Instagram (or use the the #bmccmakerspace tag) to be highlighted on our page!
And if you want to prep the file for one of our machines, here’s how to do it for the Laser Cutter and Vinyl Cutter! The Stamp Workshop may also be of help.
Related Links:
- Emojipedia, the Emoji Encyclopedia
- Emojis on Wikipedia
- Unicode.org Emoji FAQ
- Unicode.org’s emoji design guidelines
- Emoji.gg, Custom Emotes for Discord
- Gareth David Studio: Beginner’s Guide to Illustrator
- Dansky: Illustrator Basics in 3 Minutes
- Flow Graphics: Learn Illustrator in 5 Minutes
- Tech & Design: Illustrator Tutorial: Part 1 | Part 2
- Inkscape provides their own tutorials. And even have interactive ones in the software!
- TJ FREE: Inkscape Tutorial
- Logos By Nick’s YouTube Channel has some Fantastic tutorials on working in Inkscape!
- Adobe’s Illustrator Cheat Sheet
Please note if you are using Inkscape, Laser Cutter files must be saved as an EPS, Vinyl Cutter files as both an EPS and DXF.

