Stenciling is probably as old as art itself! The earliest examples of stencils comes from prehistoric cave paintings, where our ancestors blew pigments (ochre and chalk are very common) over their hands with a reed straw to get the desired effect.

Today, we tend to use other materials to create stencils, particularly of our medium isn’t entirely safe to use on our bodies (oil paints, spray paints, certain dyes et cetera.) Most pre-made stencils for consumer use are made from mylar, a type of flexible plastic, or silicone, a type of rubber that can easily cleaned.
In a pinch, paper and cardboard can work, especially if it’s on hand. Paper works best for dry mediums like crayons, colored pencils or pastels. It can tolerate some ink-based mediums like permanent or magic marker, but could get soggy. Cardboard works for all those, and spray paint, though it too is absorbent and can take the paint and get soggy.
For our workshop we’ll be using Bristol Paper, a type of stiff paper, what can take dry mediums. I have linked below further resources on tutorials using different materials.
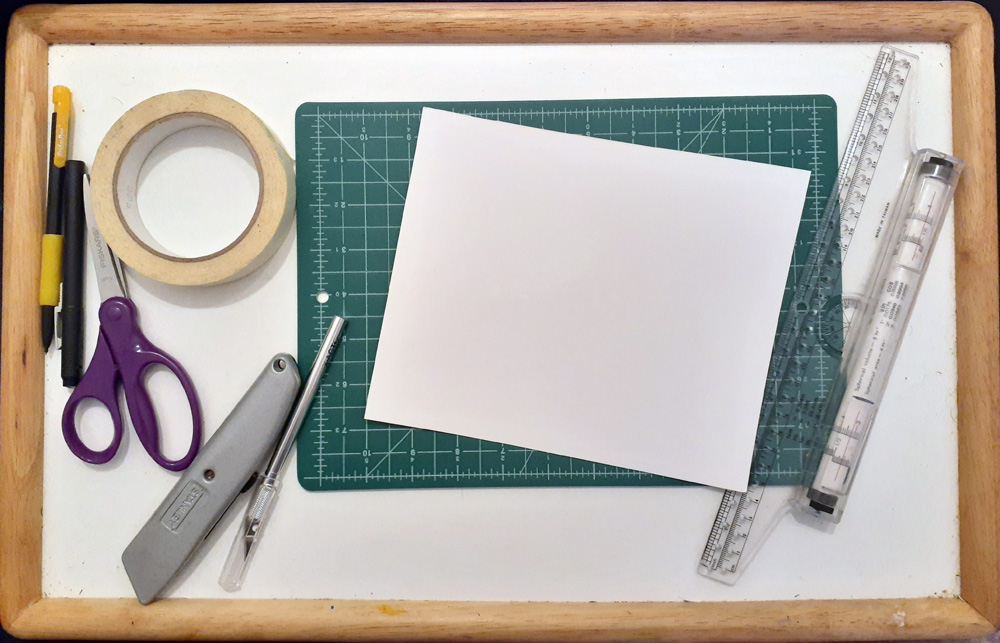
What You Will Need:
We have made a list of things that can be easily purchased physically or online, If you’re not sure where to purchase things, you can visit our Materials page, or contact us! Our info is in the Staff page.
- Stiff. heavy paper (100lb cardstock, poster board, Kraft paper, Bristol paper, ) OR chipboard OR cardboard
- Pencil
- Ruler
- X-acto knife or box cutter
- Scissors
- OPTIONAL: Printer (if you’re designing digitally)
- OPTIONAL: Duct tape (if you’re using cardboard)
There are pros and cons to each method of stencil making.
Creating digital versions of your stencils can allow for rapid mass production on the vinyl or laser cutter. You can also print it and hand cut it if you don’t have the machines or don’t want to machine cut it. It can also be modified in the future as opposed to when you draw directly onto your stencil.
Machine cut stencils tends to be cleaner looking as well, and it’s difficult to replicate the handmade flaws digitally as well– but not impossible. Which is great for when you need precision– like a decal or a repeating wall decor element.
Meanwhile, handmade stencils may be faster when putting the design down directly, but if you are making multiple pieces can wind up time consuming. But sometimes the flaws that come from human error add to the aesthetics– especially if you are going more for a messy, street art kind of look.
Designing Stencils By Hand:
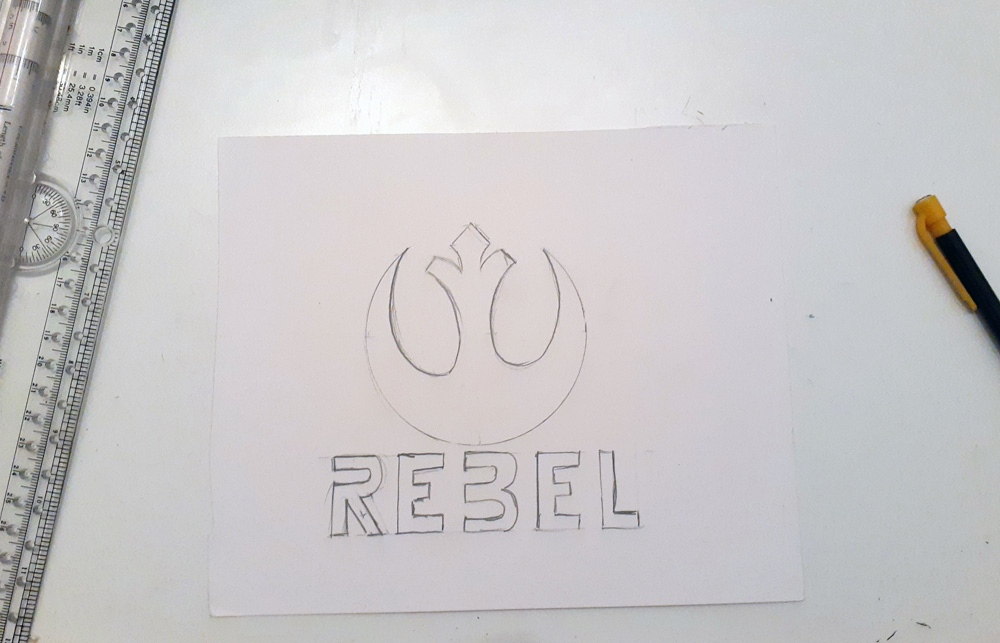
Once you’ve sketched out ideas and come to a design you like, there’s some ways you can get it from paper onto your material. If you want to save the original design, you can make a copy using a light board. That way that can be the stencil and your original work is saved.
If you have a projector, you can project the art on a larger sheet of material and trace too…but let’s assume you don’t have a projector lying around. You’re going to have to draw by hand.
I’m using Bristol paper, which is not as thick as card stock but can be used as a stencil for things like crayon and pencil, and marker, but may end up getting soggy if used too many times with them.
If there’s text in your design, you’ll need to add some tags, otherwise the whole letter will fall out. Which is fine if that’s what you want. If you don’t,
characters like O,B,D,R,A,Q,P, e,a,o,p,b,d,g,q,i, j, 4,6,8,9,0 will need it.
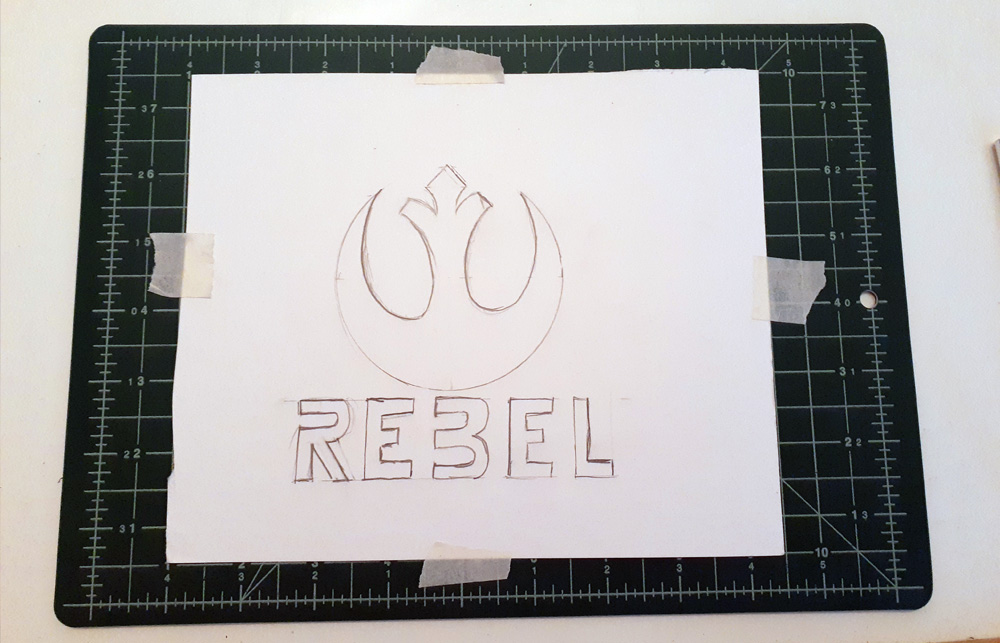
Next, using an X-Acto knife or box cutter, cut away the excess.
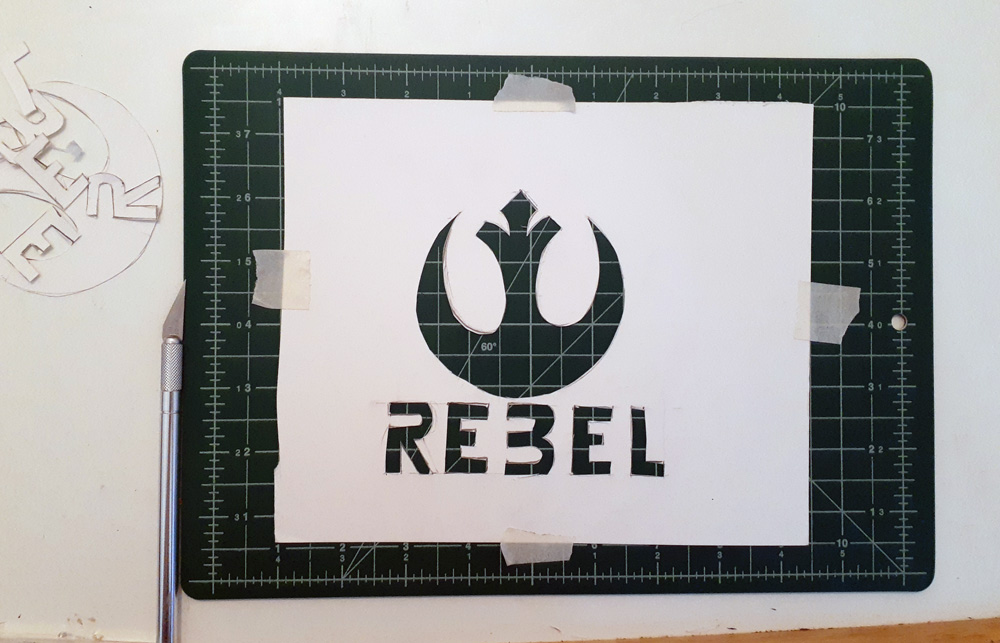
And there you have it!
I also did a quick demon with cardboard– it’s fantastic for the laser cutter, but hand cutting through corrugation is a challenge, as demonstrated below:
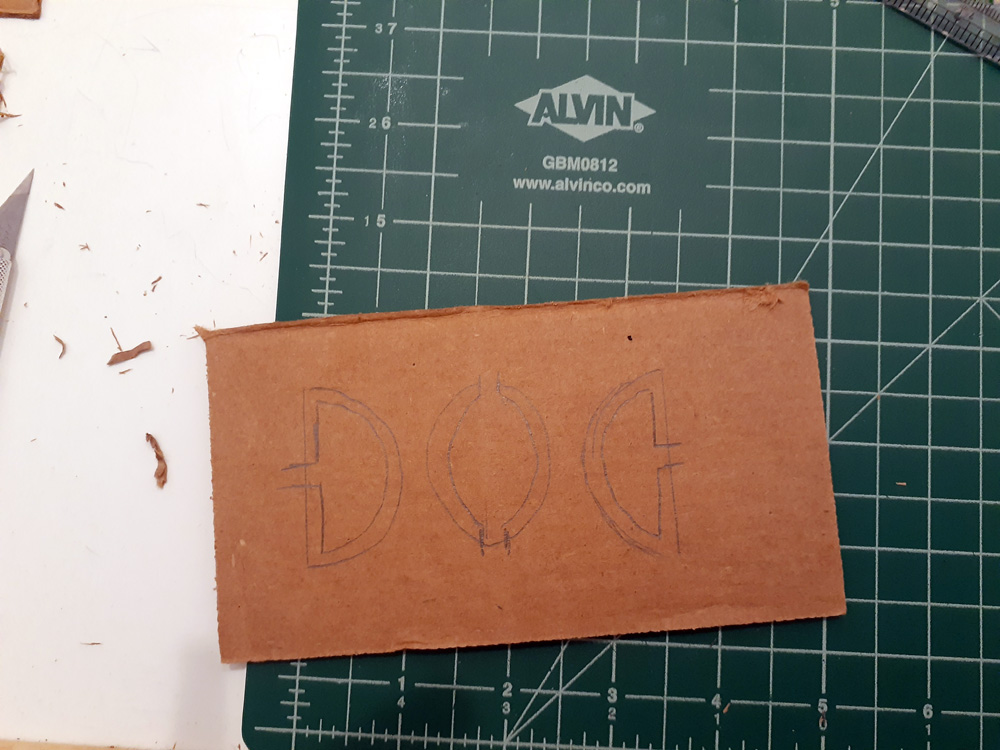
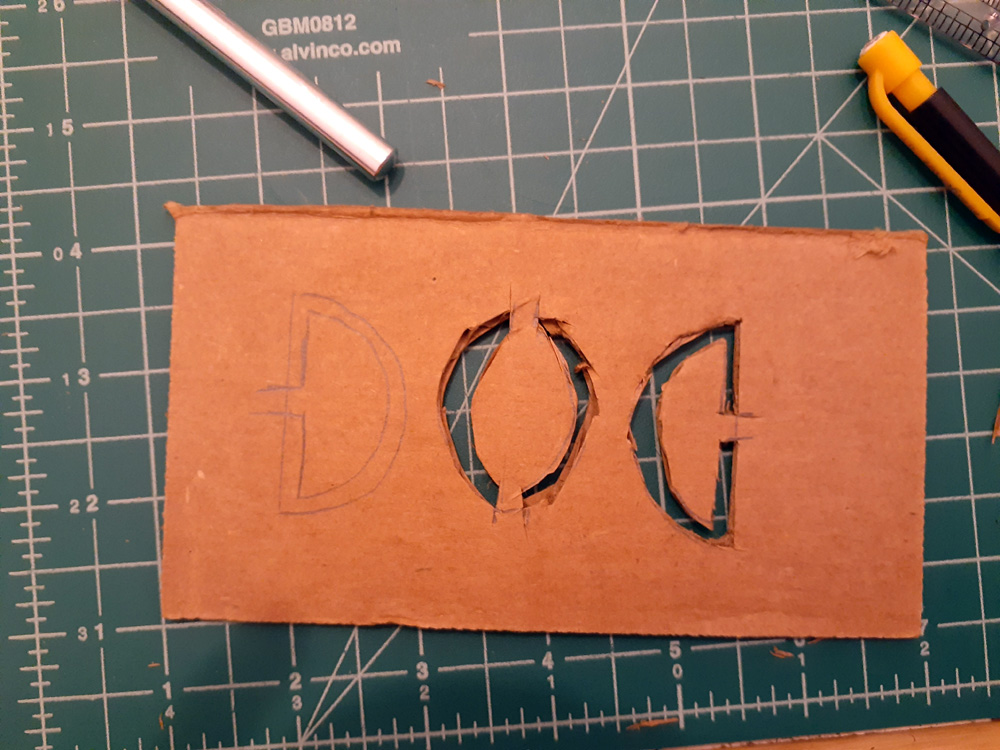
If you had intended to use this for more than few times, you can “seal” it by covering it in duct tape so that the paint cannot soak through.
Designing Stencils Digitally:
You can do this in any art program. If you don’t have programs from Adobe or Corel (which understandable, they’re expensive!), you can visit our Software page in our Resources for free or low cost image editing software. However if you’re designing SPECIFICALLY for the laser or vinyl cutter it needs to be a vector-based image.
This tutorial will be done in Adobe Illustrator CS5, but do not worry. The Makerspace machines have the newest version (and likely more things than what I can do). Do not be alarmed if your layout looks different– all the icons, commands, and everything else I cover is in your copy as well!
First make your file. If you are using a vinyl cutter, make it 12×12 inches. For the laser cutter it will be 24×12 inches. For a standard US Letter paper for a printer, set it up wot 8.5×11 inches.
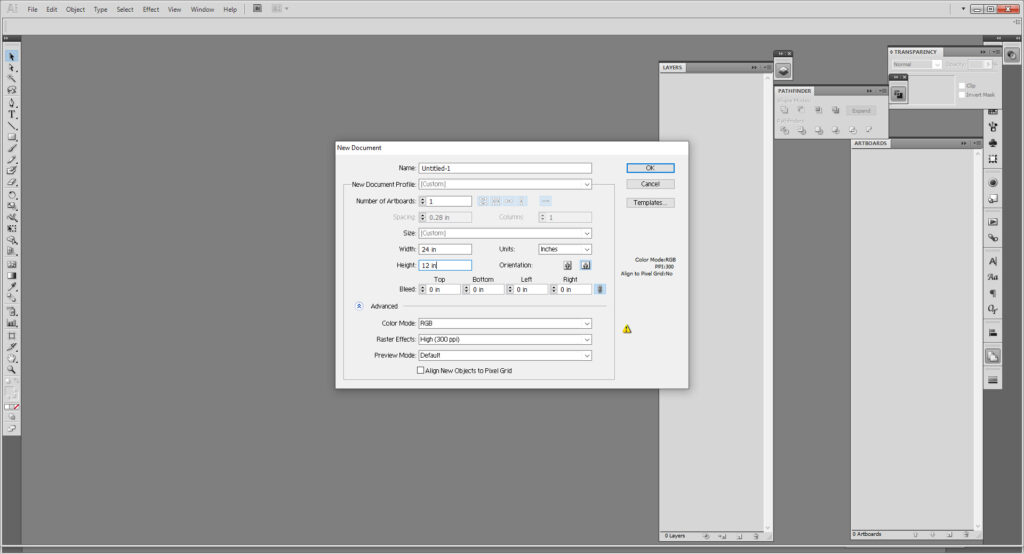
If you’re new to Illustrator, I might suggest first looking through our Stamp Workshop Tutorial, or even my Blog Post about how to start learning these programs before continuing.
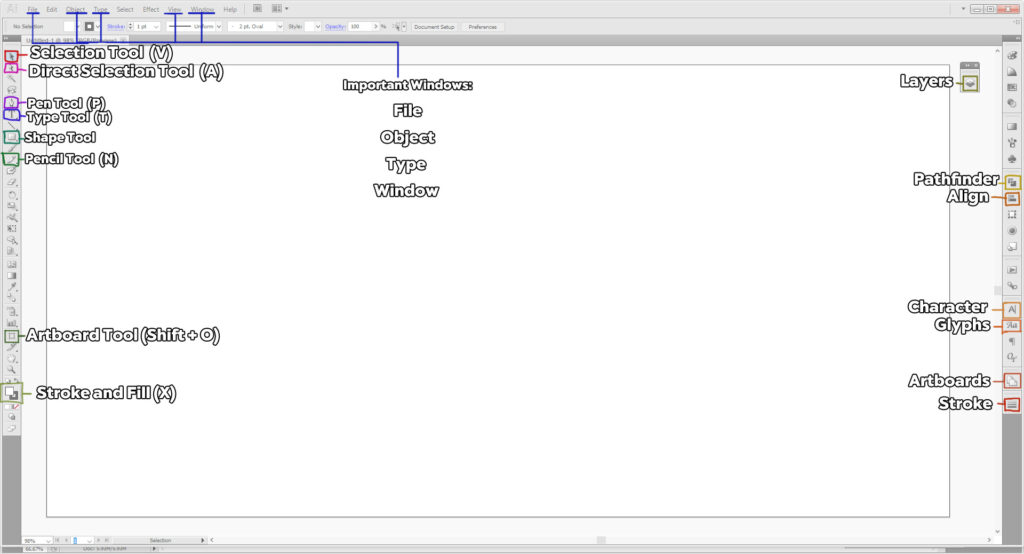
Important Tools in Illustrator:
- Select Tool (V) is self-explanatory. It selects items, and if grouped, will select the whole group
- Direct Select Tool (A) selects only the item you click on.
- Pen Tool (P) is probably the most important, as you will need that to draw your stencil. Holding down the pen tool opens up a panel for further tools we’ll use later.
- Type Tool (T) is for adding text. Be advised, you will need to edit your letters for a stencil, which we will go over below.
- Shape Tool draws shapes. Quick Command M for rectangles and L for circles. Holding down the Shape tool in your toolbar will open up more options.
- Pencil Tool (N) works best if you are using a drawing tablet, you can easily draw over your reference and fix the lines after.
- Artboard Tool (Shift + O) resizes your current artboard. Good to know if you started off in one size and need to output in another (particularly since the vinyl and laser cutter use different dimension artboards…)
- Stroke and Fill (X) allows you to make your shapes filled in solid or just remain outlines, or both. You will need to physically clock on each to set the color. Using D resets your colors to the default white fill and black stroke.
Important Panels in Illustrator:
If you cannot find these in your workspace go to Window on the top of your main menu. Select the panels as needed.
- Layers shows you every path, shape, our type object you’ve made. You can organize a pieces using many different layers, or groups within said layers.
- Pathfinder merges multiple shapes together in different ways.
- Align helps you center or stagger shapes relative to your artboard.
- Character allows you to edit your Type’s font, size, kerning, spacing, etc. Unlike the rest of the panels you must go Window > Type > Character instead.
- Glyphs some fonts have special characters, you can access them here in the Glyphs panel. To access this go to Window > Type > Glyphs.
- Artboards make multiple artboard in the document, meaning you can export it as a multi page document. great if you’re printing for a large surface and limited to the 8.5×11 of a printer sheet.
- Stroke allows you to change the appearance of your stroke, its thickness, or to make it a dotted line
Important Windows in Illustrator:
- File is where you check your color mode, or output settings.
- Object allows you to further edit, group, or expand your shapes (important for laser cutting prep)
- Type allows you to edit type, change the case, and the like.
- View allows you make, show, or hide guides and grids.
- Window is where you can access all your panels if they aren’t on your artboard or you accidentally close them.
Shortcuts to Know:
- Ctrl/Cmd + A selects everything
- Shift + Ctrl/Cmd + V pastes an object in place relative to where it was on the previous space; great if you’re moving it to a new file/artboard.
- Ctrl/Cmd + G groups selected items into groups
- Shift + Ctrl/Cmd + G ungroups the group selected
- Ctrl/Cmd + R opens up the rulers on the artboard, allowing you to easily make guides
- Cntrl/Cmd + J closes open shapes.
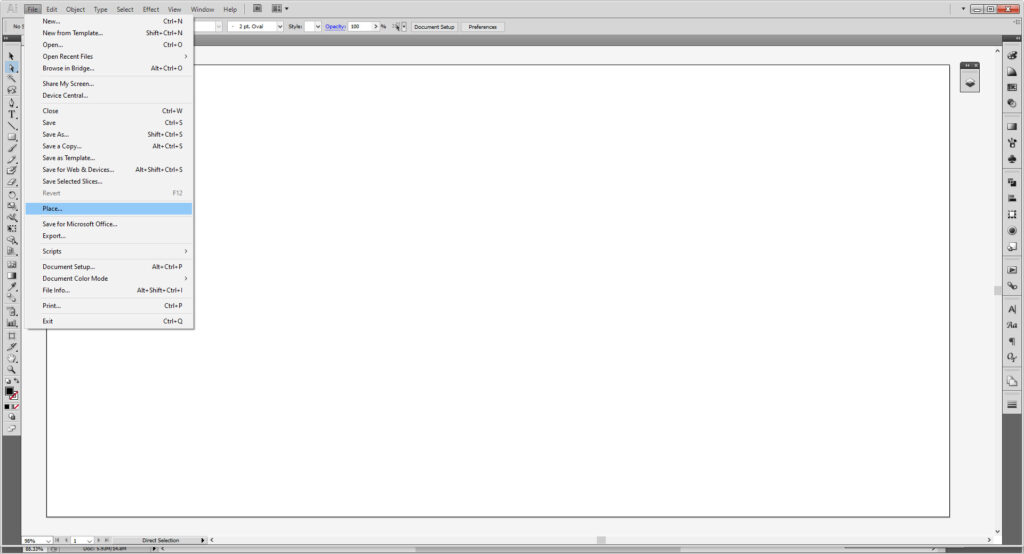
Once you have your artboard set up, then you need to place your image you plan on stenciling into the file got to File > Place and find the image where it is stored on your machine and hit OK.
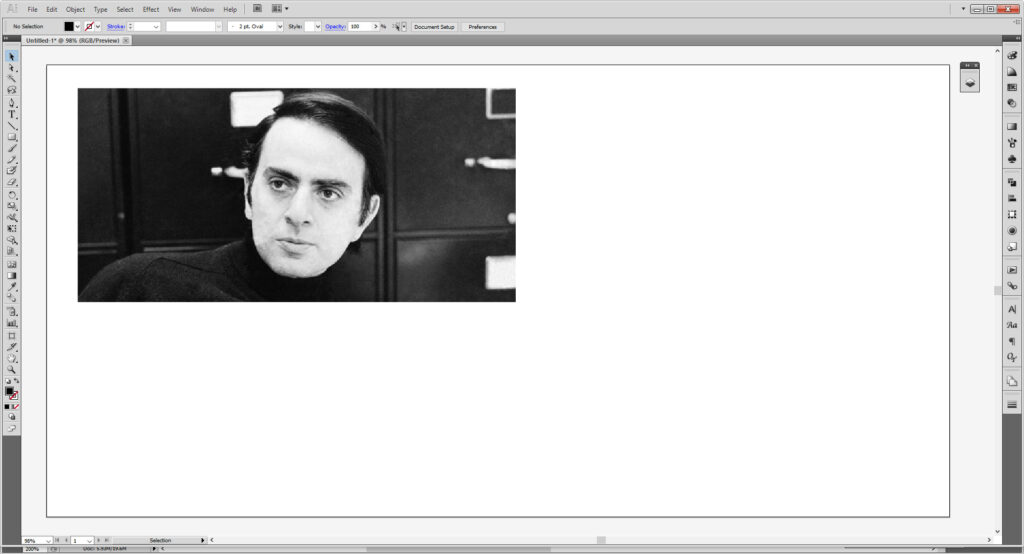
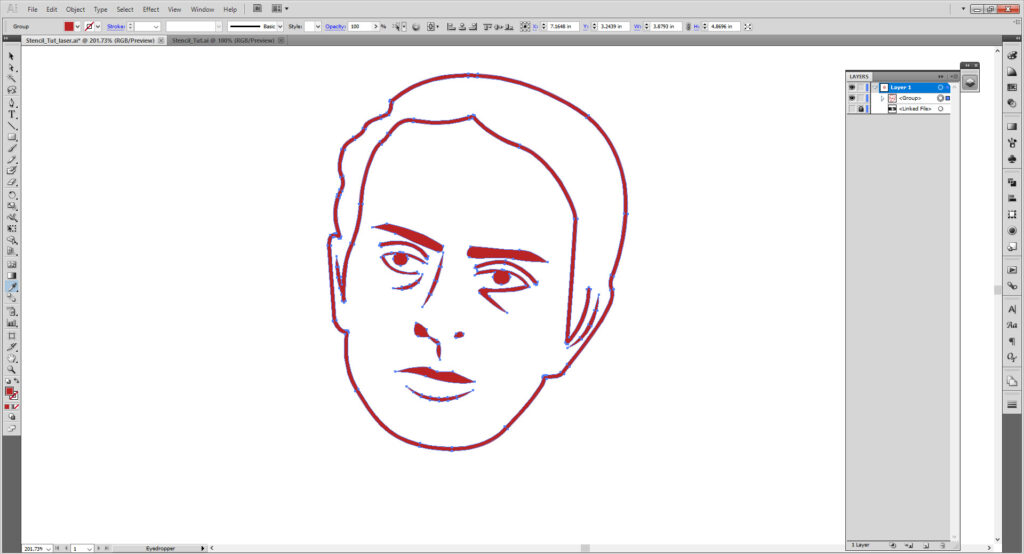
My image was very small so I scaled it up. Do not worry if your image is blurry, after all, we will be hiding or removing it once we’ve drawn over the sketch. Using the pen (or pencil tool), draw over the image you want to create the shapes you want. (If you need to change the color for visibility, go ahead.
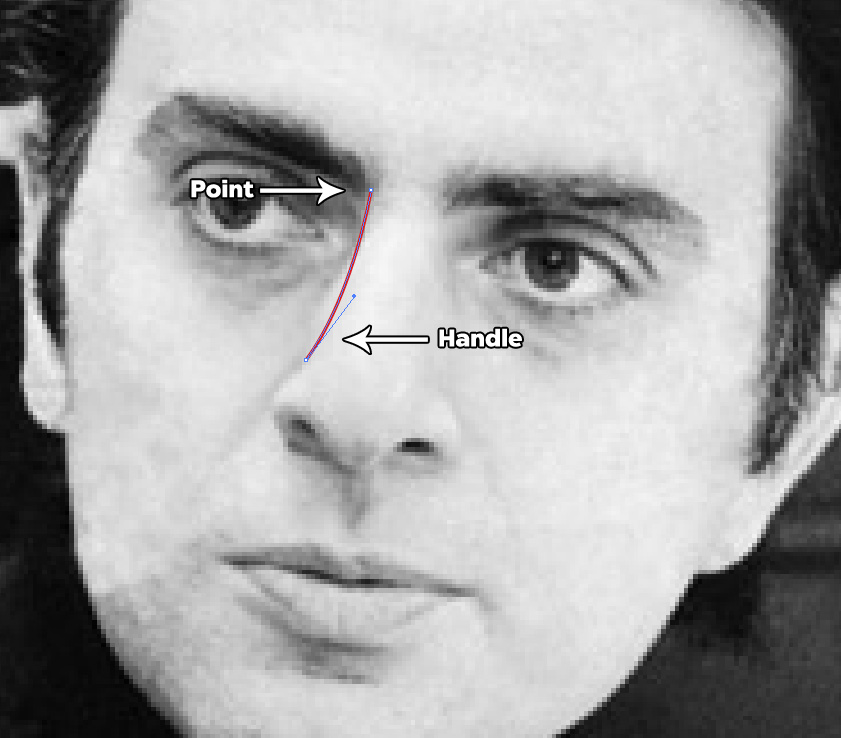
What you are making is a series of Points. in between are lines which the program tries and calculate the best line to make between the points. The little lever looking objects are Handles. Handles help control the angle and direction of your stroke.
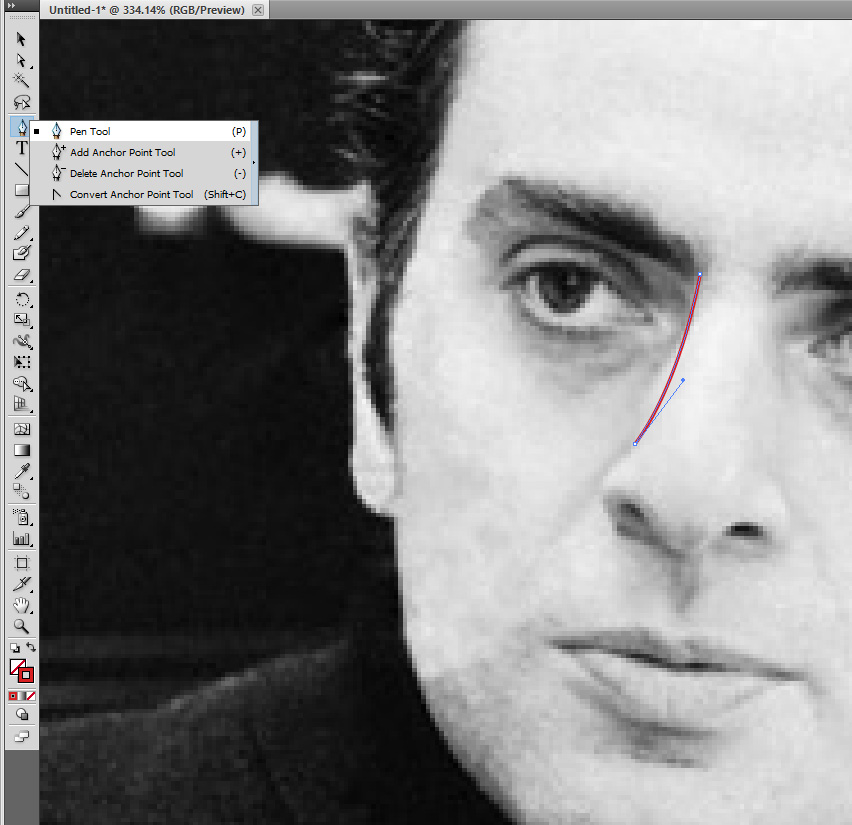
Holding your mouse down on the Pen Tool opens up more options. The Add and Remove tools add or remove points you make along your shape. The convert point tool converts a point to act more like straight than curved line. Use these to help get the desired outline.
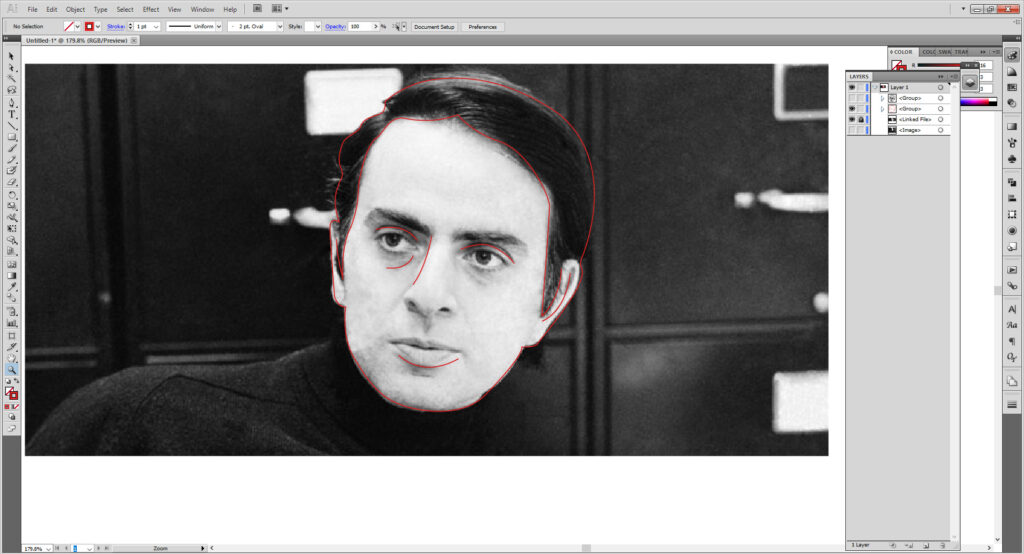
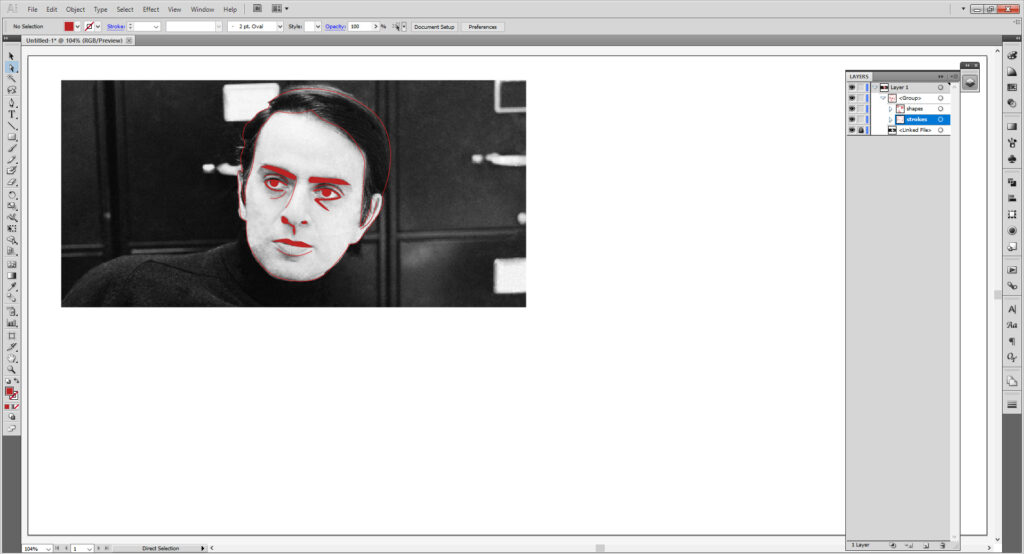
Everything so far has been strokes (which we will revisit later). But I want some things to now be lines, and thus need the to be shapes. The only difference is these will be filled with color instead of the line going around the outside. You can change that in the little Stroke and Fill tool on your toolbar.
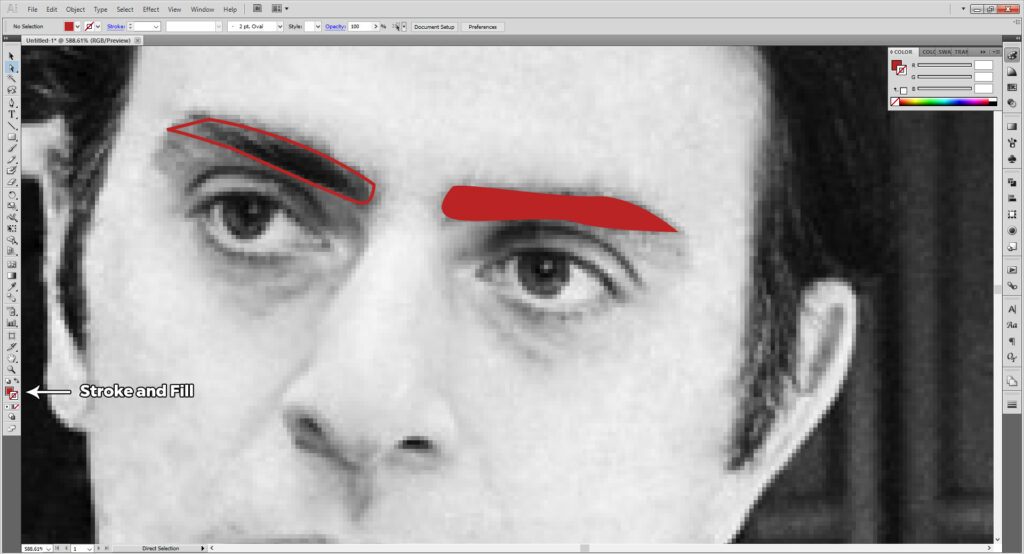
If it’s something rounded, it’s easier to just manipulate an ellipse and group it with the other shape for the desired effect.
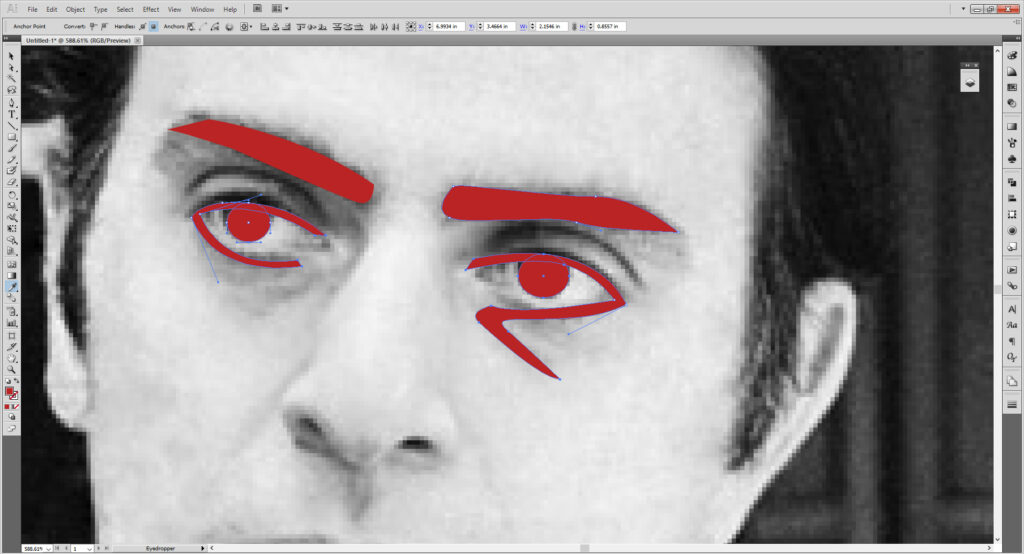
Continue until you’ve drawn all your desired shapes.
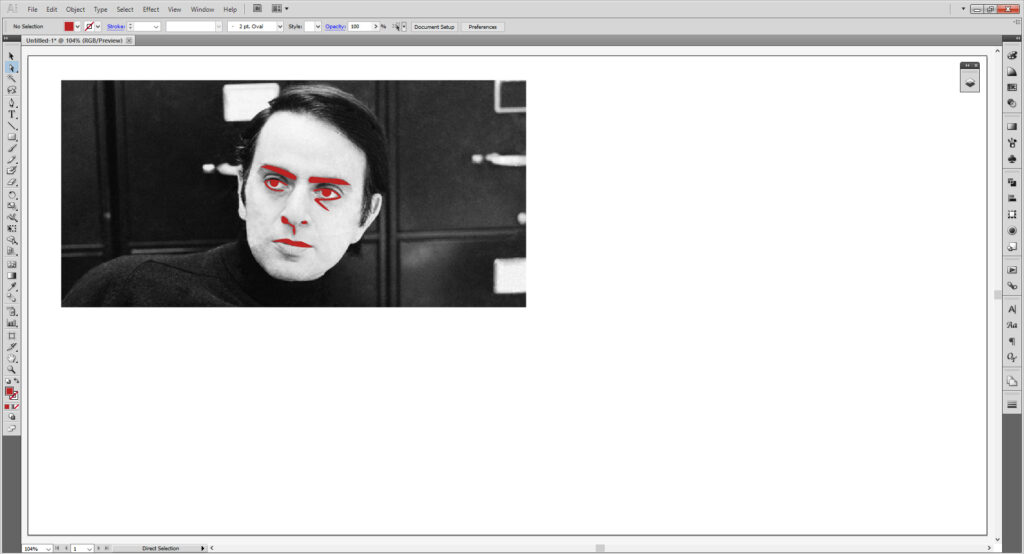
If you haven’t done so already, group your strokes and your shapes into different groups for ease of editing. It won’t matter too much later, but for now it does.
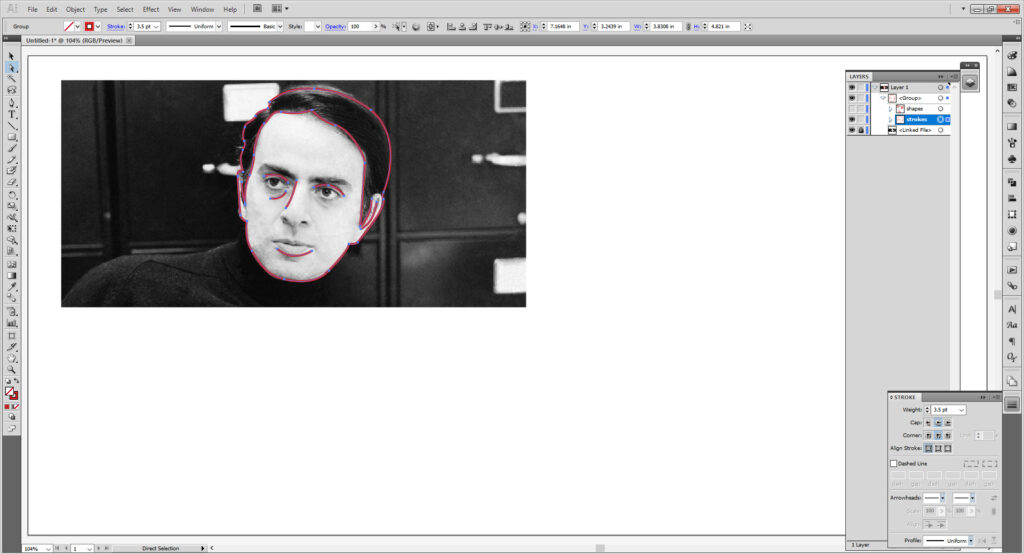
Select your Stroke group and open the Stroke panel. Change the stroke weight to however thick you see fit. 3.5 points worked best for mine.
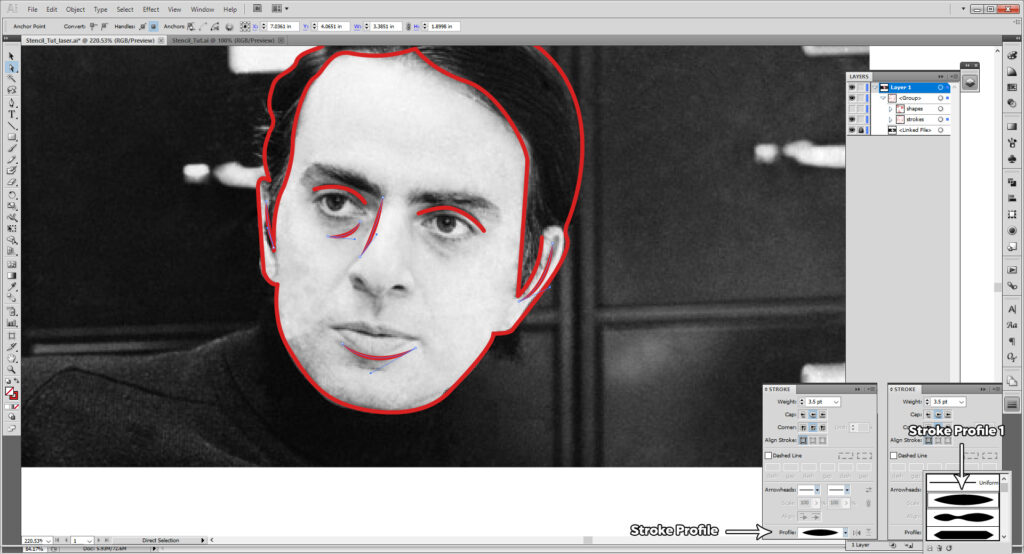
But that’s not all. some of my lines I want to taper. So I will select those lines (easier to select them from the layers panel) and change the stroke profile of these particular strokes. I’m using Stroke Profile 1, because it tapers at each end. Different profiles get different results. Don’t be afraid to experiment.
Once I’m satisfied, I’ll select everything and go to Object > Expand Appearance. If you noticed, it didn’t do everything. Go back to Object > Expand, and select it, You’ll get a dialog box, select Fill and Stroke and hit OK.
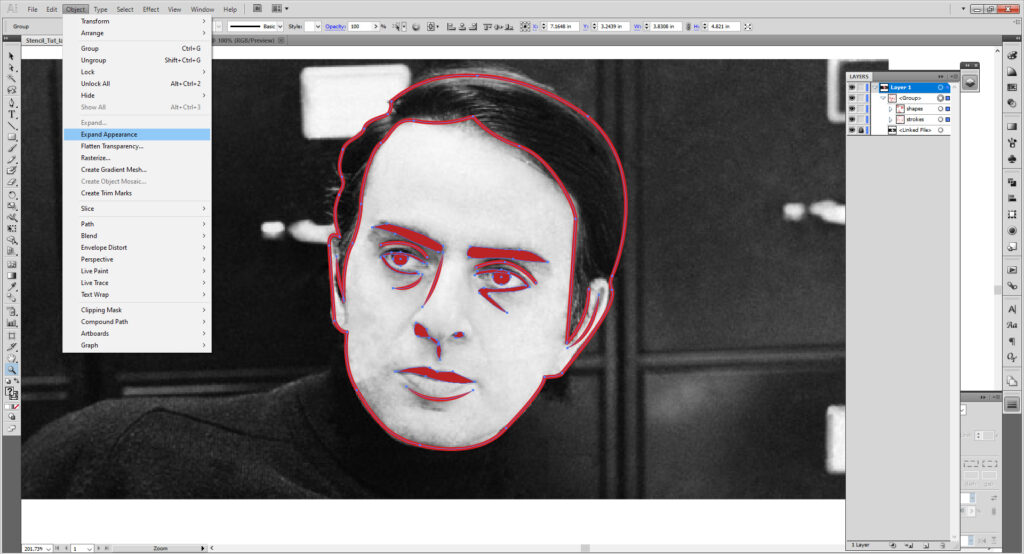
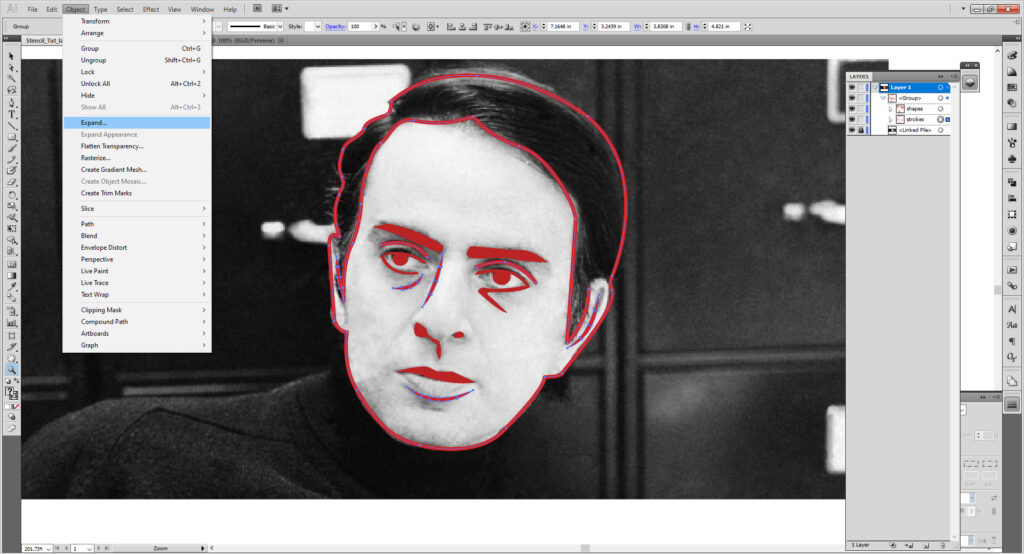
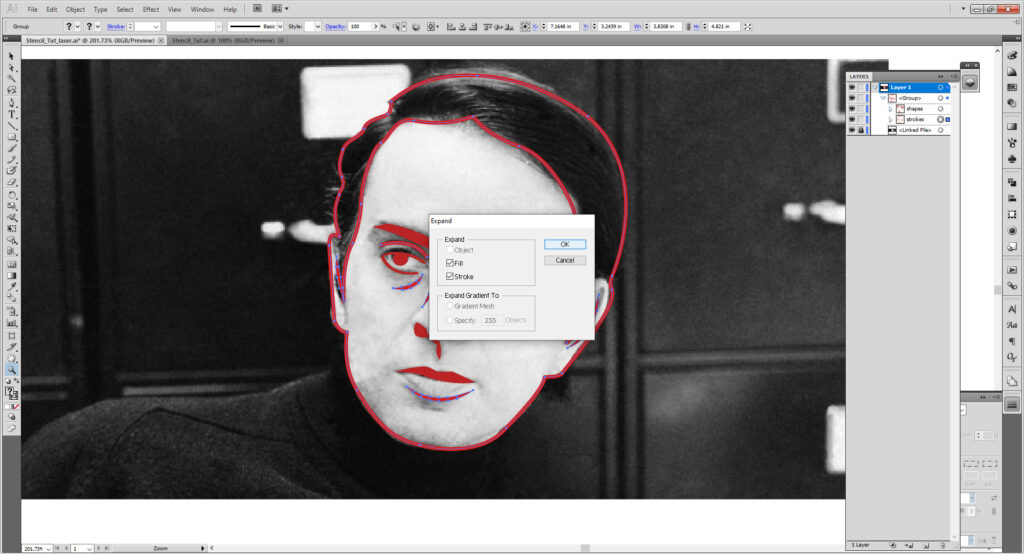
My example my colors weren’t the same, so I just sampled using the Eyedropper Tool (I) to make sure everything is the same.
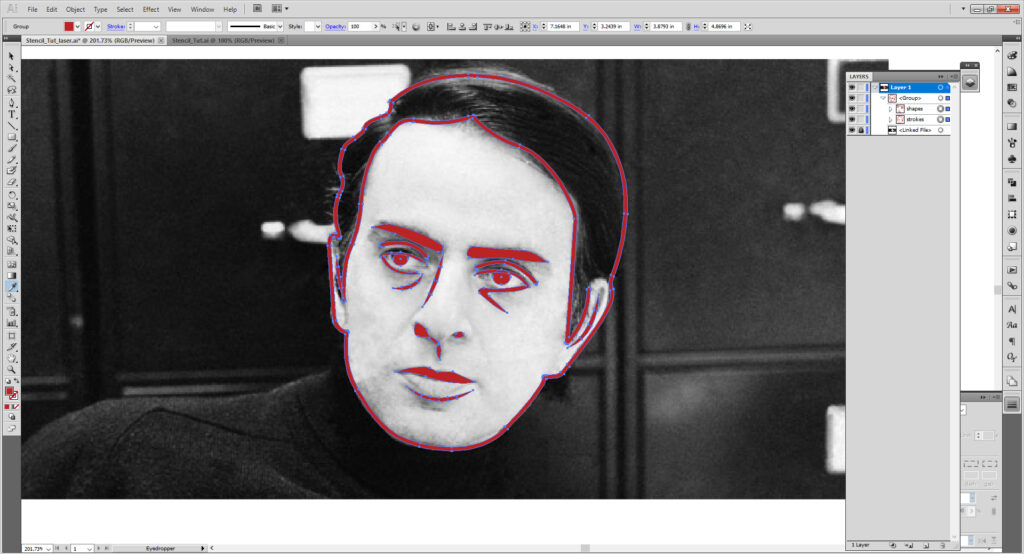
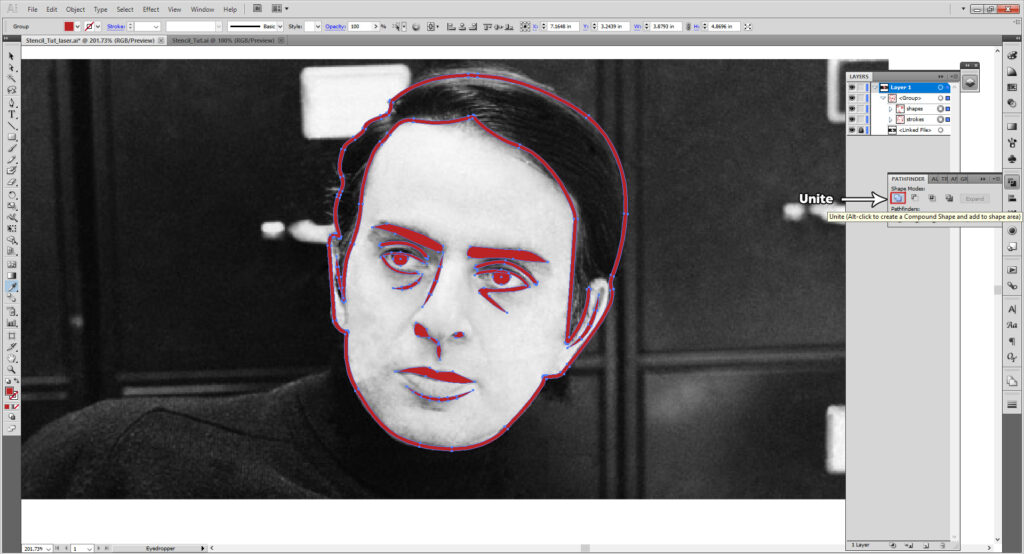
Now using the Pathfinder Panel, we’ll merge everything using the Unite option. Hide your image and you have your stencil!
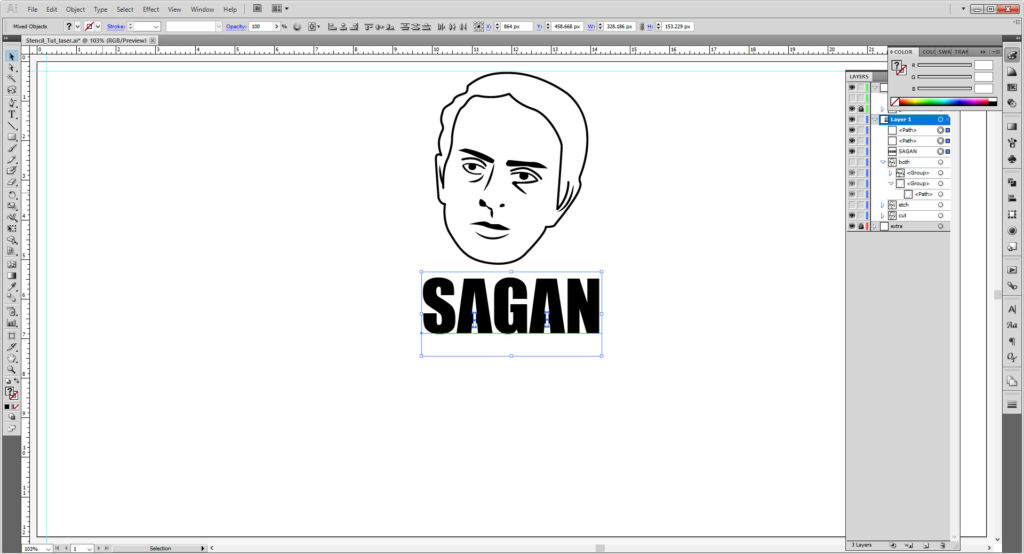
Suppose you wanted text too! Using the Type tool, lay out your words. You will need to “cut out” parts of certain letters or the whole of the letter will fall out out, unless that is the look you’re going for. The eraser, knife, and scissors tool in illustrator are either inaccurate or tedious to use. For ease and efficiency make a white (#ffffff) rectangle and place it in places where the inside would fall off. Characters like O,B,D,R,A,Q,P, e,a,o,p,b,d,g,q, i, j,4,6,8,9,0 will need it.
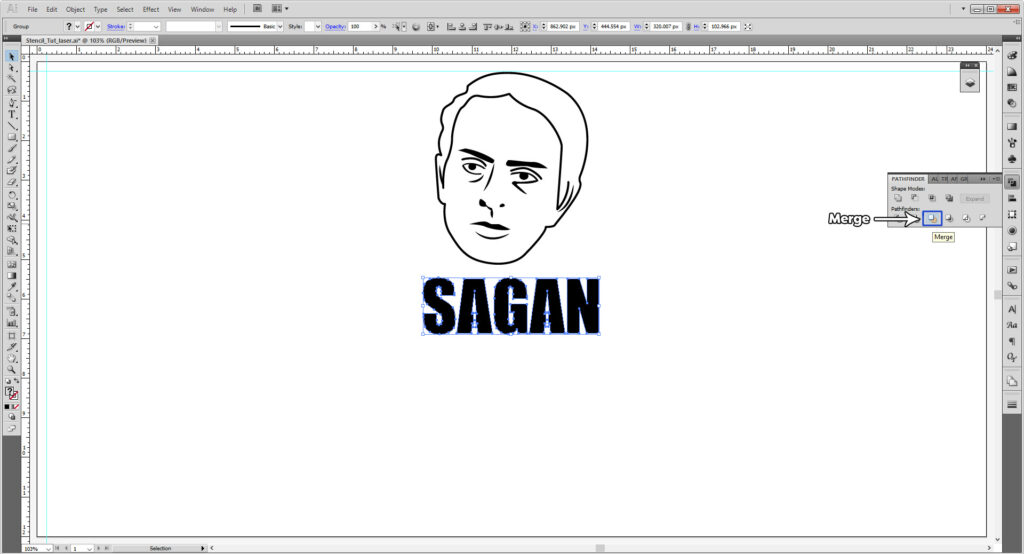
Once again, go to Object > Expand Appearance or Object > Expand and repeat until everything is a shape. This time, you want to use the Merge option.
In the Group, remove anything that isn’t the solid black. And there you have it!
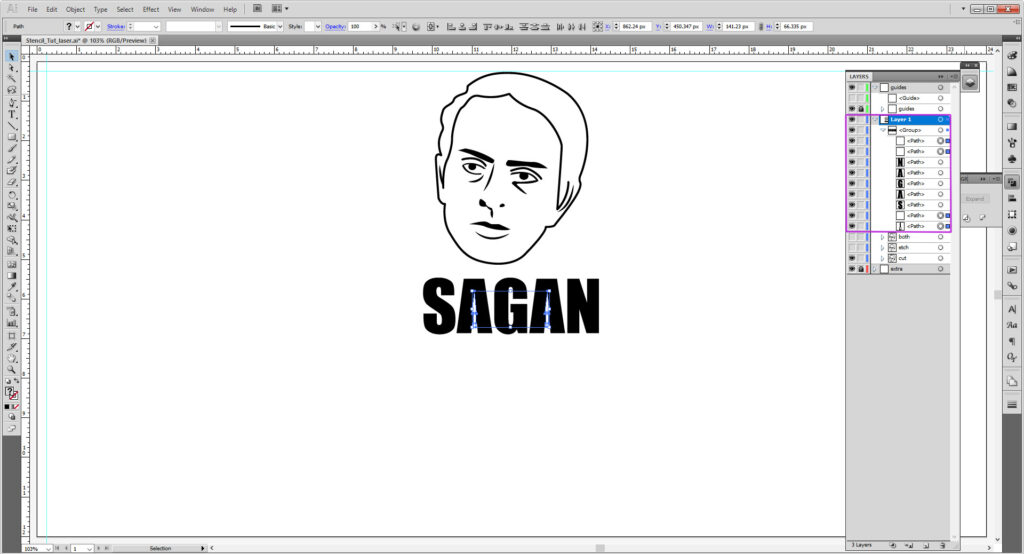
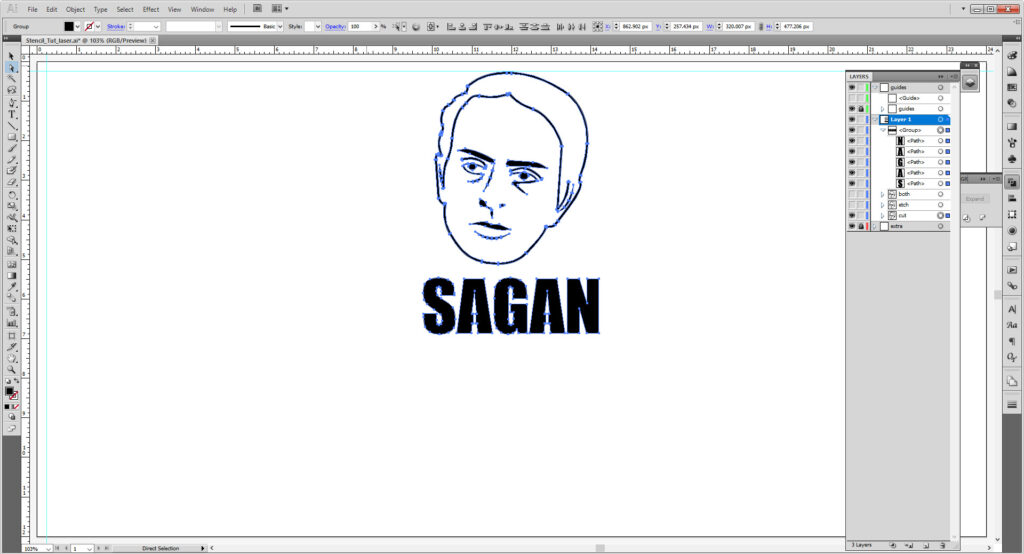
You can now save it as image to print (scroll down) Or output it for the Laser Cutter or Vinyl Cutter.
Output for Print (Printer)
Using the Artboard tool, set your artboard to 8.5×11 inches. This is standard US Letter size. If you for some reason print at a different dimension, change accordingly. Adjust your image as needed. If using a larger surface for your work, you can make more than one artboard and paste them into a multi-page document by going to Window > Artboard
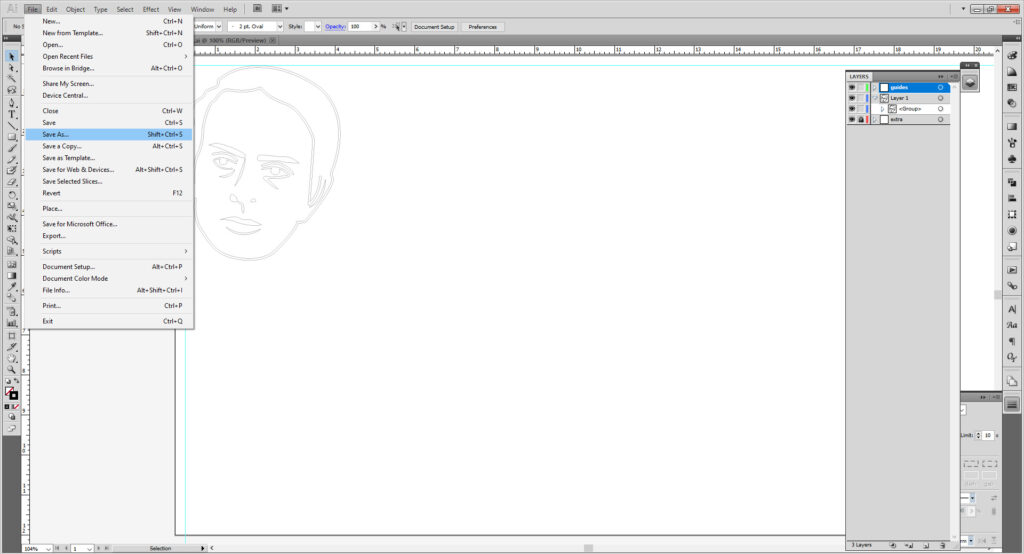
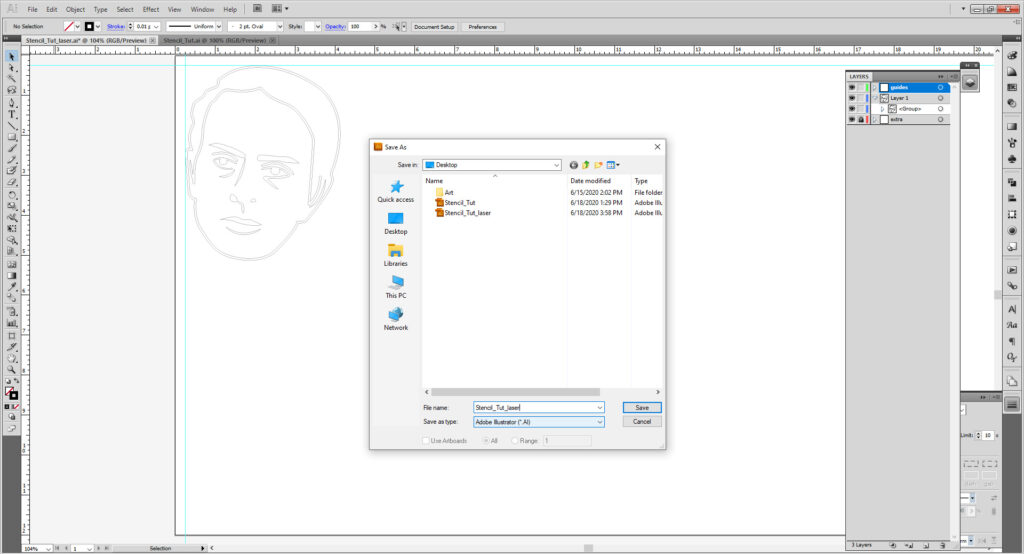
Next, go to File > Save As and name your file. Save it as an AI file. (If you’re not using Illustrator then please save it as an EPS file.)
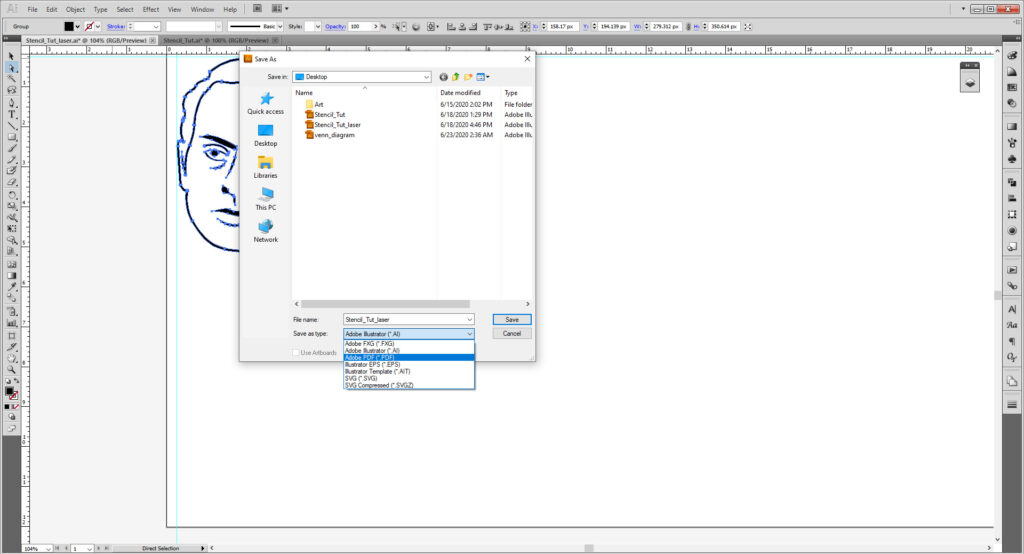
Repeat again and save as a PDF file.
You can also flatten it as a JPG by going to File > Export. However the best file type for print is a PDF. Especially if you have multiple parts for a larger piece.
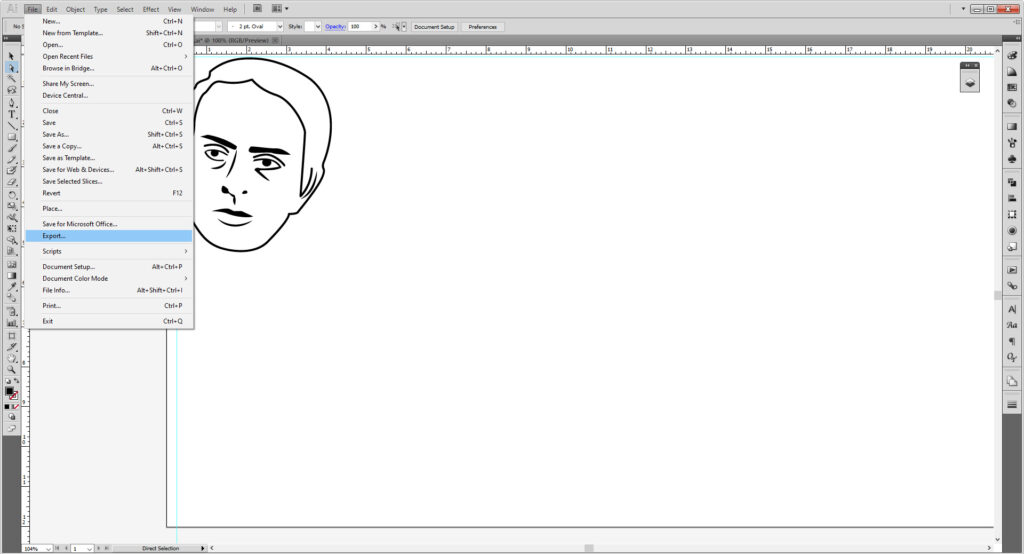
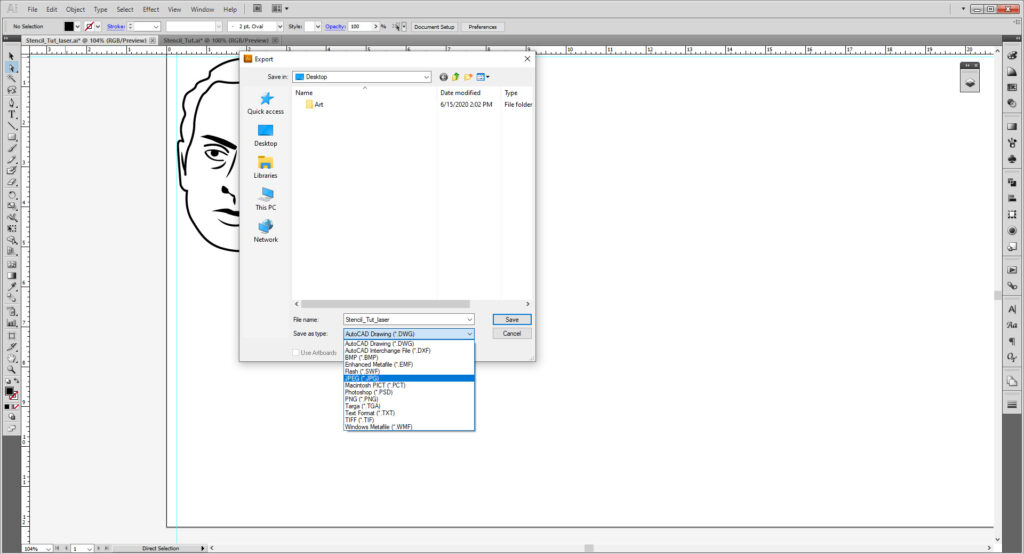
Once you have it printed, use masking tape to stick it onto the surface of your cutting material, and use an X-acto knife or box cutter to cut through it to make your stencil.
Show us what you made! Send it to lab manager or reach us at bmcc.makerspace on Instagram (or use the the #bmccmakerspace tag) to be highlighted on our page!
Other Links:
- Wm. Walker Co. on Youtube: How to make a DIY Stencil uses chipboard– both hand cut and laser safe!
- Instructables: Make Your Own Stencil uses foam board, which is safe to cut with blades, but not for laser cutting.
- Instructables: Simple Spray Paint Stencil uses a plastic sign, good for doing by hand but not for the laser cutter.
- My Modern Met has pre-made designs to download and print, and a tutorial to use mylar (which cannot be laser cut in the makerspace).
- Salvaged Inspirations has another mylar-based tutorial.
- Our Stock Resource Page has links to sites where you can use vector shapes to make your stencils.
- Adobe Illustrator Shortcut Guide
