Contents
- 1 macOS SETUP
- 2 Steps to Setup Your Development Environment
macOS SETUP
This steps you through setting up a macOS computer with the software and settings needed for our class.

Total Time Needed: 3 hours (estimate)
Steps to Setup Your Development Environment
Step 1: Install Visual Studio Code
VS Code is the code editor we will use in class. It’s made by Microsoft but it’s free, cross platform and integrates well with what we are doing.
You should be done with this step.
Step 2: Install NVM
This is the Node Version Manager and will be used to install Node (next step). This page has these instructions in more detail (external link).
curl -o- https://raw.githubusercontent.com/nvm-sh/nvm/v0.38.0/install.sh | bash“Profile Not Found” error
If it you see this “Profile not found” message in the text that shows when the code runs then you will need to create a profile.
Creating a Profile
- For older macOS you would use bash profile. For newer OS you can use zsh profile. It’s actually fine to have both. Run each of these lines separately by copy and pasting them into the Terminal then pressing return:
touch ~/.zshrctouch ~/.bash_profile- Run the curl command again
- curl -o- https://raw.githubusercontent.com/nvm-sh/nvm/v0.37.2/install.sh | bash
It should install NVM and tell you you have to close the terminal or enter a command.

If not, the install didn’t work. Expand the part below and try the steps outlined there.
“command -v nvm” shows nothing error
If you type in command – nvm and nothing shows then you may have to manually run the commands to get nvm going.
Copy and paste this into the terminal
export NVM_DIR="$HOME/.nvm"The press return
Then copy and paste this line into the Terminal
[ -s "$NVM_DIR/nvm.sh" ] && \. "$NVM_DIR/nvm.sh"press return
and finally copy and past this third line into the Terminal
[ -s "$NVM_DIR/bash_completion" ] && \. "$NVM_DIR/bash_completion"and press return.
Now try testing nvm again by copy and pasting this into the terminal.
command -v nvmHopefully you now see nvm
If that doesn’t work either see the detailed link at the top of this step or post in Discord for help.
Step 3: Install Node
Node is a handy tool that gives you access to a lock of command line developer tools. If you have ever seen a tutorial that started “It’s easy just npm install myThingy” and had no idea what that really meant, this will let you do that. Luckily if NVM is installed properly then installing Node is quick:
nvm install nodeNode should install and tell you what version it is.
You can test by typing: node -v
It should show something like v16.1.0
Step 4: Homebrew
Homebrew is a package manager for macOS that helps you to install other things (like Git which we will do next). We did not use it for NVM because NVM is also a package manager for Node and the two can conflict.
Here are official Install instructions: https://brew.sh/
It may ask you for your admin password.
It may need to install XCode command line tools. This is OK and you should let it do it.
Apple Command Line Tools
This article covers installing both the Apple Command Line Tools (useful) and Homebrew.
Note: to check whether or not you have the developer tools installed:
1. Open Terminal
2. Type in: xcode-select –version
If you get back something like: xcode-select version 2384
then you have it installed. If not, then you will need to install them.
You should have it installed!
Step 5: Install Git with Homebrew
Git is the version control system we will use and the most popular one in the industry. On the mac you may have an out-dated version already installed. The following will either install or help update it and then you can continue to use Homebrew to manage it.
brew install gitYou should see it start to install git and show the process in terminal.
Step 6: Update Terminal to use zsh
If you get a message to update to zsh when you open Terminal (will get it in the later versions of macOS) then you should follow these steps. If you don’t get it then you can ignore these and jump to step
Fuller instructions with more options are on this other website.
brew install zshYou should see it start to install and show the process in terminal.
Step 7: Install Oh My Zsh
Oh My Zsh is an open source, community-driven framework for managing your zsh configuration. It comes with a bunch of features out of the box and improves your terminal experience.
Install Oh My Zsh:
sh -c "$(curl -fsSL https://raw.githubusercontent.com/robbyrussell/oh-my-zsh/master/tools/install.sh)"When this installs it should set your default shell (terminal window) to zsh. If that didn’t happen copy/paste the following into terminal and press return.
chsh -s $(which zsh)You many need to quite and reopen Terminal for the changes to take effect.
Step 8: Integrate zsh with Visual Studio Code
This is optional but will make the terminal in VS code consistent with the Terminal if you just open the app.

If it says bash then you can change it to zsh

- In that terminal that appeared, click the down arrow by where it says bash
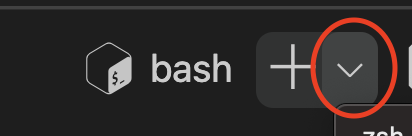
- then click Select Default Profile
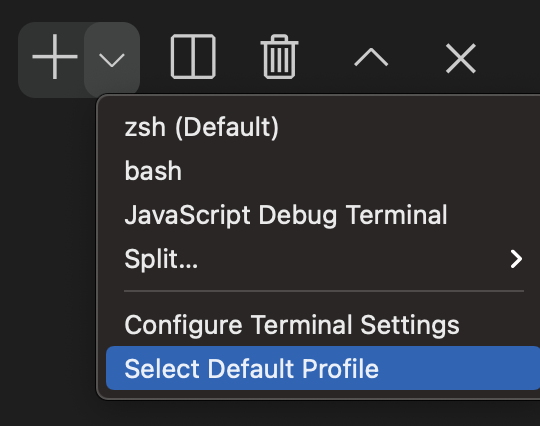
- Select zsh from the options

- you may need to restart Visual Studio Code
- You should now see zsh instead of bash

.