Introduction to After Effects
After Effects is part of the Adobe Creative Suite (like Animate, Photoshop, Illustrator, Premiere etc.) It is often cited as the industry standard for Motion Graphics (a term which encompasses a wide variety of projects, but where typography and design principles usually play a central role). After Effects is very versatile: it can be used to add animated graphics to videos, for animating text, logos etc. Some animators also like to use it for character animation. In this course we will focus on how it can be combined with Animate to enhance traditional animation (adding credits, camera movement, effects etc).
Interface
The After Effects Interface can be setup differently for different usage. For our purpose, the “Animation” workspace usually works well (go to Windows > Workspaces > Default).
The most important windows when animating are:
- The Project Panel is where the compositions you create are listed (they can be grouped inside subfolders)
- The Timeline is where you control action through time. It is composed of layers
- The Composition Window is where you’ll place and adjust your visual elements
- The Character and Paragraph Panels are where you can set the size, font, color etc. of your text
- The Effects Panel is where you can find/add effects to your layers
- The Tool Palette is where you’ll find tools to create and edit visual elements. The properties to the right of the palette will change according to the activated tool. While you can import files from Photoshop and Illustrator into Animate you can also build all your content directly in the software.
You may want to adjust some of these elements before moving forward. You can save these adjustments by going to Window > Workspaces > New Workspace.
Key Concepts
After Effects can be broken down into 6 main concepts:
- Compositions:You can think of Compositions as “scenes”. Each composition has its own Timeline. All compositions in a project can be accessed through the Project Panel.
- Layers: Each new shape or text you create is placed on a separate layer. Each layer has its own Timeline.
- Animation: Animation properties (such as scale, rotation, position etc.) can be found on each layer of the Timeline by toggling the little arrow to the left of the layer’s name. Each time one of these properties is changed, a new Keyframe is created on that layer’s Timeline.
- Effects: After Effects includes effects (such as Fractal Noise, Color matting, Channels etc.) They can be found in the Effects Panel, applied to layers and combined to dramatically change the look of a layer.
- 3D: While individual layers are 2D, they occupy a 3Dimensional space: Each layer in the Composition are positioned along the x (horizontal), y (vertical) AND z (depth) axis. You can use the camera to reveal the 3dimensional aspect of your composition.
File Format
To create a new project with settings appropriate for HD animations, go to File > New > New Project. A single project can have multiple compositions. Note that the settings are for 1980×1080 at 24 frames per second. To create your first one, go to Composition > New, make the following adjustments and click OK:
- Composition Name: name your scene
- Preset: HDTV 1080 24
- Duration: the length of your scene (i.e: for 30seconds: 0:00:30:00)
- Background color: White
Go to File > Save As and give your file an appropriate name and location.
Layer Types
If you import content from other software, After Effects will place your content on layers, dependent on the software and the settings you choose when you import it.
You can create different types of layers within Adobe After Effects. The most commonly used ones are: Solid, Shape and Text layers. Each one has different attributes:
Solid Layer
A Solid layer is a rectangle of pixels that is a raster/resolution dependent object. This means it cannot be scaled up without deteriorating the image. It includes basic animation properties (i.e: position, scale, opacity etc.), but not more complex ones (i.e: stroke, fill, corner roundness etc.). The upside to these limitations is that this type of layer is less taxing on processing power/more efficient. For this reason, they are often used as starting point for Effects. And they are often used when applying effects, which we will look at later.
To create a new Solid Layer
- Go to Layer > New… > Solid (or Command + Y)
- Set the Solid’s name, dimensions and color in the Settings Window (if you want the layer to fill the entire Composition, press the Make Comp Size button).

- Notice that a new Solid layer was added to the Timeline
- Get into the habit of renaming your layers by clicking on their name and pressing Enter to edit.
Shape Layer
After Effects allows you to create vector shapes whose properties (including basic ones such as position, scale opacity, but also more complex ones such as stroke, fill, number of sides etc.) can be changed during the course of the animation. Since these are vector objects, they are resolution independent and can be scaled infinitely without degradation to the image quality.
To create a new Shape layer:
- Go to Layer > New > Shape Layer
- Activate one of the Shape tools (click and hold the Shape icon to see the different options) and set the Fill, Stroke and Stroke Weight
- Click and drag on the composition.

- Notice that the type of shape is now listed under the Contents tabs
- Rename the layer and its content
You can also create a custom shape with the pen tool
- Go to Layer > New > Shape Layer
- Activate the Pen tool and set the Fill, Stroke and Stroke Weight
- Create your shape with the pen tool
- For instructions on how to change the path of the shape overtime, see “Shape layer properties” section below.
Text Layer
The content of Text layers can be customized similarly to text in other software (such as font, font size, color paragraph size, text spacing, kerning etc.). Their “Transform” menu has the same Animation properties as Solid and Shape layers.
To create a new Text Layer:
- Activate the Text tool
- Set the Character and Paragraph options in their respective Panels (follow these links to review what the different options are for the Character and Paragraph panels)
- Click once on the Composition and type the text
- Notice that a new Text layer has been created in the Timeline and that its name matches the typed text.
Anchor Point
A layer’s anchor point is its main control point (the point from which it will move, rotate etc.). By default a layer’s anchor point is the center of the composition. While you can manually change the value of the anchor point in the Animation Properties (see below), some menu items can help you achieve common anchor point edits more efficiently:
- To move a layer’s anchor point to the center of the layer content, go to Layer > Transform > Center Anchor Point in Layer Content
- Once you’ve aligned the anchor point to the center of your layer content, you can center the layer content on the composition by going to: Layer > Transform > Center in View
Animation Properties
In After Effects, each layer has a set of Animation properties. Each one controls a different aspect of the layer’s content and can be adjusted overtime. There are also Animation properties that control the content of the layer (i.e: Shape, Solid , Text). These will vary depending on the type of layer/content.
Solid, Shape and Text Layers all have the same 5 basic properties. They are listed under the Transform tab (toggle the little arrow to the left of “Transform” if you don’t see them).

What do they control?
- Anchor Point: x, y axis of the control point of the layer *Keyboard shortcut: A
- Position: x, y axis of the layer on the composition *Keyboard shortcut: P
- Scale: width, height of the layer’s content *Keyboard shortcut: S
- Rotation: full (360) rotation + degrees of the layer *Keyboard shortcut: R
- Opacity: 0% = fully transparent, 100% = fully opaque *Keyboard shortcut: T
You can decide to change one, several (or none) of these properties over the course of your animation. Any property that will change overtime will first need to be given an initial Keyframe:
- Bring the Time Indicator at the point you want to start keeping track of the property (i.e:0;00;00;00)
- You can do this by sliding the Indicator along the Timeline or by entering the time numerically in the Preview Time box (hours;minutes;seconds;frames).

- Click on the little Stop Watch icon to the left of the property and set the value you want it to have at this point of the animation (i.e: completely transparent / 0%)
- Notice that a little diamond has been created in the Timeline, at the level of the layer’s activated property

- To create the next Keyframe, move the Time Indicator (i.e: 0;00;05;00) and simply change the value of the property.
- Notice that the new diamond/Keyframe was automatically created when the value changed (without having to click on the Stop Watch).

- Preview the animation by pressing the Spacebar. You’ll notice that After Effects automatically tweens between Keyframes.
Shape Layer Properties
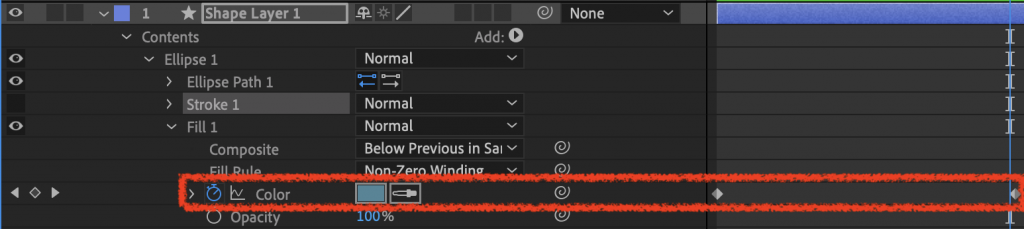
Shape layers have animation properties beyond the regular transforms that can help you easily animate a shape’s paths, color, etc. To access these properties, toggle the arrow next to Contents and then the arrow next to the Shape you want to animate. One common reason you may want to access these shape-specific property is to change a shape’s color overtime:
- Bring the Time Indicator at the point you want to start keep track of the color (i.e:0;00;00;00)
- Toggle the arrow next to the Fill property to see the Color property
- Click on the little Stop Watch icon to the left of the Color property and set the color swatch to the color you want it to have at this point of the animation.
- To create the next Keyframe, move the Time Indicator (i.e: 0;00;05;00), click on the swatch and choose a different color.
The shape layer properties can also allow you to change a path (i.e: one created with the pen tool) overtime
- Bring the Time Indicator at the point you want to start keep track of the path (i.e:0;00;00;00)
- Toggle the arrow next to the Path property
- Click on the little Stop Watch icon to the left of the Path property
- To create the next Keyframe, move the Time Indicator to where you want the next “stage” of the shape to be completed (i.e: 0;00;05;00),
- Double click on the shape and adjust it’s anchor points to adjust the paths.
Keyframe Interpolation
Essential animation principles (such as easing-in and out, acceleration, timing etc.) can easily be applied in Adobe After Effects by looking at keyframe interpolations (also known as “tweening”) and making adjustments. Keyframe interpolation/tweening refers to the way the software fills in the unknown data between two keyframes. After Effects provides several interpolation methods that affect how the in-between values are calculated.
Linear
By default, After Effects will place frames/dots at equals intervals between two keyframes (linear interpolation). There will be more or less frames depending on the speed of the animation. The slower the animation, the more frames.

Any keyframe can be moved along the timeline to change the speed of an animation independently by clicking and dragging on it.
Easy ease
One of the 12 principles of animation is “Slow in and slow out”. “Ease in and ease out” is the equivalent in digital animation: when using both, the animation will slowly accelerate and slowly decelerate. This means there will be more frames/dots at the beginning and end of the motion path than in the middle.

To create an “easy ease” interpolation (wherein both easing in and out are applied), right-click on the keyframe and select Keyframe Assistant > Easy Ease (or press F9). You’ll notice that the little diamond turn into an hourglass. The keyframe assistant also provides options for Easy Ease Out and Easy Ease In.

Hold
If you want a property to change abruptly from one keyframe. value to the next one (rather than tweening gradually), right-click on the first keyframe and select Toggle Hold Keyframe.

Bezier Curve
Easy ease transforms the interpolation temporarily, but we can also change it spatially. We can apply the arc principle by transforming a motion path that’s linear (a straight line) into a bezier curve. To do so:
- Select all the keyframes in the timeline by clicking on the property name (i.e: position).
- Right-click on any of the selected keyframe and select Keyframe Interpolation…
- Change the Spatial Interpolation dropdown from Linear to Bezier. You’ll notice that a little handle has been added to each Keyframe.
- Click and drag the handle(s) to curve the path.
- Alternatively, you can turn individual keyframes into beziers by activating the Convert Vertex tool (click and hold the Pen tool to select) and clicking and dragging on an anchor point.


Of course, this spatial transformation could also be combined with a temporal one (i.e: also applying Easy Ease to these Keyframes)
The Pen tool can also be used to add Keyframes along a path:
- Select the Pen tool.
- Click on an existing path at the point where you’d like to add a Keyframe
- Click and drag that new anchor point to change the shape of the path.


More temporal adjustments
If you have more than two keyframes and want to alter the speed of the entire path while keeping the same ratio of space between each frame:
- Select all the Keyframes in the Timeline by clicking on the property name (i.e: position).
- Alternatively you could select a series of frames rather than all of them by just clicking and dragging to create a selection on the Timeline.
- Hold the Option key and click and drag the last Keyframe in the selection.
Rendering
Your Adobe After Effects file uses a proprietary format called .aep. This is your working file, with all your layers, keyframes, properties etc.
In order to view your animation as a self-contained mp4 video file (the format required to upload to YouTube, Vimeo etc.) you must render it:
- Open the Composition you wish to export
- Go to File > Export > Add to Adobe Media Encoder Render Queue. This will open the Adobe Media Encoder.
- On the right hand side of the interface, you can see the Queue. Choose H.264 and Match Source:High Bitrate.These are the settings to create an MP4 file
- Press the green Play button to render the file.
Video Tutorials
Some short videos I made that give a brief introduction to Animate
Windows and palettes in the After Effects interface
Creating solid and shape layers in After Effects and using Transform to animate properties
Assignment:
Create a background for your walk cycle. Details here
Checklist
- Open up After Effects, create a 5 second composition, add a solid layer and shape layer, play around with animating some properties (position, opacity, rotation, scale for example). Try rendering your file out, as well, following the instructions above. Try to fool around a bit so you get a feeling for the software.
- Create a background image with a vector program, such as Illustrator or Animate. Make sure it is at least 3000 pixels long.
- Export the file as a PNG or JPG.
- Created a post on your OpenLab Portfolio with the image and posted a link to the Background Image discussion board
- Posted the JPG or PNG file to Blackboard along with the URL for the portfolio post.