What is Kinetic Typography?
“Kinetic” derives from the Greek kinetikos: “moving, putting in motion”. “Kinetic typography” refers to the art of animating letters and words. This is a popular technique in today’s media – you’ve likely encountered moving typography in advertising, music videos, websites, and apps.
However, kinetic type didn’t come about in the digital age. It has been popular in animation and movies for many decades. The filmmaker Alfred Hitchcock often used elaborate and highly stylized opening credits which are still amongst the most beautiful examples of animated text.
The opening credits for Alfred Hitchcock’s 1960 “Psycho”
This workshop will introduce you to kinetic type techniques through Adobe After Effects. These files can then be exported to video or GIF.
There are some interesting HTML/CSS/Javascript experiments (see the Further reading/resources section at the bottom of this page). These are fairly advanced code-wise, but could be a nice option for someone with strong front-end development skills.
Adobe After Effects: Introduction
What is Adobe After Effects
After Effects is part of the Adobe Creative Suite (like Animate, Photoshop, Illustrator, InDesign , Premiere etc.) It is often cited as the industry standard for Motion Graphics (a term which encompasses a wide variety of projects, but where typography usually plays a central role). While After Effects is very versatile and could also be used for character animation, we will focus on its typography tools in this workshop.
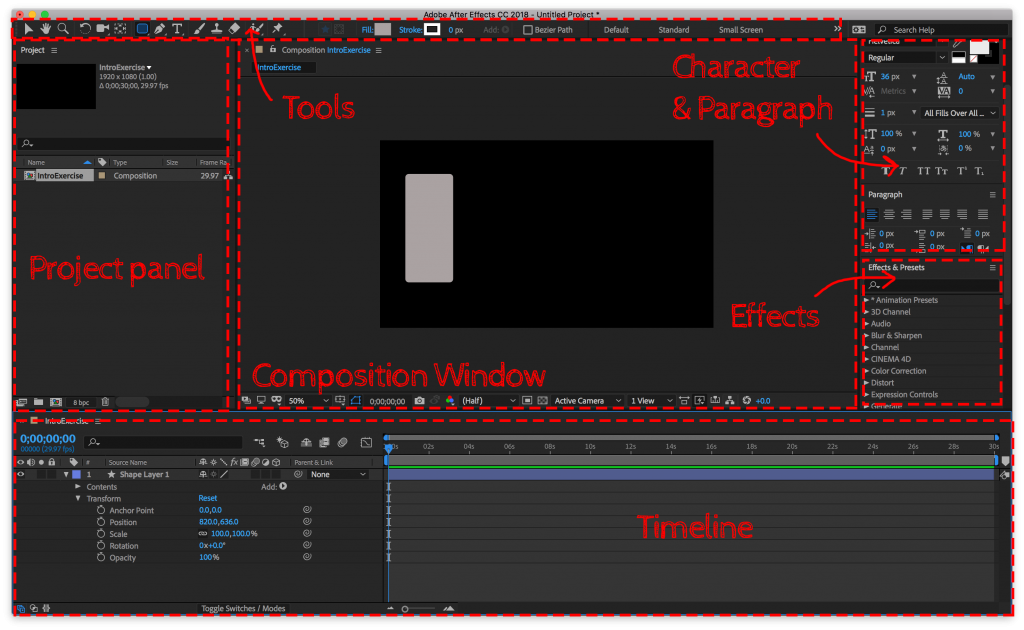
Interface
The After Effects Interface can be setup differently for different usage. The preferred workspace for text driven Motion Graphics is “Text” (go to Windows > Workspaces > Text).
The most important windows when animating are:
- The Project Panel is where the compositions you create are listed (they can be grouped inside subfolders)
- The Timeline is where you control action through time. It is composed of layers
- The Composition Window is where you’ll place and adjust your visual elements
- The Character and Paragraph Panelsare where you can set the size, font, color etc. of your text
- The Effects Panel is where you can find/add effects to your layers
- The Tool Palette is where you’ll find tools to create and edit visual elements. The properties to the right of the palette will change according to the activated tool. While you can import files from Photoshop and Illustrator into Animate you can also build all your content directly in the software.
You may want to adjust some of these elements before moving forward. You can save these adjustments by going to Window > Workspaces > New Workspace.
Key concepts
After Effects can be broken down into 6 main concepts:
- Compositions:You can think of Compositions as “scenes”. Each composition has its own Timeline. All compositions in a project can be accessed through the Project Panel.
- Layers: Each new shape or text you create is placed on a separate layer. Each layer has its own Timeline.
- Animation: Animation properties (such as scale, rotation, position etc.) can be found on each layer of the Timeline by toggling the little arrow to the left of the layer’s name. Each time one of these properties is changed, a new Keyframe is created on that layer’s Timeline.
- Effects: After Effects includes effects (such as Fractal Noise, Color matting, Channels etc.) They can be found in the Effects Panel, applied to layers and combined to dramatically change the look of a layer.
- 3D: While individual layers are 2D, they occupy a 3Dimensional space: Each layer in the Composition are positioned along the x (horizontal), y (vertical) AND z (depth) axis. You can use the camera to reveal the 3dimensional aspect of your composition.
- Rendering: We must render our projects to share them with the world (i.e: exporting to Quicktime).
Creating a New Composition
To create a new HD video Composition:
- Go to Composition > New (or Command + N)
- Set the Preset dropdown to HDTV 1080 29.97 (unlike traditional character animation, the standard frame rate for motion graphics is 29.97).
- You can set the approximate duration of your animation in the Duration box (although you can also always add/remove frames later).
- Set the background color by clicking on the color swatch at the bottom of the Window.
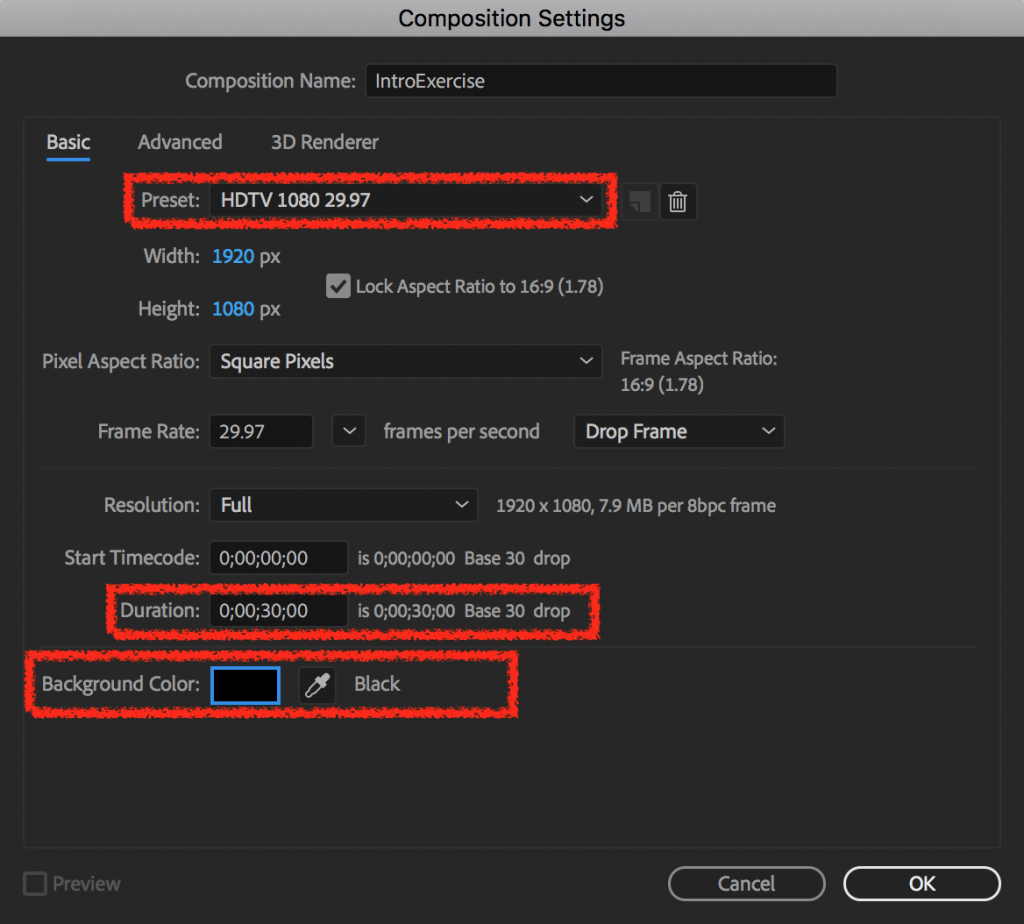
Before going any further, save your project:
- Go to File > Save As and give your file an appropriate name and location.
Basic Transform Properties
In After Effects, each layer has a set of Animation properties. Each one controls a different aspect of the layer’s content and can be adjusted overtime.
There are also Animation properties that control the content of the layer (i.e: Shape, Solid , Text). These will vary depending on the type of layer/content.
General Layer properties
Solid, Shape and Text Layers all have the same 5 basic properties. They are listed under the Transform tab (toggle the little arrow to the left “Transform” if you don’t see them).
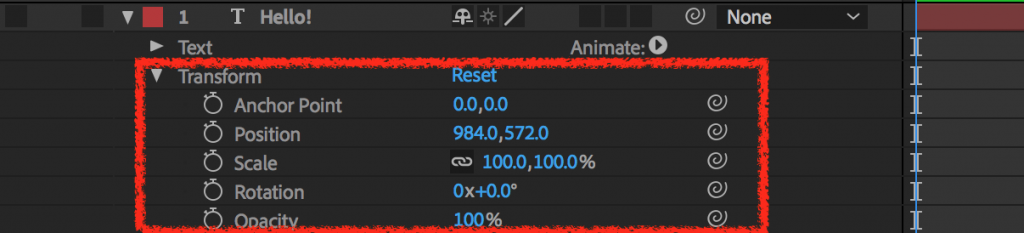
What do they control?
- Anchor Point: x, y axis of the control point of the layer (the center of the composition, by default)
- Position: x, y axis of the layer on the composition
- Scale: width, height of the layer’s content
- Rotation: full (360) rotation + degrees of the layer
- Opacity: 0% = fully transparent, 100% = fully opaque
You can decide to change one, several (or none) of these properties over the course of your animation.
Any property that will change overtime will first need to be given an initial Keyframe:
- Bring the Time Indicator at the point you want to start keeping track of the property (i.e:0;00;00;00)
- You can do this by sliding the Indicator along the Timeline or by entering the time numerically in the Preview Time box (hours;minutes;seconds;frames).
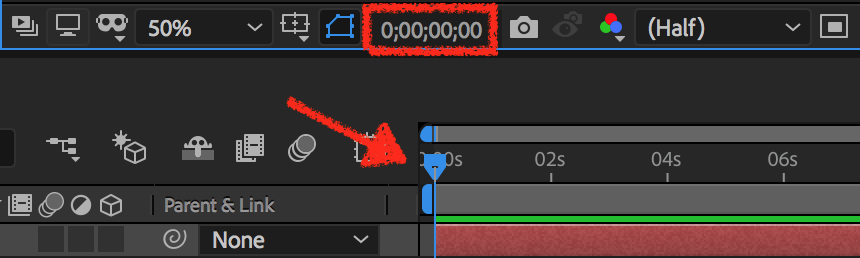
- Click on the little Stop Watch icon to the left of the property and set the value you want it to have at this point of the animation (i.e: completely transparent / 0%)
- Notice that a little diamond has been created in the Timeline, at the level of the layer’s activated property

- To create the next Keyframe, move the Time Indicator (i.e: 0;00;05;00) and simply change the value of the property.
- Notice that the new diamond/Keyframe was automatically created when the value changed (without having to click on the Stop Watch).

- Preview the animation by pressing the Spacebar. You’ll notice the After Effects automatically tweens between Keyframes.
Animating Text Layers
While all the basic transforms (Anchor Point, Position, Scale, Rotation, Opacity) can be applied to Text Layers, they also have unique properties.
Text Animators
Text Layer Animator Properties allow you to control the individual characters and/or words within a layer and to create more dynamic animated text.
There are 17 Animator Properties and each of them has several basic and advanced parameters. They are listed within the little “Animate” button to the right of the Text tab within the Text Layer.

We’ll do a simple tutorial demonstrating the general workflow for using them, but there’s a lot more to explore beyond this example.
You can watch the finished example below and download the .aep file here:
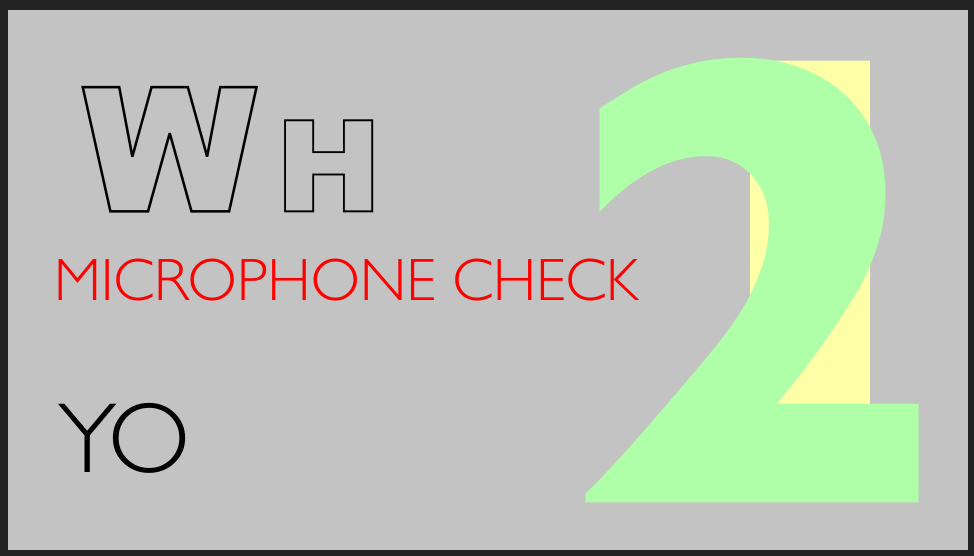
Before starting to use Animator properties, we must have some Text Layers to apply them to. You can create your own or use this example file. It consists of 5 Text Layers, each one appearing at a different points on the Timeline. No Transform nor Animator properties have been applied so far.
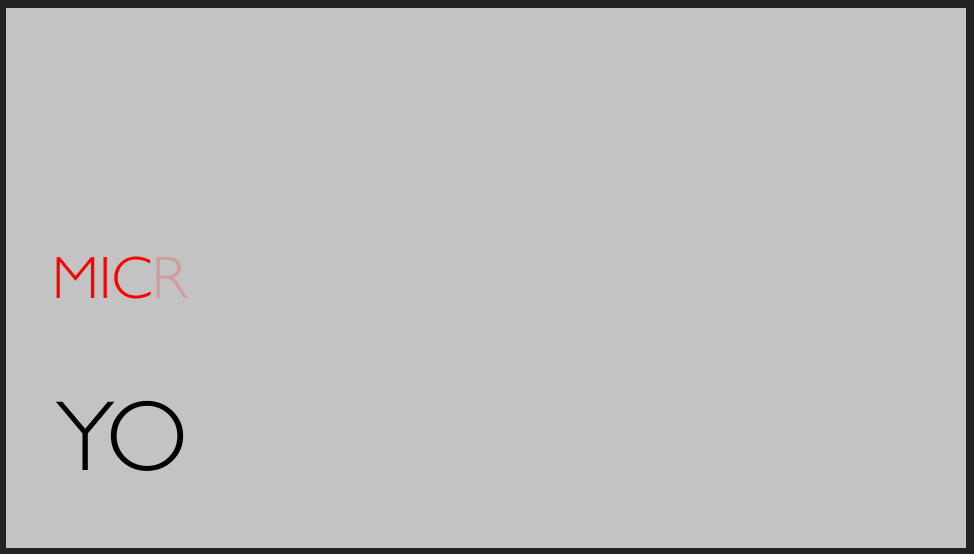
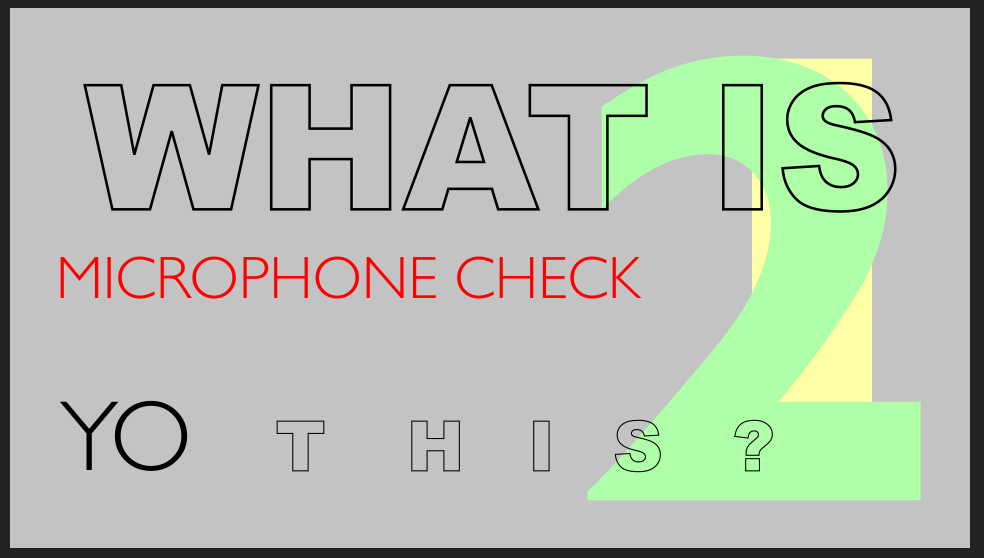
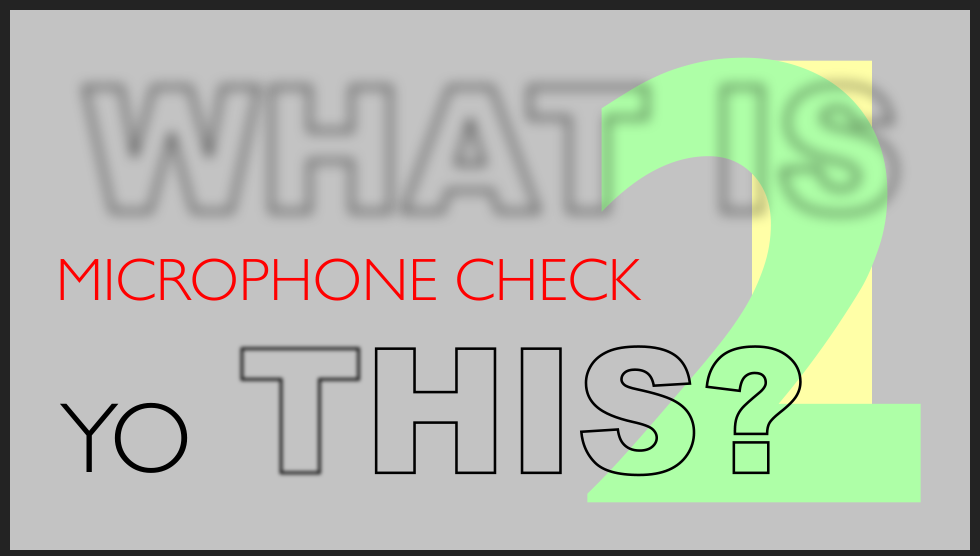
The “microphone check” layer appears all at once at 0;00;01;15. What if wanted each letter to fade in one by one?
- Set your Time Indicator to the beginning of the “microphone check” layer (0;00;01;15)
- Toggle the arrow to the left of the “microphone check” Text tab.
- Click and hold the “Animate” button and select “Opacity”. Notice that an “Animator1” tab has been added to the layer.
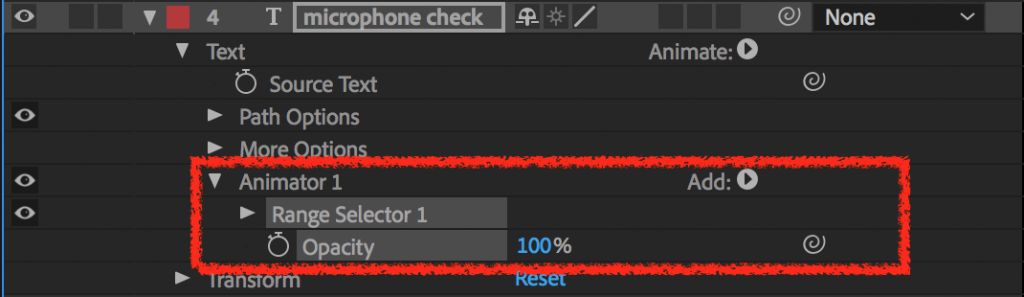
- Toggle the “Range Selector 1” tab.
- Make sure the Time Indicator is still where you want your text to start fading in (0;00;01;15).
- Click on the little Stop Watch next to to Start property and set its value to 0%.
- Position the Time Indicator where you want your text the fade to end (0;00;02;15) and change the value of the Start property to 100%,
- Preview your Animation by hitting the Spacebar. You’ll notice that each letter gradually appears on the screen.
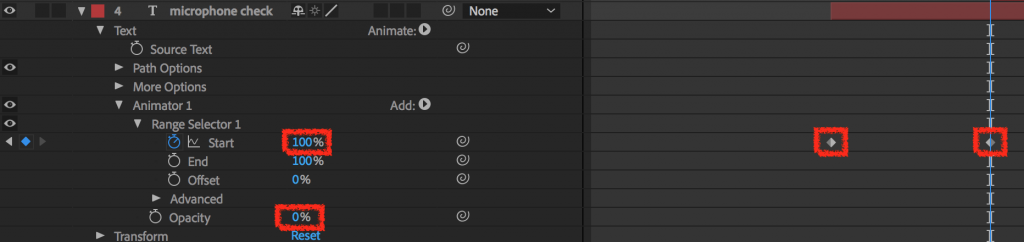
- The Offset option allows you to apply the effect to only a portion of the layer (i.e: if set to 50%, the first part of the line will appear without the effect and the second half will fade-in)
- The Advanced tab allows you to control things even further: For example, the “Based on” dropdown lets you decide wether the property is applied to individual characters, words or lines

You can always remove an Animator property by selecting its tab and hitting the deletekey.
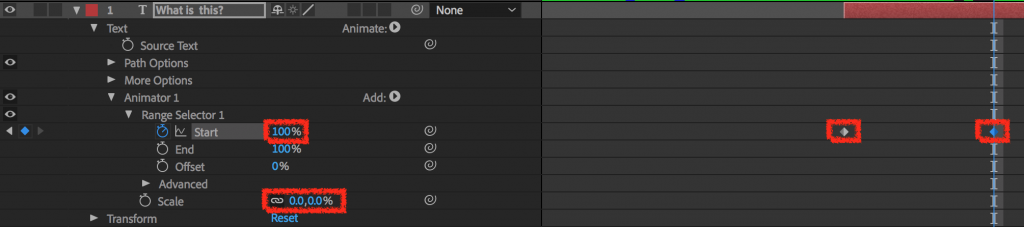
Next, we’ll try the Scale Animator. We’ll use it to gradually scale up the “what is this?” layer:
- Toggle the arrow to the left of the “what is this?” Text tab.
- Click and hold the “Animate” button and select “Scale”. Notice that an “Animator1” tab has been added to the layer.
- Set the Scale percentage to 0% (essentially saying you want the initial Scale to be 0).
- Toggle the “Range Selector 1” tab.
- Position the Time Indicator where you want your text to start scaling up (0;00;03;00).
- Click on the little Stop Watch next to to Start property and set its value to 0%.
- Position the Time Indicator where you want the text to reach its full scale (0;00;03;15) and change the value of the Start property to 100%
- Preview your Animation by hitting the Spacebar. You’ll notice that each letter gradually appears by scaling up on the screen.
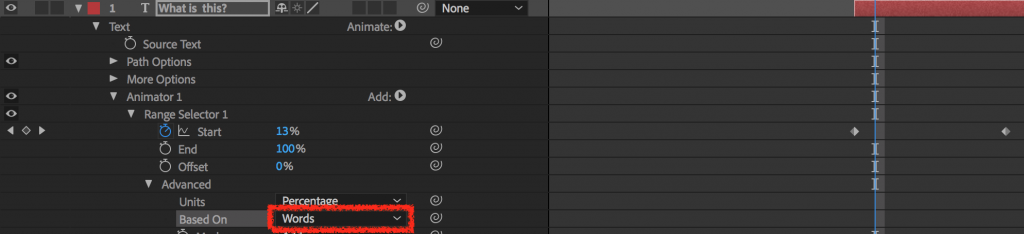
But what if I wanted each word (not letter) to scale up one by one?
- Toggle the Advanced tab within Range Selector 1
- In the Based On dropdown, select Words
- Preview your Animation by hitting the Spacebar. You’ll notice that the letters within each word now scale up at the same time.
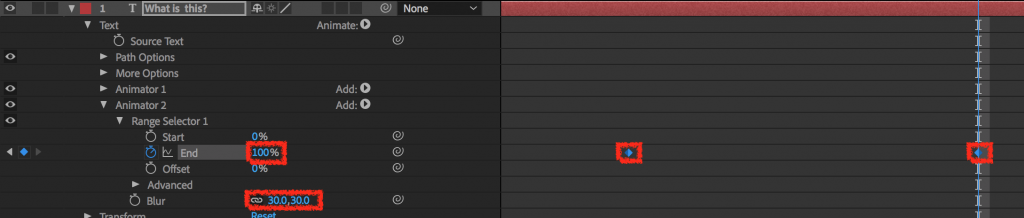
Finally, let’s give the Blur Animator property a try. We’ll use it to blur each word one by one after they’ve been scale up.
- Make sure you are still within the “what is this?” Text tab.
- Click and hold the “Animate” button and select “Blur”. Notice that an “Animator2” tab has been added to the layer.
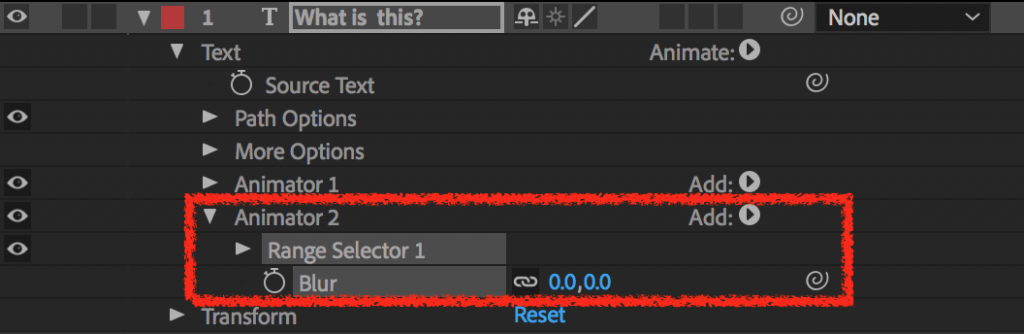
- Set the Blur percentage to 30% (this time we’ll set the value to what we want the end state to be – 30% blurred).
- Toggle the “Range Selector 1” tab.
- Position the Time Indicator where you want your text to start blurring (0;00;04;00).
- Click on the little Stop Watch next to to End property and set its value to 100%.
- Position the Time Indicator where you want the text to reach its full blur (0;00;05;00) and change the value of the End property to 0%
- Preview your Animation by hitting the Spacebar. You’ll notice that each letter gradually blurs.
Animating type on a path
By default, After Effects’ Text tool will create linesof text. However these lines can be transformed into different shapes and can even be animated along a path. These shapes/path could be simple vector shapes (i.e: ellipse, rectangle etc.) or something custom created with the pen tool.
We’ll use both in this simple example. You can watch the finished example below and download the .aep file here:
We’ll start with a New Composition.
- Go to Composition > New Composition(or Command + N) and use the following Settings:
- Name: “TextPath”
- Preset dropdown: HDTV 1080 29.97
- Duration: 0;00;05;00
- Set the background color by clicking on the color swatch at the bottom of the Window
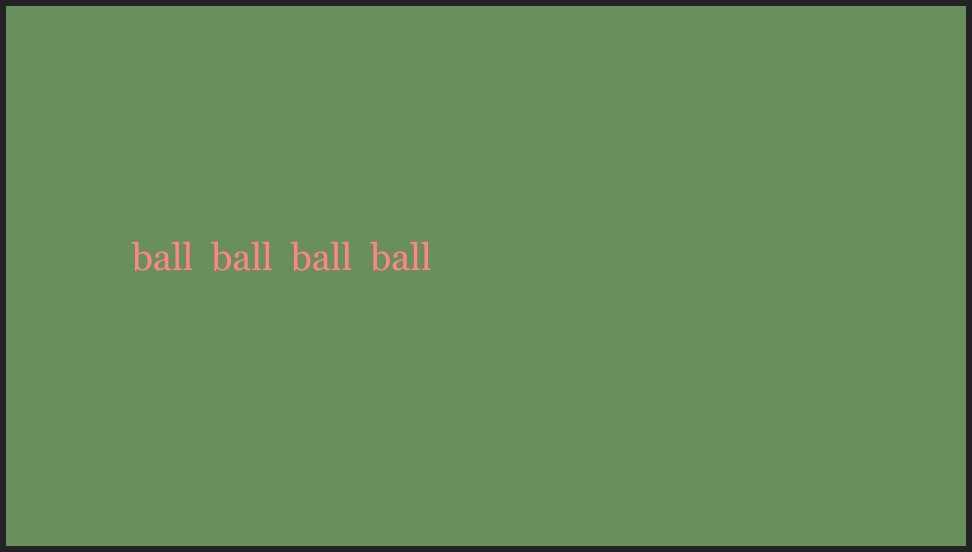
Now let’s add some text:
- Activate the Text tool
- Set the options in the Characters panel.
- Click on the Composition and type the word “ball” 4 times with a double space between each instance.
Next, we’ll create the simple shape we want this Text layer to map unto. We will use the Shape tool, but to create a Mask rather than a Layer:
- Make sure the “ball ball ball ball” Text Layer is selected in the Timeline.
- Activate the Ellipse tool. Notice that there are no Fill/Stroke options since the shape will be created as a Mask
- Click and drag in the center of the Composition to create your circular Mask. Hold Shiftif you’d like it to be a perfect circle.
- Notice that a Mask tab has been created within the Text Layer
- Also notice that the only part of the Text Layer still visible on the screen is that inside the Mask.
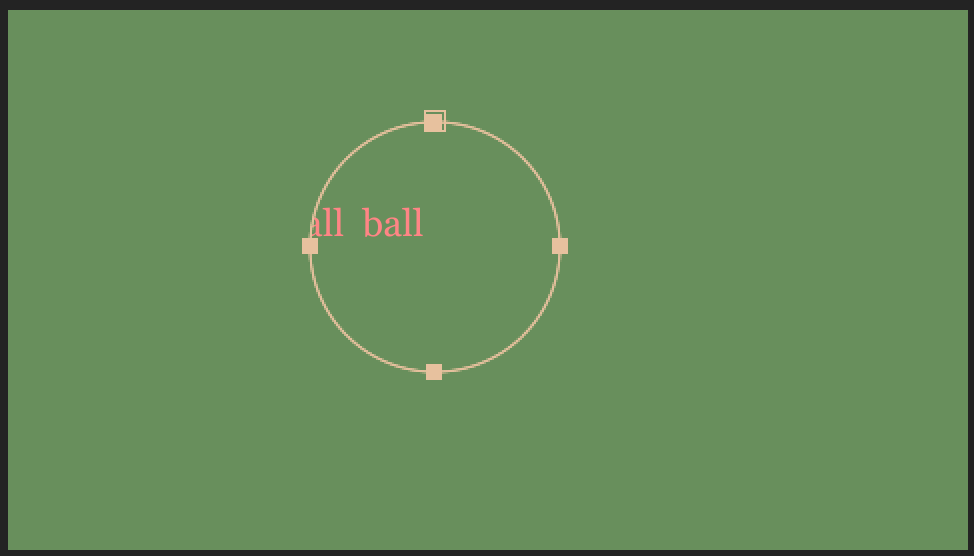

Next, we must tell our Text content to follow the Path defined by the Mask we just created:
- Toggle the little arrow next to the Text tab.
- Toggle the Path Options tab.
- In the Path dropdown, Select “Mask 1”
- Notice that the text is now mapped onto the shape of the Mask.


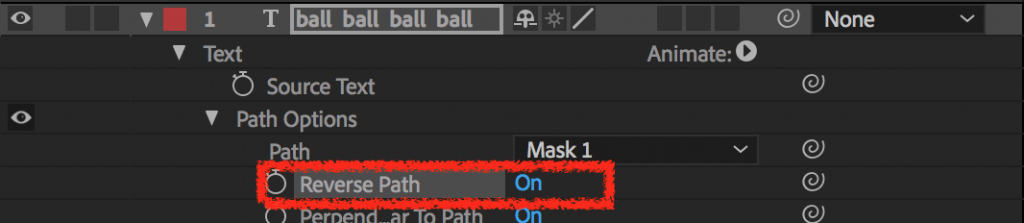
- By default, the text will be placed inside the shape. If you’d like the characters to sit on the outside, you can set the Reverse Path option to On
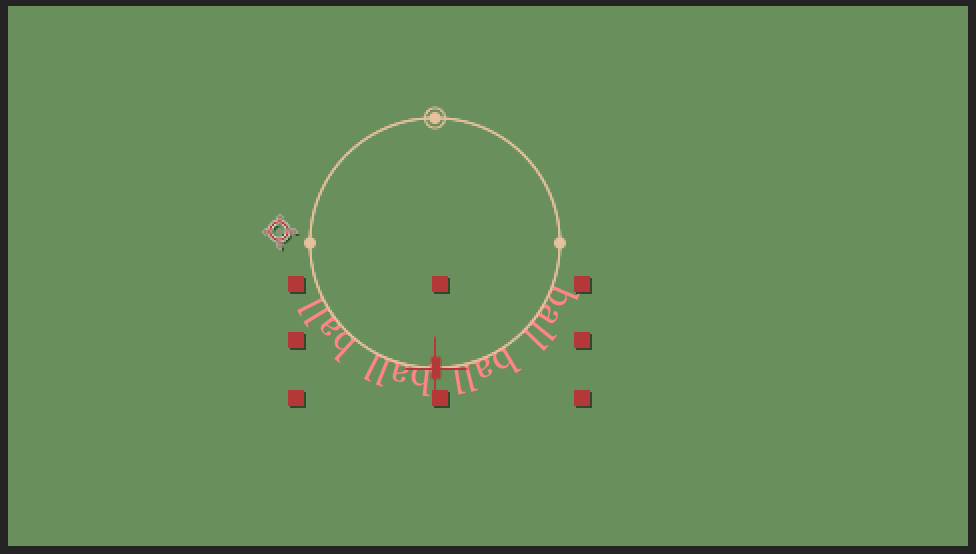
We’ll add a few more instances of the word to fill in our circle
- Activate the Text tool.
- Click on the existing text and type as many instances as you need to go all around the shape.

We could also adjust the Mask to accommodate the text:
- Select Mask 1 within the Masks tab.

- Activate the Selection tool and double-click on the Mask in the Composition window.
- Click and drag the transform box to change the shape’s dimensions.
This might be a good time to center our ball on the Composition:
- Make sure the Text Layer is selected in the Timeline.
- Go to Layer > Transform > Center Anchor Point in Layer Content.
- Go to Layer > Transform > Center in View
There are several ways we could animate this circle. We could use our basic Layer Transform properties to rotate the ball, but the Path Options can be used to create a similar effect (there are no right/or wrong workflow in this instance – just different possibilities):
- Set the Time Indicator to where you’d like the rotation to start (i.e: 0;00;00;00)
- Toggle the Path Options tab
- Click on the little Stop Watch next to the First Margin option and set its value to 0.
- Set the Time Indicator to where you’d like the rotation to end (i.e: 0;00;05;00)
- Set the First Margin option value to 360.
- Preview your animation by hitting the Spacebar. You will see your letters rotate around the shape. You can slow down or speed up the rotation by changing the value of the First Margin property.

For our next path, we’ll use the pen tool to create something a little more organic. We’ll use a single word and have it follow a “squiggly” path:
Let’s first create a new Text Layer:
- Make sure the “ball” text layer is inactive by activating the Selection tool and clicking outside the Composition
- Activate the Text tool
- Set the options in the Characters panel.
- Click on the Composition and type the word “bee” once

Next, we’ll draw the squiggly line we want this Text layer to follow as a Mask.
- Make sure the “bee” Text Layer is selected in the Timeline.
- Activate the Pen tool. Notice that there are no Fill/Stroke options since what ww draw will be applied as a Mask.
- Draw your “squiggle” by clicking, holding and dragging the Pen tool to create curves. Don’t worry about it being perfect on the first pass. You can always edit individual anchor points after the fact.
- Notice that a Mask tab has been created within the “bee” Text Layer
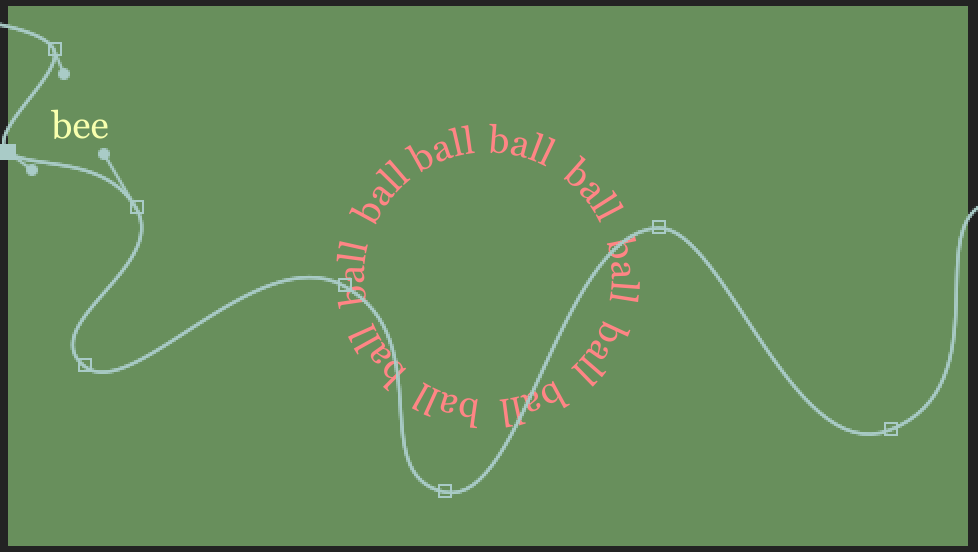

Next, we must tell our Text content to follow the Path defined by the Mask we just created:
- Toggle the little arrow next to the Text tab.
- Toggle the Path Options tab.
- In the Path dropdown, Select “Mask 1”
- Notice that the text is now anchored on the Mask.

Now. let’s define where we want the text to be along the path at the beginning and end of the animation.
- Set the Time Indicator to the beginning of the animation (0;00;00;00).
- In the Path Options tab, click on the little Stop Watch of the First Margin option and set its value to whatever will bring the text to the beginning of the path. This might be a high and negative number depending on the path you created.
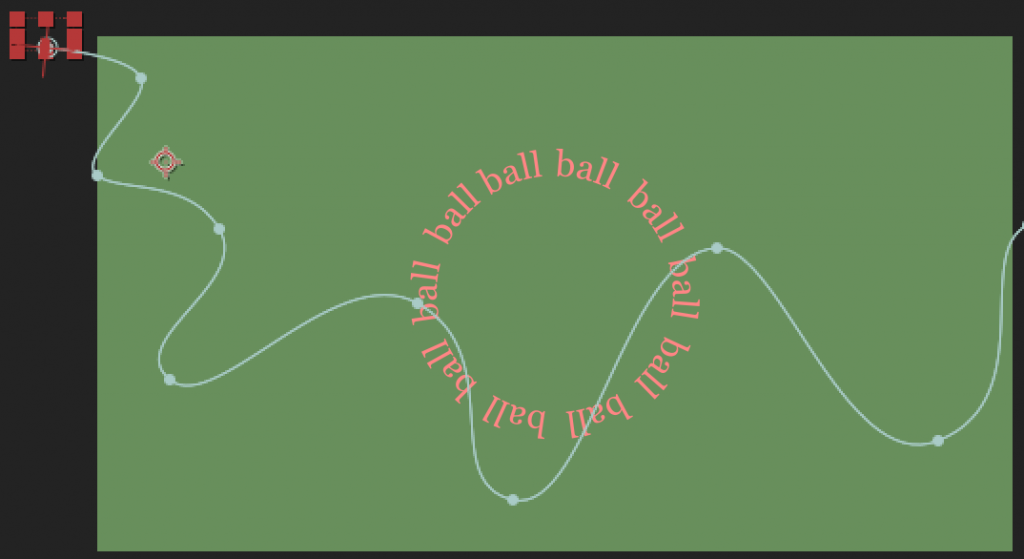
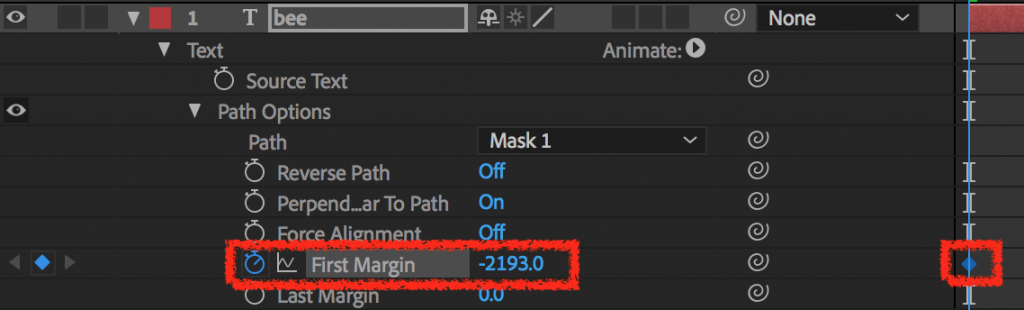
- Set the Time Indicator to the end of the animation (0;00;05;00).
- Set the First Margin value to whatever will bring the text to the end of the path.
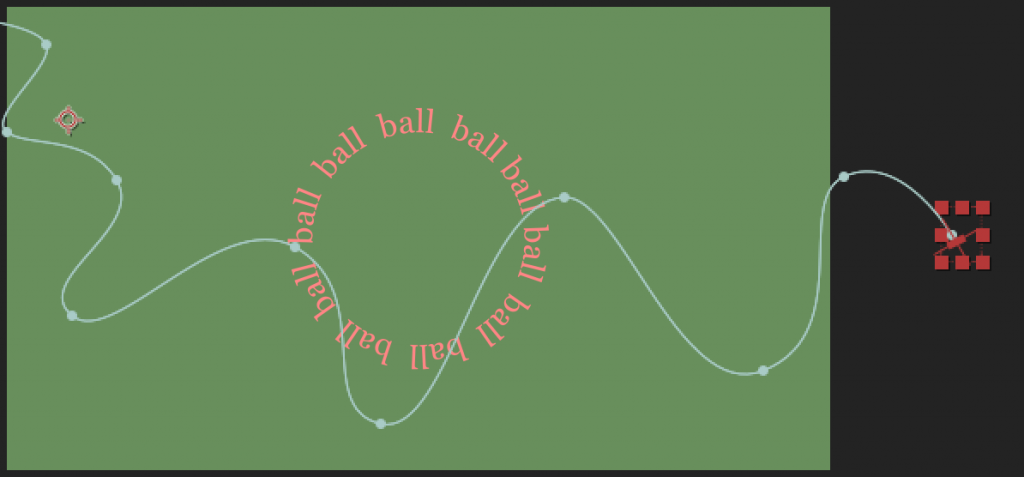
Preview your animation by hitting the Spacebar. The “bee” should be “flying” along the path.
Most of the text and images in this chapter are taken from Anna Pinkas’ “MMP260 – Introduction to 2D animation” course/website.
Further reading/resources:
- Get inspired: Kinetic Typography channel on Vimeo: https://vimeo.com/channels/kinetictypography
- After Effects CC 2018 Essential Training: Motion Graphics: Big picture concepts, Shape layer overview, Shape layers and transforms, Set type, Use text animators, Animate type on a path – Videos from Lynda.com (follow these instructions to Log In for free)
- Formatting characters and the Character panel & Formatting paragraphs and the Paragraph panel – Adobe’s After Effects User Guide
- There is a plethora of text animation presets accessible through the Effects & Presets menu. This site offers previews of all the different options: http://blog.motionisland.com/after-effects-presets-text-animation/
- Kinetic type with HTML/CSS/JS 10 Amazing CSS & JavaScript Text Animation Snippets