Walk cycles
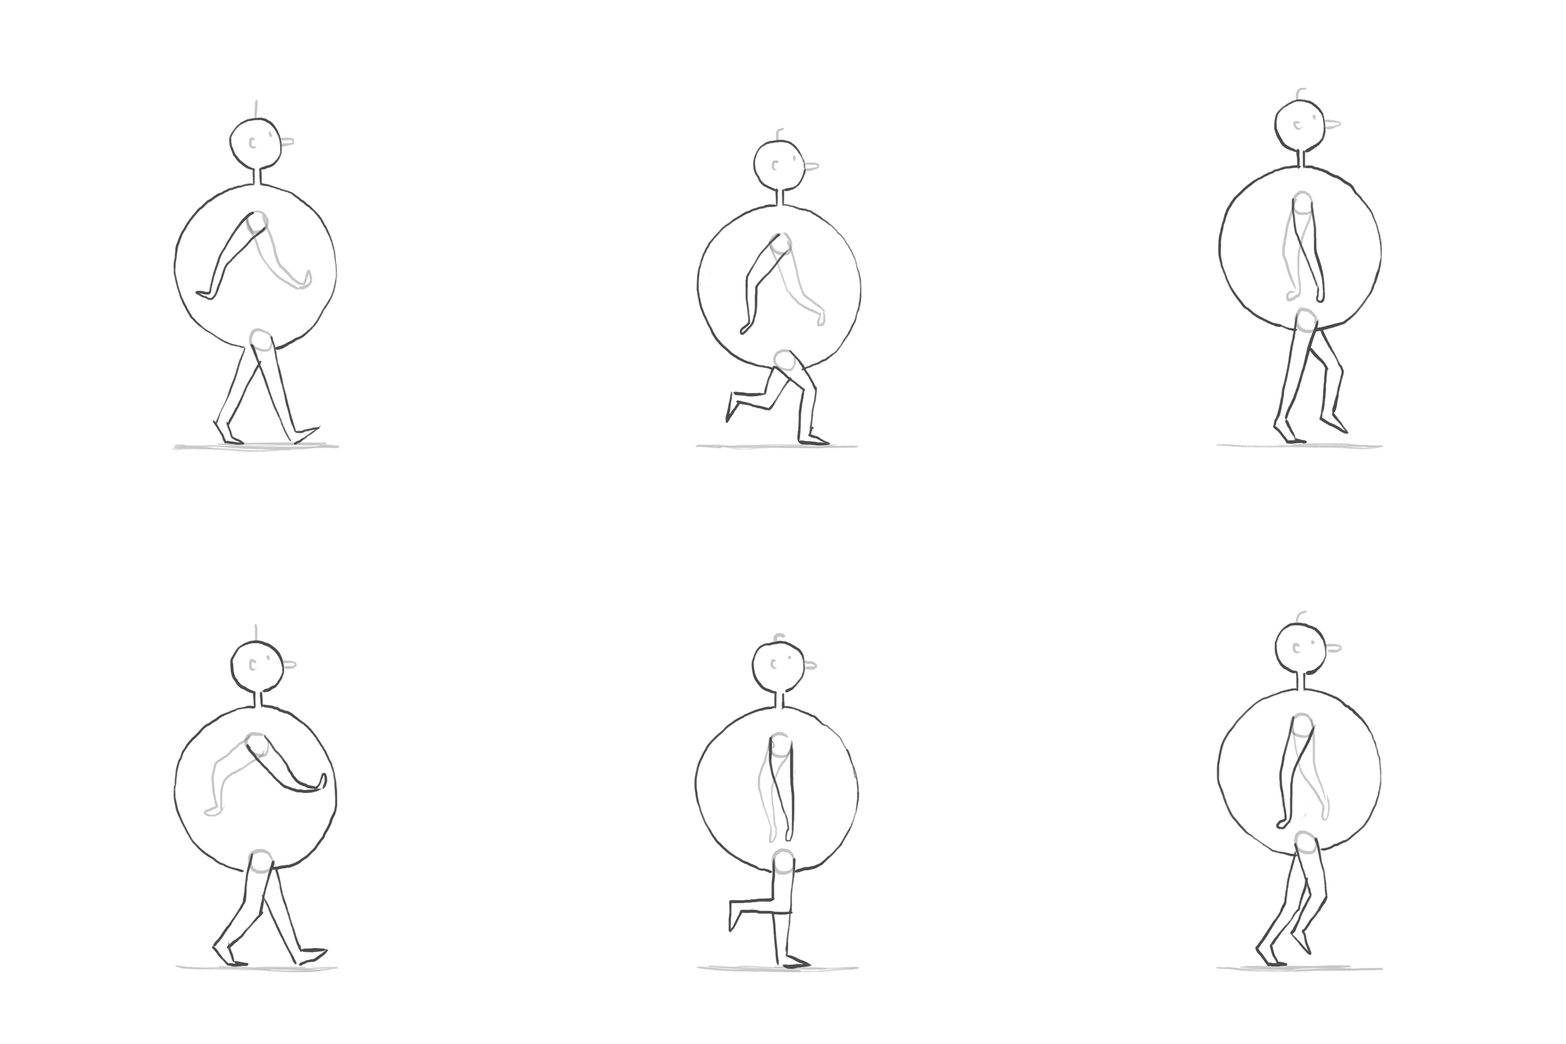
This week we will tackle the walk cycle: a looping cycle of your character walking. Creating a smooth and satisfying animated walk takes time and practice. Different walks will have different key poses and number of frames, but we’ll start with a pretty standard walk – assured, neither rushed nor slow. We will start with the legs and add the arms afterwards to keep things simple.
Key poses
Let’s break down the walk cycle into different key poses. We’ll start with:
- The contact pose: one foot is firmly on the ground, the other has just landed (usually with the heel first)
- The passing pose: the foot passes the one that was previously in front of it.

If you repeat and inverse these two poses, you get a choppy but physically sound walk cycle.


Next, we add two more key poses:
- The down pose (after the contact pose): the head is at its lowest in the cycle because the leg that just landed on the previous frame is now bent.
- The up pose (after the passing pose): the head is at its highest in the cycle because the leg that was just passed is lifting on its toes to propel the character forward.


Adding the arms
The arms usually swing in the opposite direction as the leg (i.e: if the left leg is extended forward, the left leg will be swinging back).
Adjusting the timing
Once you have the 8 basic key poses ready, you can adjust the speed and timing of your walk by adding in-betweens and/or extending certain frames.
Mood
The way a character walks can say a lot about his personality and current state of mind. Small adjustments in the timing, position and offset of the basic walk cycle above can drastically change a walk’s emotional connotation. For a sad walk for example:
- Make the up and down poses closer in height to diminish the bounce effect
- Lean the body forward
- Droop the arms (no back and forth/offset)
- Make the contact and down poses longer than the pass and up poses.

References
You can use the example above as a reference, but you can also find a lot of examples online by doing a search for “walk cycle” (i.e: these variations by Preston Blair) (this video uses a slightly longer cycle than the one above – 12 vs. 8 frames – but it’s a good summary of the mechanics at play). Acting out your character’s walk and recording it can also be really helpful.
Final project- step 2: walk cycle (rough)
Subject
This week, you will create a rough-draft of your character’s walk cycle. Your cycle should have (at least) 8 frames (see above) and should loop seamlessly. Try to match the walk to your character’s personality (happy/bouncy, sad/slow, shy/small etc…). If you have a wacom/tablet at home, feel free to use it! Otherwise, I recommend that you draft your poses with pencil and paper first and then translate them into digital frames in Animate by using the program’s basic shapes and pen tool (if you need a refresher on using the pen tool, I recommend this game: https://bezier.method.ac). Don’t worry about details now – just focus on the body, head, legs and arms – no facial features, clothes etc…
Here’s an example file of what I’m looking for (created without a stylus/tablet): https://drive.google.com/open?id=1h1LLY9iV2w9LTWArPYtQsl44fqWENWSC
Format
Use the following file format: 24fps, width: 1920px | height: 1080px. Save your .fla file and export your animation to an animated GIF (in animate, go to File > Export > Animated GIF).
Submission
Create a new post on your Open Lab portfolio. Your post should include your animated GIF (make sure you select Full Size when inserting your file) as well as a short description (reflections on your process, challenges, goals etc. are also welcome).
This assignment is due next week. Submit the following files on the following platforms:
- Blackboard: A link to your Open Lab post.
- Open Lab discussion board: Reply to the “Final project: walk cycle (rough)” discussion post with a link to your Open Lab post and .fla file.
This part of the final project. It will be taken into account in the final grade for the project (see full grading rubric here).