Storyboarding
What is a storyboard?
A storyboard is a series of panels on which a set of sketches is arranged to consecutively depict the important elements of the story. It is usually created before the animation and serves as a reference for the animator. Because the animation process is so time-consuming, proper planning through storyboarding can save animators a lot of time by making sure the entire scene works – visually and narratively – before animating each frame.
Although there are similarities between storyboards and comics (drawn, sequential art, narrative etc.) one crucial difference is the way the dialogue is presented: there are NO SPEECH BUBBLES within a storyboard panel.
History
The process of storyboarding was formalized at the Disney Studios in the 1930s. It was used to pre-visualize their first full-length film, “Snow White and the Seven Dwarfs” (1937) and for all their subsequent productions. Today, almost all animated films (and many live-action ones) are fully storyboarded before going into production.
This video shows how storyboards are often created and reviewed in a large studio like Pixar.
Process
While some filmmakers create their own storyboards, large productions often have a dedicated storyboard artist(s) who translate(s) the script into a visual narrative.
Storyboards are usually comprised of simple, sequential, rough, monochromatic drawings – created on a tablet or on paper. Some artists also like to use other drafting media, such as paint, pastels, charcoal etc.
A storyboard should include the following elements:
- Shot type: Define how far/close the “camera” is to the subject (i.e: close-up vs. long shot). Make sure you use a variety of shots to engage the viewer and bring attention to different details.
- Camera movement: Use arrows to signal camera movements (if any). This could include tilts (top-bottom), pans (left-right), zooms, and tracking shots.
- Movement within the frame: Use arrows to signal important movement within the frame (i.e: the character turning its head, a glass falling etc.)
- Captions: Dialogue, sound effects and music should be listed in the captions (often under or next to the panels). This area can also be used to clarify the action.

12 principles applied: staging
Staging is the animation principle which most directly relates to storyboarding: it refers to the process of presenting an idea in a way that is completely clear. When storyboarding a sequence, you are planning the actions, shots, camera movements, and sounds that will tell your story (or present your scene/character) in the most compelling way possible – thus applying the staging principle.
Almost all aspects of your animation should be taken into account when staging/storyboarding:
- When does an element appear and how long does it stay on the screen?
- If there is a secondary action (another principle) make sure it enhances the story/scene and doesn’t distract from your main point. Consider timing and placement in the frame.
- Are you picking the right camera shot for the right element (i.e: wide shot for taking in the entire scene or a broad movement; close-up for a subtle facial expressions).
Final project – step 2: storyboard walk cycle
Subject
Create a storyboard for your walk cycle. You should use a single view of your character (i.e: walking profile) (otherwise, you will have to create more animated versions of it), but instead of revealing the entire scene/character at once, use different shot types to focus the viewer’s attention on different details (i.e: the character’s jewelry, blinking eyes, its tail, a part of the background, a prop etc.). You should also include a title and credits (signal any movement of the text in the panel). Use the captions to write down audio elements (sound effects, music cues, voice over etc.). Don’t forget to indicate any movement within the frame or camera movement with arrows.
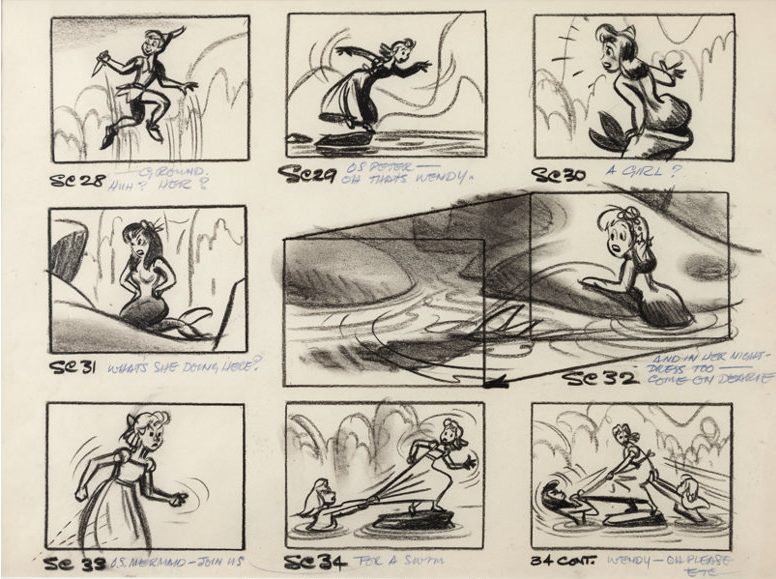
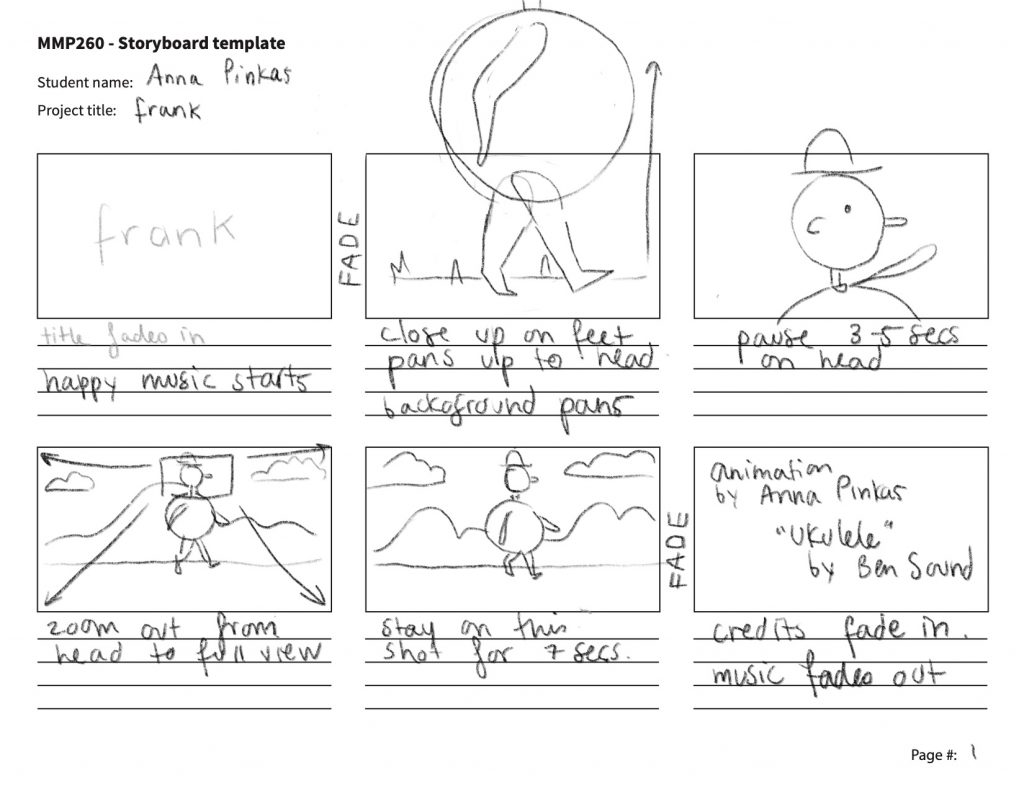
Here’s an example:
Format
The storyboard should be created on paper (or on a tablet). Print (or recreate) this template. If you decide to use a different template/create your own, make sure that there are 6 panels per page and that they abide to the HD aspect ration (16:9). Scan, export or take a photo of your storyboard to turn it into a digital file (JPG or PDF).
Submission
Create a new post on your Open Lab portfolio. Your post should include your storyboard as well as a short description (reflections on your process, challenges, goals etc. are also welcome).
This assignment is due next week. Submit the following files on the following platforms:
- Blackboard: A link to your Open Lab post.
- Open Lab discussion board: Reply to the “Final project: storyboard” discussion post with a link to your Open Lab post
This is part of the final project. It will be taken into account in the final grade for the project (see full grading rubric here).