While you can create shapes and designs to be animated directly in After Effects, doing so in Adobe Illustrator can be easier (since Illustrator is a software solely dedicated to creating vector Graphics).
In this tutorial we’ll analyze, import and animate two icons created in Illustrator. ou can watch the finished example below and download the .aep file here.
Creating and preparing Illustrator files
Adobe Illustrator and Adobe After Effects are both part of the Adobe Suite. Their interfaces and set of tools are very similar. While we don’t have time to delve into Illustrator itself in this class, you can refresh your memory with online tutorials (see Suggested Resources section on the After Effects (continued) page). For this example, we’ll use two files that were already sized and organized with the purpose of importing and animating them in After Effects. You can download the Basketball and Globe Illustrator files here. (Credits: Icons made by Freepikfrom www.flaticon.comis licensed by CC 3.0 BY)
Let’s open them in Illustrator and analyze them before importing them. These are things you should keep in mind when creating your Illustrator files for animation purposes:
- The Artboard is 1920 x 1080px (the same size as the full HD setting in After Effects)
- Each layer that needs to move independently is on a separate layer
- Each layer is clearly labeled
Importing an Illustrator file into After Effects
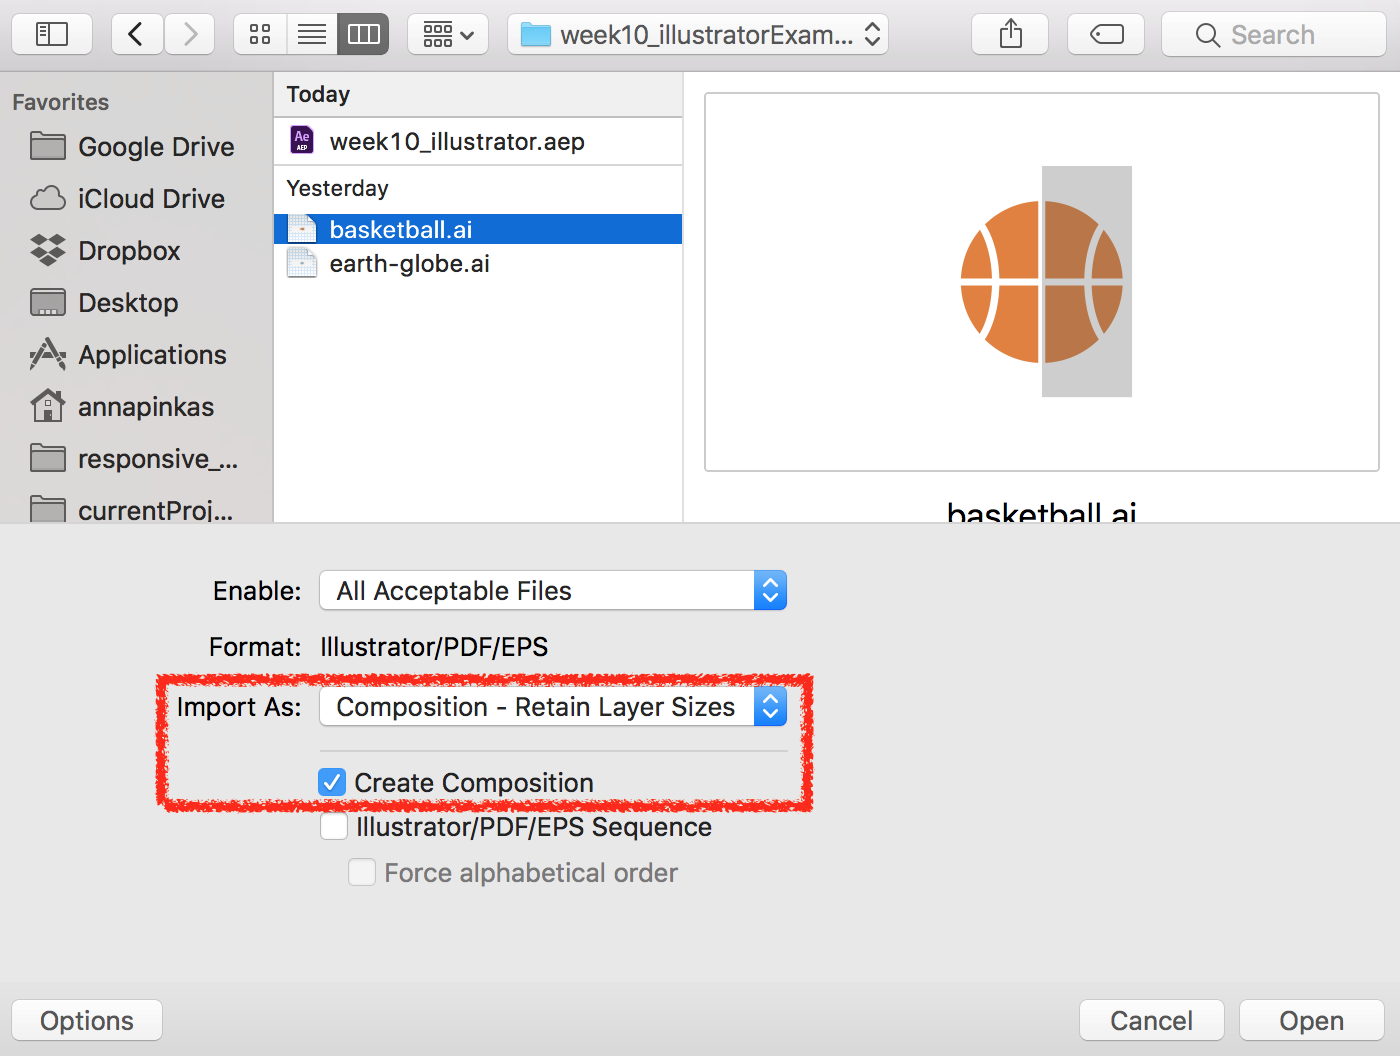
When importing an Illustrator file into After Effects, you can ask the software to automatically create a new Composition for it:
- Go to File > Import > File…
- Select the first file which will be animated (i.e: basketball.ai), set the Import Asdropdown to Composition – Retain Layer Sizes, and check the Create Composition box. Once you press Open, You’ll notice that a new Composition and Layers folder were added to the Project panel.

- Double-click on the “basketball” Composition. You’ll notice that all the layers that were created and labeled in Illustrator appear on independent layers in the Timeline window.

- By default, the Composition has a Black background, is 5 seconds long and is the same size as the Illustrator file, but you can change these settings by going to Composition > Composition Settings… (In this case, we will change the Duration to 0;00;04;00 and the Background Color to a light yellow : #FFF5C1)
Animating Illustrator layers
Each Illustrator layer has the same basic Transform properties as a layer created directly in After Effects. You can see all of them by toggling the arrow to the left of the layer’s name and then the Transform tab. In this example we’ll use Keyboard Shortcuts to access specific properties.
Let’s start by animating the ball popping up on the screen:
- Hide all the layers except for “ball”
- Set the Time Indicator to where you’d like the ball to reach its full size (i.e: 0;00;00;15)
- Activate the ball layer by clicking on it once in the Timeline
- Press the Skey to open up the layer’s Scale property
- Press on the little Stop Watch icon to set a Keyframe
- Set the Time Indicator to where you’d like the ball to start growing (i.e: 0;00;00;00)
- Set the Scale values to 0.0, 0.0%
- Select the 2 Keyframes you just created and press F9 to set them to Easy Ease

Next, we’ll get the white horizontal and vertical lines to appear on the screen. We want the vertical one to “grow” from top to bottom and the horizontal one from right to left. To do this, we’ll create a Track Matte based on the ball layer so that, no matter their position, the lines are only visible if they’re within the ball.
- To create the Matte
- Reveal the “centerVerticalLine” layer
- Activate the “ball” layer
- Copy it (Command + D)
- Drag the copy just above the “centerVerticalLine” layer
- Toggle the Mode until you see the TrkMat option
- Set the “centerVerticalLine’s” TrkMat dropdown to Alpha Matte “ball 2” (telling it to use the layer above as a Matte)
- Repeat for the “centerHorizontalLine” layer

- Now let’s animate the vertical line:
- Set the Time Indicator to where you’d like the vertical line to be fully visible (i.e: 0;00;00;20)
- Activate the “centerVerticalLine” layer
- Press the Pkey to open up the layer’s Position property
- Press on the little Stop Watch icon to set a Keyframe
- Set the Time Indicator to where you’d like the vertical line to start growing (i.e: 0;00;00;17)
- Decrease the Position’s Y value until the vertical line is entirely above the ball/invisible (i.e: 60)
- Select the 2 Keyframes you just created and press F9 to set them to Easy Ease
- Repeat these steps for the horizontal line. Staggering the animation of the two layers will create a more dynamic motion (i.e: get the horizontal line to start/end a bit later (i.e: 0;00;00;19 – 0;00;00;22)

For the side curved lines, we’ll just have them pop up. We’ll still create a Track Matte to constrain them to the ball’s edges (in case we want to increase their size or change their position later on).
- Create a Track Matte for the “leftCurve” layer based on the “ball” layer (follow the steps above – for the “centerVerticalLine” layer)
- Let’s animate the left curve popping up in place:
- Activate the “leftCurve” layer and press the Skey to bring up its Scale property
- Set the Time Indicator to where you’d like the curve to reach its final size (i.e: 0;00;01;00)
- Press on the little Stop Watch icon to set a Keyframe
- Set the Time Indicator to where you’d like the curve to start appearing on the screen (i.e: 0;00;00;25)
- Set the Scale values to 0.0, 0.0%
- Select the 2 Keyframes you just created and press F9 to set them to Easy Ease
- Repeat these steps for the “rightCurve”, once again staggering the animation (i.e: get the right curve to start/end a bit later (i.e: 0;00;00;27 – 0;00;01;02)

We’ll finish up the ball’s appearance by swiping the shadow from the right:
- Create a Track Matte for the “shadow” layer based on the “ball” layer (follow the steps above – for the “centerVerticalLine” layer)
- Let’s animate the shadow appearing from the right:
- Activate the “shadow” layer and press the Pkey to bring up its Position property
- Set the Time Indicator to where you’d like the shadow to reach its final position (i.e: 0;00;01;05)
- Press on the little Stop Watch icon to set a Keyframe
- Set the Time Indicator to where you’d like the shadow to start appearing on the screen (i.e: 0;00;01;00)
- Increase the Position’s X value until the shadow is to the right of the ball/invisible (i.e: 1320)
- Select the 2 Keyframes you just created and press F9 to set them to Easy Ease

Adding layers from another Illustrator file into the Composition
In the finished example, our goal is to smoothly transition from one vector icon to another (see finished example video at the top of this page). In order to do this, we’ll need to import the second Illustrator file and copy its layers onto the Composition we already started animating:
- Go to File > Import > File…
- Select the second Illustrator file (i.e: earth-globe.ai), set the Import Asdropdown to Composition – Retain Layer Sizes, and check the Create Composition box.
- Double-click the newly created “earth-globe” Composition
- Select all the layers and Copy them (Command + C)
- Double-click the “basketball” Composition in the Project panel to open it
- Paste all the layers from the “earth-globe” Composition (Command + V)
- We’ll change the color of the “earth-globe” layers to differentiate them from the basketball ones:
- While all the layers are still selected (or select them again), click on the little Color Swatch to the left of the layer name and select a different color.

We’ll crop these new layers’ Timeline until we want to start using them:
- Set the Time Indicator to when the first “earth-globe” layer will start appearing on the screen (0;00;02;10)
- Make sure all the “earth-globe” layers are still selected
- Press Alt + [to cut anything to the left of the Time Indicator

Transitioning from one vector icon to another
Next we’ll work on transitioning from the basketball to the globe.
We’ll start by removing each detail (starting from the most recent and working our way backwards) until we are left with only the orange ellipse. Let’s start with the shadow:
- We’ll first hold the basketball in its finished state for a few frames:
- Set the Time Indicator to where you’d like the shadow to start disappearing (i.e: 0;00;01;20)
- Activate the shadow layer and press the PKey to open up its Position property
- Without moving the Time Indicator, select the last Keyframe on the layer’s Position Timeline, copy it (Command + C)and paste it (Command + V)

- Now let’s have the shadow recede from where it came from:
- Set the Time Indicator to where you’d like the shadow to be completely gone (i.e: 0;00;01;23)
- Increase the value of the Position’s X value, until the shadow is to the right of the ball/invisible (i.e: 1320). Alternatively, you could copy and paste the Keyframe from the point where you started the shadow animation (0;00;01;00)

Next, we’ll remove the white lines. Instead of animating them separately, we’ll get all of them to slightly expand and then scale down at the the same time:
- Select the “rightCurve”, “leftCurve”, “centerHorizLine” and “centerVerticalLine” layers (by holding the Commandkey)
- Press the Skey to open up their Scale property
- Set the Time Indicator to where you’d like the lines to start expanding (i.e: 0;00;01;20)
- Click on the little Stop Watch to set a Keyframe. Since the “leftCurve” and “rightCurve” layers already have some Keyframes on their scale property, you’ll have to click on the little diamond at the very left of the Timeline window to add a Keyframe

- Set the Time Indicator to where you’d like the lines to end their expansion and start disappearing (i.e: 0;00;01;25)
- Increase the value of one of the layer’s Scale property (i.e: 140.0, 140.0%). If they are still all selected, the change in value and new Keyframe should be applied to all four layers.
- Set the Time Indicator to where you’d like the lines to be completely gone (i.e: 0;00;02;00)
- Decrease the value of one of the layers’ Scale property (i.e: 0.0, 0.0%). Again, if they are still all selected, the change in value and new Keyframe should be applied to all four layers.
- Select any Keyframe that isn’t set to Easy Ease yet and press F9

Now that all we have left is our orange ellipse, let’s have it expand slightly and then decrease to the size of the globe:
- Set the Time Indicator to where you’d like the ball to start its expansion (i.e: 0;00;02;00)
- Select the “ball” layer and press the SKey to open up its Scale property
- Copy and Paste the last Keyframe on the Timeline (or click on the little Diamond icon on the left) to add a Keyframe without changing the current values.
- Set the Time Indicator to where you’d like the ball to reach the end of its expansion (i.e: 0;00;02;05)
- Increase the Scale values (i.e: 120.0, 120.0%)
- Set the Time Indicator to where you’d like the ball to match the globe’s size (i.e: 0;00;02;10)
- Decrease the Scale values until the two ellipses match (i.e: 69.0, 69.0%) (zoom into the Composition to make sure you are precise)
The final step of the transition (before just focusing on adding the globe details), is to get the globe’s blue ellipse to cover the ball’s orange one:
- Hide all the “earth-globe” layers except for the “earth” one
- Set the Time Indicator to where you’d like the blue ellipse to fully cover the orange one (i.e: 0;00;02;15)
- Activate the “earth” layer and press the S Key to bring up its Scale property
- Click on the little Stop Watch to set a Keyframe
- Set the Time Indicator to where you’d like the blue ellipse to start appearing (i.e: 0;00;02;10)
- Decrease the Scale values to 0.0, 0.0%

Now that we’ve completely removed the “basketball” layers from view let’s crop them:
- Set the Time Indicator to where no basketball layer is visible anymore (i.e: 0;00;02;15)
- Activate all the basketball layers
- Press Alt + ] to cut anything to the right of the Time Indicator

Next, we’ll get all the continents to pop up on the screen:
- Reveal and activate the “Americas”, “Europe”, “Africa” and “England” layers
- Press on the S Key to bring up their Scale property
- Set the Time Indicator to where you’d like all these layers to reach their full scale (i.e: 0;00;03;00)
- Click on one of the little Stop Watch icon. If all the layers are still selected, the Keyframe should be applied to all four layers.
- Set the Time Indicator to where you’d like all these layers to start appearing on the screen 0;00;02;25)
- Decrease the value of one of the layer’s Scale property (i.e: 0.0, 0.0%). Again, if they are still all selected, the change in value and new Keyframe should be applied to all four layers.
- Select all the new Keyframes and press F9 to set them to Easy Ease
- The animation will be a little more fun if each layer’s appearance is a bit staggered. Select and shift each layer’s set of frames slightly

Now let’s get our “metal” and “stand” layers around the earth. The metal piece will come from the right, the stand from the bottom:
- Reveal the “metal” and “stand” layers
- Set the Time Indicator to where you’d like the stand and metal to reach their final position (i.e: 0;00;03;05)
- Activate the “metal” and “stand” layers and press the P Key to bring up their Position property
- Click on one of the layers’ Stop Watch to set a Keyframe on both Timelines
- Set the Time Indicator to where you’d like the metal layer to start entering the Composition (i.e: 0;00;03;00)
- Make sure only the “metal” layer is active
- Increase the “metal’s” Position propert’s X value until the metal is out of view (i.e: 2110)
- Set the Time Indicator to where you’d like the stand layer to start entering the Composition (i.e: 0;00;03;03)
- Make sure only the stand layer is active
- Increase the “stand’s” Position property’s Y value until the stand is out of view (i.e: 1130)
- Select all the Keyframes you just created and set them to Easy Ease by pressing F9

Finally, let’s add the “earth’s” and “stand’s” shadows:
- Reveal the “earthShadow” and “standShadow” layers
- Add a Track Matte to both layers, using a copy of the “earth” layer for the “earthShadow” and one of the “stand” layer for “standShadow”
- Set the Time Indicator to where you’d like both shadows to reach their final position (i.e: 0;00;03;10)
- Activate the “earthShadow” and “standShadow” layers and press the P Key to bring up their Position property
- Click on one of the layers’ Stop Watch to set a Keyframe on both Timelines
- Set the Time Indicator to where you’d like both layers to start entering the Composition (i.e: 0;00;03;05)
- Make sure only the “earthShadow” layer is selected
- Click and drag the earth’s shadow in the Composition so that it comes at an angle from the top left of the earth. Notice that this will automatically create a new Keyframe
- Make sure only the “standShadow” layer is selected
- Click and drag the earth’s shadow in the Composition so that it comes from the right side of the stand.
- Select all the Keyframes you just creates and set them to Easy Ease by pressing F9

Preview your animation. You should now have a smooth transition and a completed globe.
Converting an Illustrator Layer into an editable Path
One challenge we didn’t encounter in this example, but that could come up, is what to do if changing a layer’s basic Transforms (i.e: Scale, Opacity, Position etc.) is not enough. What if we need to change an Illustrator Layer’s overall shape (i.e: going from a ball to a coffee cup)
Illustrator Layers are imported as parametric shapes, but we can turn them into editable Bezier Paths:
- Right-click on the Illustrator layer you want to transform into an editable Path and select Create > Create Shapes from Vector Layers. You’ll notice that the original layer is now hidden and that a new one called “nameOfOrigianLayerOutlines” was created right above it.
- Toggle the arrow to the left of the new Layer and go to Contents > Group 1 > Path 1
- Set your Time Indicator tho where you’d like the shape to start morphing
- Click on the Path1’s Path’s Stop Watch icon to set your first Keyframe
- Set the Time Indicator to where you’d like the morph to be complete
- Use the Pen, Add/Remove Vertex, Convert Vertex and Selection tools to edit and move Vertex points to change the overall shape.

