Key Concepts
Straight Ahead vs. Pose to Pose
You can approach an animation sequence in two ways:
- Straight ahead animation means you start on frame 1 and add each subsequent frame chronologically. This approach works particularly well for fluid movements such as that of smoke, water, fire etc.
- In the pose-to-pose approach, you create the key poses first and fill in the blank. This is more commonly used for character animation. It makes drawing the in-between frames (see below) much easier and helps in planning the speed and timing of the action.
This concept is also part of the 12 principles of animation. You can watch the video example here.
In-betweens and Breakdwons
In-betweens are the drawings between keyposes (or keyframes). They define the smoothness of the action. Let’s take the example of a head turn: if the action lasts 24 frames, but there are only 2 in-between drawings between the frame 1 and frame 24, the animation will feel quite choppy. The more drawings I have to gradually move from one head position to the next, the smoother my animation will be.
This doesn’t mean you should always have the same number of in-betweens per keyframes. In-betweens also control the speed of the action. If I want the second half of my head turn to go faster than my first half, I will create fewer frames (thus fewer in-betweens per keyframes).
Breakdowns are transitional drawings: they can help you “break down” an action before you start drawing all the in-betweens. The breakdown drawing go our head turn example may be a pose midway through the action, with the head facing down and the eyes blinking. You would typically draw a breakdown after the key pose and before the in-betweens.
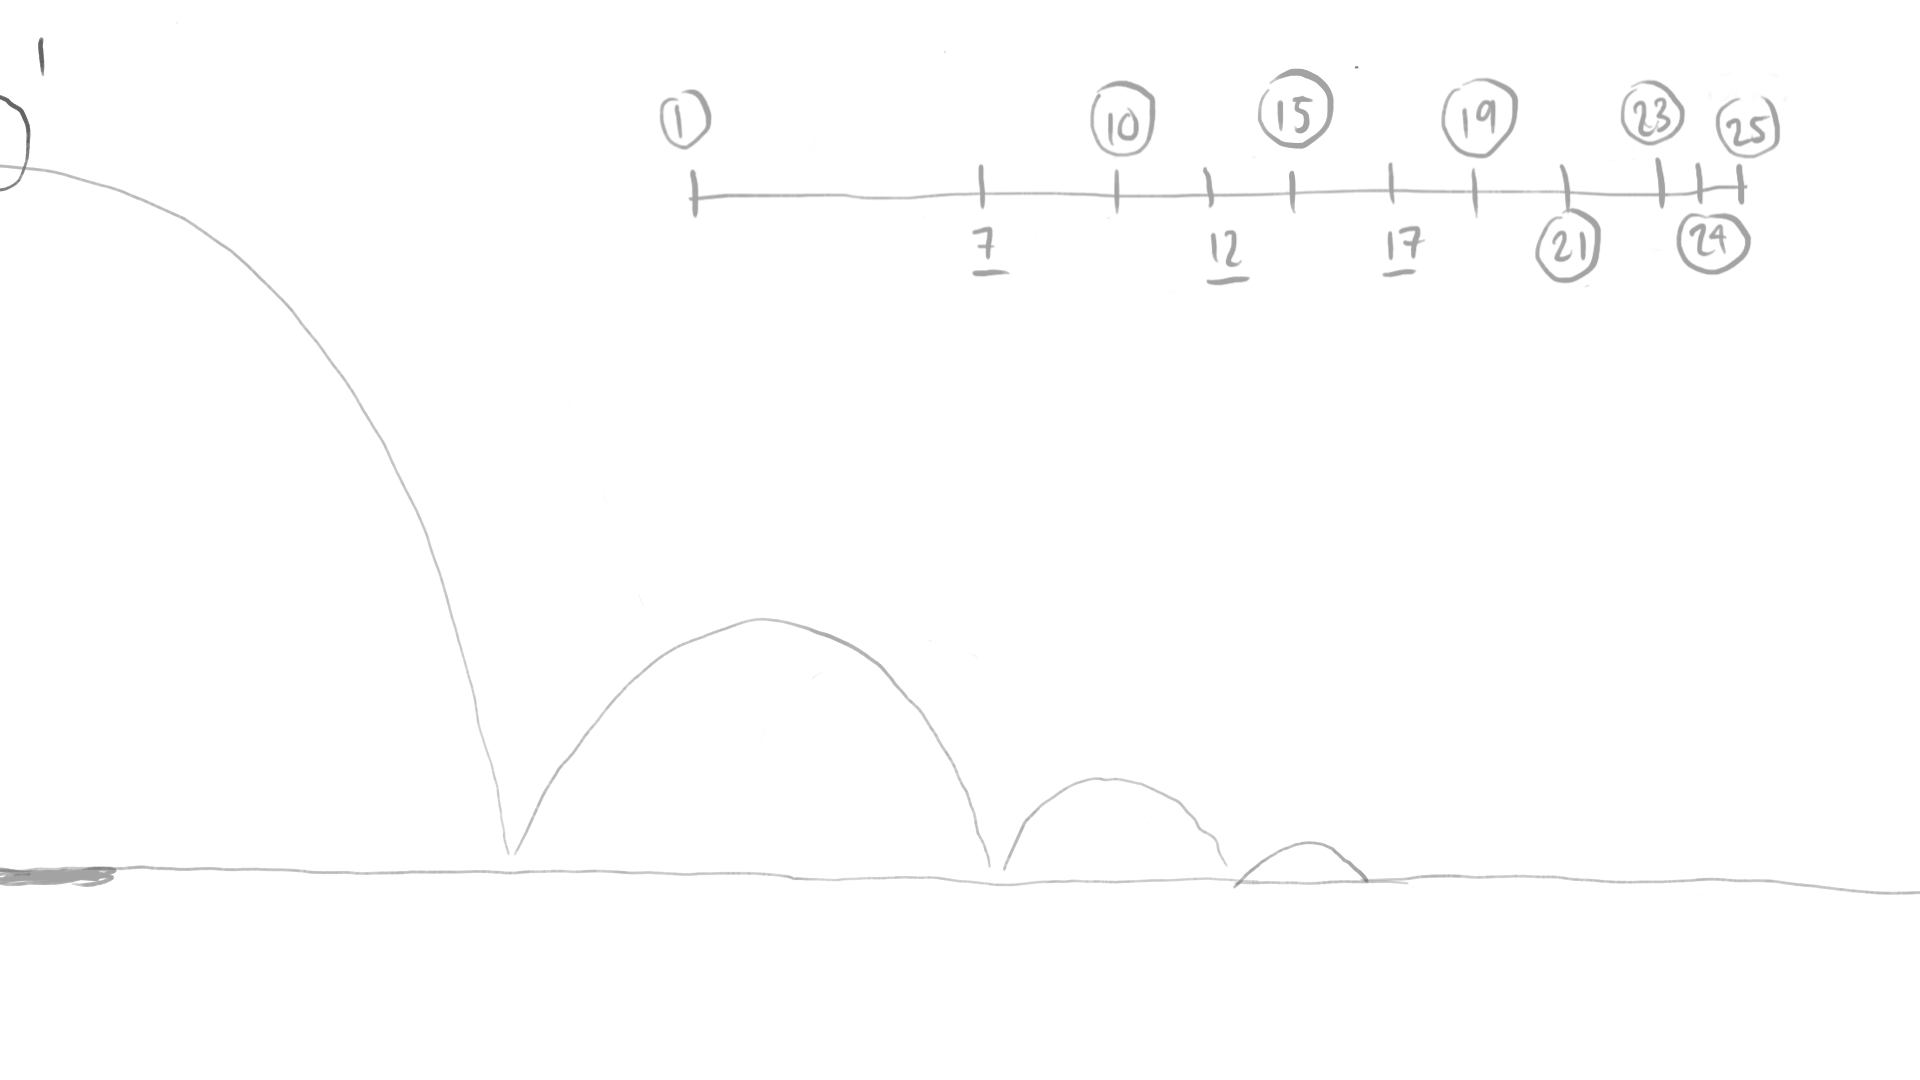
Timing Charts
A timing chart can help you plan how many breakdowns and in-betweens you’ll need to complete your action.
It’s a straight line starting and ending with the first and last keyframes of the action. Each perpendicular stroke on the line represents a separate drawing. There are a few design rules you can follow to make your timing chart as clear as possible:
- A keyframe should be circled
- A breakdown should be underlined
- An arch bridging three steps on a timing chart means that the two halves are equal
12 Principles Applied: Arcs and Timing
Let’s review two other important principles of animation: Arcs and Timing (Don Hertzfeldt’s “Billy’s Balloon” (1998) is a great example of how timing can be used for comedy) and let’s apply them to an animation of a ball bouncing across the screen. Here are some things to keep in mind as you draw your frames:
- Start by creating a guide layer with a line for the ground and arcs representing the path of the ball.
- The pose-to-pose approach is better suited for this exercise. Create your keyframes first and fill in the in-betweens afterwards.
- Consider creating a timing-chart to plan your animation.
- Timing and Slow-in & Slow-out are related. There will be fewer in-betweens as the ball gets closer to the ground, and the action will slow down (more in-betweens) at the top of the arcs.
- Don’t forget about Squash & Stretch (including keeping the volume consistent).
Assignment: Ball #2
Subject
Use Adobe Animate to create an animation of a ball falling from a cliff and bouncing a few times before coming to a stop. Apply the squash & stretch and slow-in & slow-out principles you used for your last assignment AND carefully apply 2 more: arcs, and timing. Anticipation can also enhance your animation (i.e: have the ball hover at the edge of the cliff before falling, have the ball move back and forth very slightly a few times before coming to a full stop etc.).
Format
Use the following file format: 24fps, width: 1920px | height: 1080px. Save your .fla file and export your animation to Quicktime (review exporting instructions on the week 2 page). Upload your animation to Vimeo or Youtube
Submission
Create a new post on your Open Lab portfolio. Your post should include a link to your Vimeo or Youtube video as well as a short description (reflections on your process, challenges, goals etc. are also welcome).
This assignment is due next week. Submit the following files on the following platforms:
- Blackboard: .fla file and a link to your Open Lab post.
- Open Lab discussion board: Reply to the “Study#3: Ball#2” discussion post with a link to your Open Lab post
The grading rubric for this assignment can be found here.