In Brightspace, the quiz tool is used for quizzes, tests, and exams. This page for instructors explains how to set up a quiz, add questions, choose settings, present it to students, and more.
Getting Started with Quizzes
- On the navigation bar, click Course Tools and select Quizzes.
- On the Manage Quizzes page, click New Quiz.
- Enter the Name for your quiz.
- In the Grade Out Of section, you can choose to Edit or Link to Existing, which links the quiz to an existing grade item (column) in the Grade Book, or you can choose to Add to Grade Book to create a new grade item.
- Important: Select the Due Date. Due dates throughout Brightspace are useful because they’re automatically entered on students’ calendars and students will get reminders about due dates on their phones (if they’ve downloaded the free Pulse App).
- Enter an optional Description into the text field.
Managing Questions
Next, you are ready to add questions and choose appropriate settings.
From the quiz itself, you can choose to either “Add Existing” or “Create New” questions. While you could just build questions within the quiz, D2L recommends that you create and keep questions in the Question Library.
Then, after the Question Library is populated with questions, from the quiz, you choose “Add Existing” and then “Browse the Question Library.”
Create or Import Questions from the Question Library
In the Question Library (QL), you can create, import, and organize all the questions you’ll use in quizzes or tests. You can also create “Sections” (which are essentially folders) and easily move questions into or out of them. You also have the option to use the QL Sections as pools for creating randomized quizzes.
From the Quizzes page, click on the Question Library.
Then, click the “New” button to set up Sections (which are essentially folders), or just start creating questions first and, optionally, move them into Sections later.
Types of Questions Available in Brightspace:
- True or False Question (T/F)
- Multiple Choice Question (MC)
- Multi-Select Question (M-S)
- Written Response Question (WR)
- Short Answer Question (SA)
- Multi-Short Answer Question (MSA)
- Fill in the Blanks Question (FIB)
- Matching Question (MAT)
- Ordering Question (ORD)
- Arithmetic Question (2+2)
- Significant Figures (x10)
- Likert Question (LIK)
Importing Questions from Another Brightspace Course
To do this, we don’t work from within the Quizzes page, but we’ll go to the “Import/Export/Copy” area.
- Click the Gear icon on the top right of Brightspace and choose “Import/Export/Copy Components.”
- Choose “Copy Components from another Org Unit” (which means course) and click “Search for offering.”
- On the next page, you want to search for the course you want to copy from. Click “Search for Offering” and then enter a partial title or a single word that’s in the course title. (It will only search courses you have access to). Then, click “Search”, and when you’ve selected the course you want to copy from, click the “Add Selected” button at the bottom.
- Now that the course you’re copying from is shown as z click the “Select Component” button at the bottom of page.
- Scroll down to either Quizzes or Question Library and choose all or a specific element. You might need to click “Expand All” to see what’s available. Select the questions or sections you want, and click continue.
- Click Finish. This may take a few minutes to complete. Once the copying is completed, you can find your copied elements either in the Quiz list or in the Question Library.
Move questions from existing Quizzes in the same course into the Question Library
Quizzes can include bonus (or extra-credit) questions in them. Questions that won’t hurt the student’s overall score if they don’t get them correct, but can improve the student’s score if they do get them correct.
- Select the extra-credit (bonus) question(s)
- Click More Actions and select Toggle Bonus from the dropdown menu
- The text “BONUS” appears under the point value of the question (far right)
- De-select the question(s) when done.
- Click Save
Note: The questions that are ‘bonus’ will not calculate into your total points for the quiz
Utilize the Quiz Settings
Availability Date Ranges and Other Access Restrictions
This setting is what will automatically hide and reveal a quiz on the dates/times you designate.
- On the Manage Quizzes page, click on the quiz to edit it.
- In the Availability Dates & Conditions section on the right, do any of the following:
- Set the opening date/time when students can take the quiz and closing date/time when it will no longer be available. Bear in mind:
- If you check the box to include availability dates on their calendars, the pros are that they will be able to plan for what’s coming. The cons are if you have a lot of activities on your course calendar, it may add confusing clutter.
- If you’ve provided a link to the quiz within a Content Module (see “Linking to Quizzes in Content Modules” below), they will see an unclickable link to it there and its dates of availability. (This is only if you haven’t also manually set its display to “hidden” – indicated by the eye/slash icon. In that case they will see nothing. You will need to manually change that setting to “Visible” for students to see or take the quiz.)
- Set the opening date/time when students can take the quiz and closing date/time when it will no longer be available. Bear in mind:
- Optional: Enter Release Conditions. This is where you can choose to have students complete something else before they get access to the quiz. Read more about release conditions on the Brightspace Community site.
- Optional: Enter Special Access. IMPORTANT: This is NOT where you enter accommodations settings. See below for quiz accommodations This is where you can grant access to specific students for perhaps a one-time different time period and with a different due date from the rest of the class. In the Special Access area, select your type of access and click Add Users to Special Access. Then specify properties: Due date and Availability Dates.
- Optional: Enter a Password.
Hide a Quiz or Make it Visible

Hidden/Visible overrides any other setting. So, if a quiz is set to be “Hidden,” students won’t be able to see it even after the availability date begins (see availability dates above). You can see if a quiz is hidden because an icon with an eye appears next to it.
To hide or show a quiz, manually:
- On the Manage Quizzes page, click the down arrow next to the quiz title and choose “Hide from Users.” Then, to reveal it, the select the option to “Make Visible to Users
- Alternatively, when editing a quiz, you can toggle between “Hidden” and “Visible” at the bottom of the page near the Save button. You can also hide and reveal it where it’s linked in a Content Module.
Bear in mind that hiding is only controlled manually by you or a TA. You will have to manually set it to visible.
Timing & Display of Quizzes
In the Timing & Display area, select a timing option for the quiz:
- For an untimed quiz, uncheck “Set Time Limit”
- If you do want to “Set Time Limit” you have several options to select
- Enter the minutes
- Click “Timer Settings”
- Choose from the settings described and click “OK”
- Note: The grace period option no longer exists
- Choose Paging option – how many questions displayed per page
- Choose whether to shuffle the questions
- Display: Hints are optional additions you can add to questions
- Disabling Email, etc. is not recommended as it only pertains to Brightspace tools
- Header and Footer are optional but be aware that if you have chosen to display one question per page, the header and footer will appear on each page.
Attempts & Completion
In the Attempts & Completion drop-down, you can do any of the following:
- To change the number of attempts allowed, click Manage Attempts.
- Set how many attempts a learner can make on a quiz.
- To allow learners to only retake incorrect questions, select the On new attempts, only allow answers for previously incorrect questions checkbox. For more information on how this affects learners, refer to Retake incorrect questions in subsequent attempts
- If the number of attempts allowed is greater than 1, you must determine how the final grade is calculated. From the Overall Grade Calculation drop-down menu, select one of the following options:
- Highest Attempt – Only the attempt with the highest grade is used as the final grade.
- Lowest Attempt – Only the attempt with the lowest grade is used as the final grade.
- Average of all Attempts – The average of the grades on all attempts is calculated and used as the final grade.
- First Attempt – Only the grade on the first attempt is used as the final grade.
- Last Attempt – Only the grade on the last attempt is used as the final grade.
- If the number of attempts allowed is greater than 1, an optional feature under + Attempt Conditions allows you to determine minimum and/or maximum scores that must be achieved by the learner to obtain the additional attempts.
Note: If you enter a minimum score, then learners must achieve that set minimum score to receive the subsequent attempt. For example, if you only want learners who receive greater than 50% to receive a subsequent attempt, you can enter that value in the Min % field.
If you enter a maximum score, then learners can achieve up to that limit to receive subsequent attempts, but not greater than that limit. For example, if you only want learners who receive below 80% on the quiz to receive an additional attempt, you can enter that value in the Max % field.
- Category: Categories of quizzes can be set up on the Quiz page so that you can organize them into related chunks. For instance, weekly quizzes could be one category and exams another. Important! These categories only pertain to the Quizzes page. They do not have any relationship to categories in the Grade Book.
- Email Notifications: To receive notifications when a quiz is completed, enter your (or multiple) email addresses in the Notification Email box.
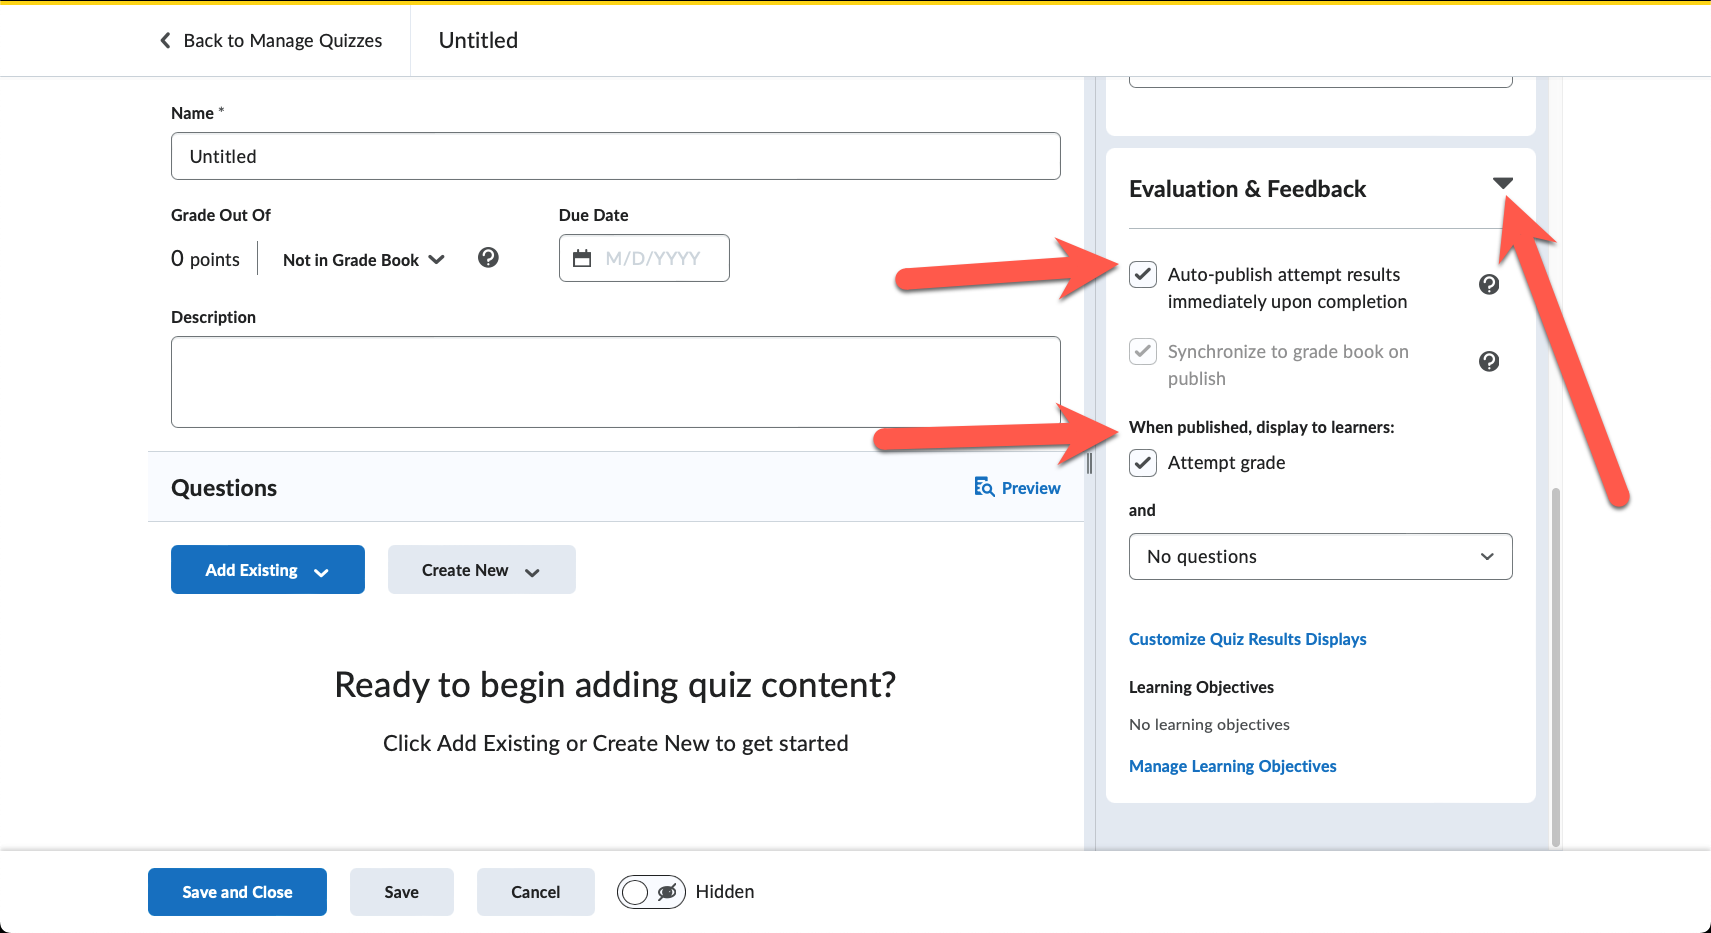
Evaluation & Feedback
In the Evaluation & Feedback drop-down, do any of the following:
- To present the students immediately with their quiz grade, select the Auto-publish attempt results immediately upon completion checkbox. This setting must be turned on for grades to be automatically sent to the grade book and for the default submission view to be released to users when they complete an attempt. Do not select this if you have Written Response question types. (See alert box above.)You have the option to publish grades after the due date or other time you choose.
- To have the quiz grades sent to the Grade Book when they are published, select the Synchronize to grade book on publish checkbox.
- To display your learners’ attempt grade and possible answers, under When published, display to learners, select the Attempt grade checkbox; and you can choose how you would like questions to be displayed after evaluation.
- To customize how your quiz results display, click Customize Quiz Results Displays.
- To further customize what students see, and when, click Edit View or Additional View.
For example: You wish students to see their score immediately after their attempt, but during class you would like students to be able to view all questions. Create an additional view for specefic date and/or time period.
Important: If you make edits to Quiz settings after students have taken the quiz, you need to manually publish results again. To do that, click “Grade” from the Quiz drop down menu. By default, you see 20 students. If you have more, change the page to display all of them. This is done at the bottom of the page, e.g. if you have 175 students, choose to display 200. Then, Select All (checkbox at top/left of roster) and click Publish.
Set Accommodations
(This action takes place in a different place in the course.)
The good news is that you can set accommodations once, and they will persist for all quizzes (and exams) during the course. To do this:
- In the Course nav bar, click Grades & Feedback > Classlist.
- Scroll down to each student who has a testing accommodation (you’re notified by the Access Office) and click the down-arrow by their name.
- From the menu that appears, choose Edit Accommodations.
- Check the box to Modify Time Limit.
- Enter the multiplier of original time (usually 1.5).
- Click Save.
You will now see a new icon next to their name. Students who have this will see this icon, too, and when they click it, it will confirm that they’re being given time and a half.
IMPORTANT: This is NOT where you adjust one off quiz availability. See above for guidance on quiz availability.
Add a Quiz Link to Content & Activities
In Content & Activities, navigate to the module where you want to add the quiz link.
- From within the module, click the “Existing Activities” button.
- Scroll down to Quizzes and select the quiz to add.
Grading Quizzes
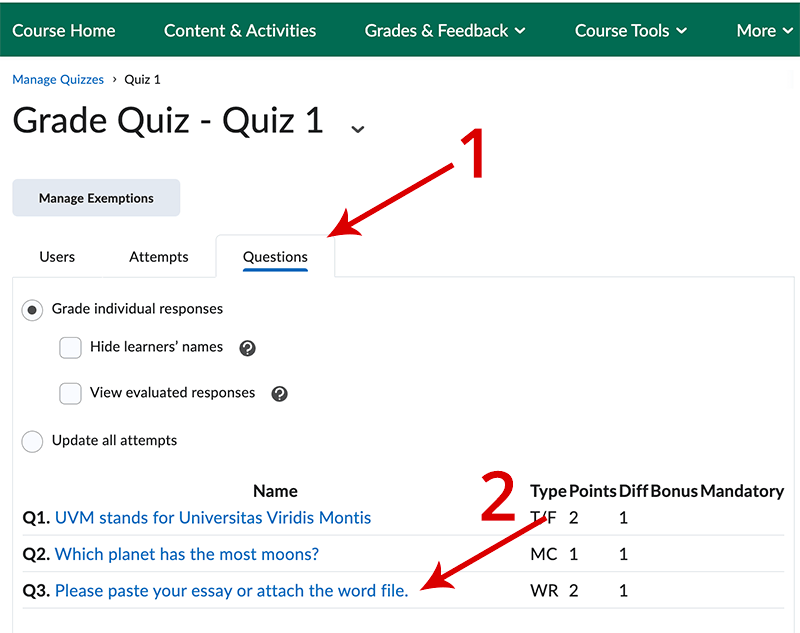
View Results and Grade Written Response Questions
Most quiz question types are automatically graded by Brightspace. The exception to this is the Written Response question. There are a few ways to approach this, and here is one:
- Go to the Quizzes page.
- Click the small arrow next to the Quiz title.
- From the menu, choose Grade.
- On the next page, click the “Question” Tab to isolate just the written response question(s)
- Click on the question to grade
- Enter a grade and feedback then click the arrows to go to the next student’s submission.
Where Students See Feedback
It’s different than assignments. Students can see the grade, only, under Grades and Feedback. For feedback, they should go to Course Tools > Quizzes and next to the quiz, they’ll see Feedback: On Attempt to the right. It will allow them to view feedback on each attempt, if more than one was allowed.
NOTE: Feedback will only appear if you’ve chosen this setting. When you edit the quiz, under Evaluation and Feedback, select to show “All questions with correct answers.”
Correcting Quizzes or Resetting a Students’ Quiz Attempt
Resetting a Quiz to Not Taken
There might be an occasion where you want to remove a student’s quiz attempt so they can start fresh. These steps will remove their attempt entirely:
- Go to Course Tools > Quizzes.
- Click the dropdown menu next to the quiz title and select “Grade“.
- Select the student(s) and their attempts to reset.
- OR, if you want to reset everyone’s quiz to untaken, make sure everyone is displayed on a single page. At the bottom of the page, it may say “20 per page,” so if you have a larger class, choose a display number that will include all students.
- Once the entire roster is shown, select all students and attempts by choosing the top/left checkbox above the roster.
- Click “Reset” just above and confirm “Yes“
Correcting and Regrading a Quiz
When you discover that a question is incorrect you can simply eddit it if no one has taken the quiz yet. However, if some or all students have taken it, you’ll have to correct the question, regrade all quiz attempts, and then publish the updated grades.
Correcting questions after a quiz has been taken by some or all students
If there are still students who haven’t taken the quiz, edit the question normally so these students will get the corrected version when they open the quiz. Note: This ONLY corrects it for future attempts.
- Go to Course Tools > Quizzes.
- Click the name of the quiz.
- Click on the question to edit. Make your change.
Update questions/grades on quizzes that have already been taken.
- Go to Course Tools > Quizzes.
- In the dropdown menu for the quiz, choose Grade.
- Click to view the Questions tab.
- Select “Update All Attempts.”
- Click on the question that has to be re-graded.
- This next part varies according to question type. For a multiple choice question (where the wrong answer was selected to be the correct one), you’ll essentially want to give points to students who chose the actual correct answer and eliminate points if they selected the erroneously-chosen “correct” answer. So,
- Give points to attempts with answer X [choose what is actually the correct answer] and enter the number of points they should have received for it.
- Save.
- Now, give to attempts with answer y [the incorrect answer which had been erroneously set as the correct one] and enter 0 points.
- Leave a comment explaining the correction in the comment field.
- Save.
- Each question type has slightly different options for making adjustments. NOTE: Matching questions settings: If the question was originally set to “All or nothing” this cannot be changed to partial credit after students have taken the quiz. You will need to update the question grade for each attempt individually.
- Save and Go Back to Question.
- Grades should now be updated.
For more information on Quizzes in Brightspace, see this D2L video:
Reference: The University of Vermont/Enterprise Technology Services Brightpace Knowledge Base
I have been searching and not finding how to import a question pool into Brightspace. In the case of Blackboard, there were third-party websites that would format questions to be imported into Bb as a pool. Is there such a solution for Brightspace?
Hi Satenik,
Very good question. I see that some colleges that use Brightspace have developed their own, such as:
https://plato.algonquincollege.com/BrightspaceQuizGenerator/
https://edc.carleton.ca/brightspace/quiz/generator/
https://mnsite.learn.minnstate.edu/shared/quizConverter/index.html
I can’t yet attest to how well they work, but I can ask my team for help testing and we’d love to hear from any faculty who are able to give it a try, say in a Brightspace practice course.
Thank you so much! I am just seeing your reply. I am going to troubleshoot and see if that works. If it does, it is a game changer.
I just wanted to share a ChatGPT prompt that’s been very helpful in translating Blackboard “calculated formula” (math) quiz questions to Brightspace “arithmetic” questions:
1. Reprint the Question Text: Replace square brackets with curly braces in the question.
2. Rewrite for Clarity: Provide a rewrite that would be clearer for freshmen to understand, without changing the substance of the question.
3. Provide a Formula: Present the formula in plain text with variables in curly braces.
4. Suggest Ranges: Provide suggested ranges for each variable.
5. Provide Question Feedback: Explain to the student how to solve the problem.
6. Generate an Excel File: Create an Excel file that can be used to test the results. The Excel file should include a formula to calculate the result.
Hi,
I have a quiz that is visible, with a due date of 09/30, the availability dates are from 08/26 until 12/23, but it is not visible to students. Initially, the two quizzes I posted for that module were not visible (it said something like “Broken Link”), and when I clicked on that message/broken link, I was able to get one quiz visible, but not the other.
Please help me.
Thanks!