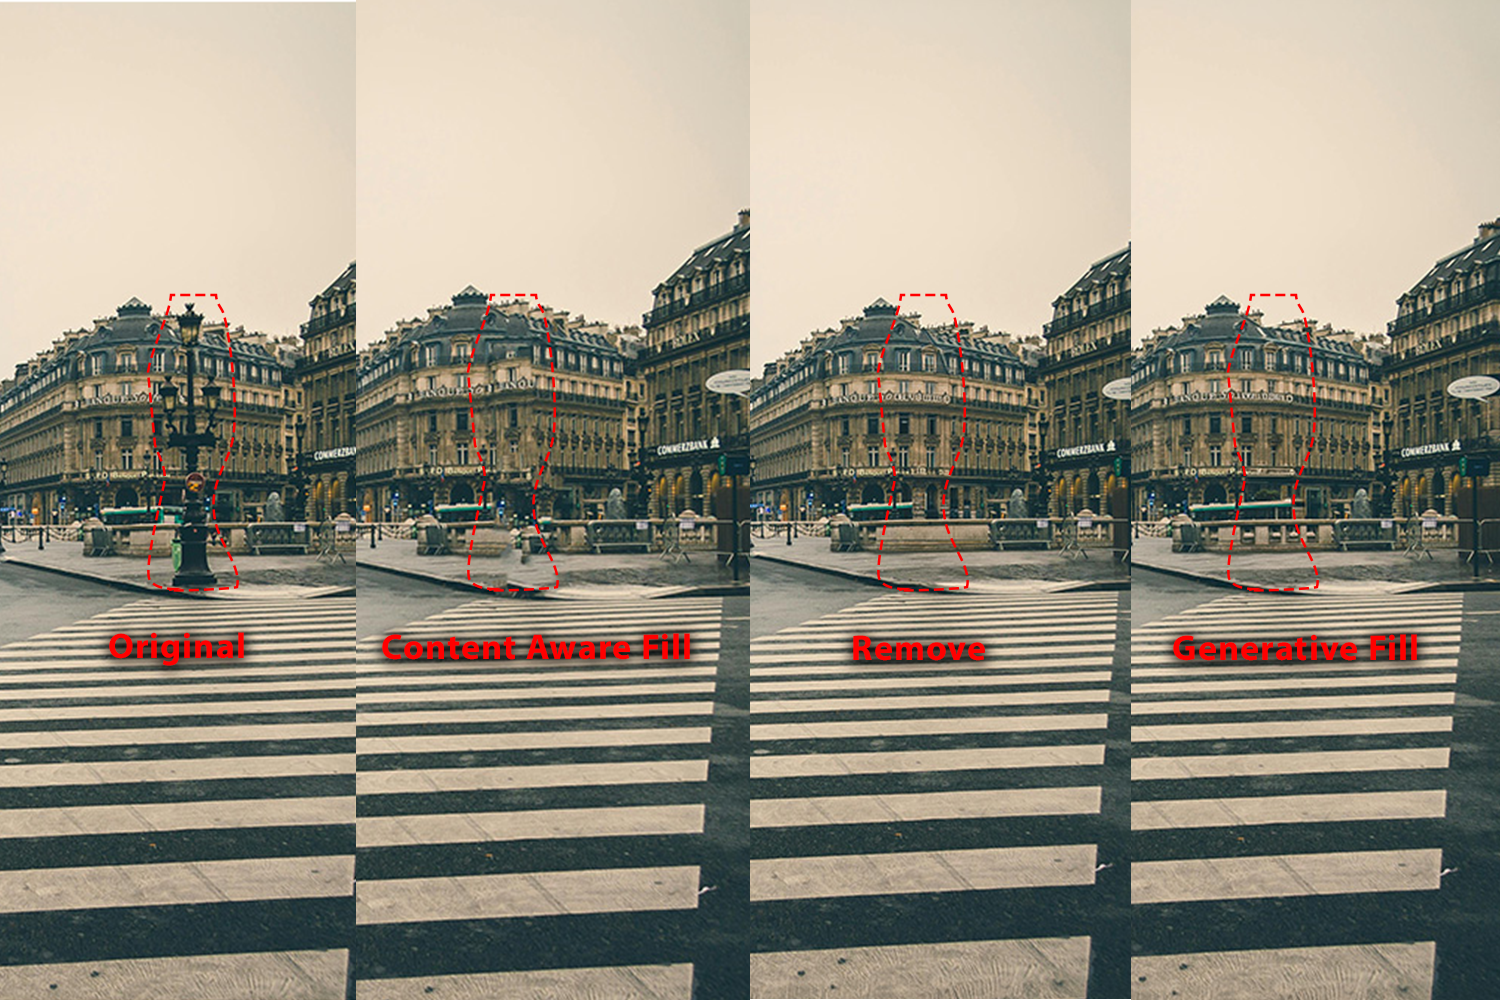
There are a few different tools that allow you to remove objects, items people etc from images. They each have different uses and do or don’t use generative AI.
Removing Objects from Images
Content-aware Fill. Fill in the space left by removed people or objects with matching pixels. By analyzing the surrounding area, the algorithm can generate a natural-looking result.
USE: (1)select what you want to remove then (2) Edit > Content Aware Fill
Try changing the Sampling Area Options and Fill Settings to see what works best for your image
You can have it output to 1) Current Layer, New Layer, or Duplicate Layer
NOTES
good for areas with patterns and textures (grass, clouds, road).
Not as good for specific objects and images with small irreguar objects and shadows.
does NOT use generative AI
try first to reduce your impact from generative AI.
works well on higher resolution images
Remove Tool. This lets you paint over objects to remove them. Generative AI will fill in based on image context.
USE: (1) Choose the Remove Tool, then (2) brush over the thing you want to remove.
NOTES
good for quick touch-ups, removing things like powerlines and small objects.
Uses generative AI but more to help reconstruction than completely generating.
Creates new layer with generated pixels
Generative Fill. You make a selection and then photoshop fills it in. Without a prompt it will take context from other parts of the image. With a prompt it will add what you prompt into the image
USE: (1) Select what you want to remove, (2) Click Generative Fill from the Quick Selection bar, (3) Do not enter in any prompt and Click Generate.
NOTES
Good for extending large parts of the image (we used it to sky and grass to an image), removing large items, extending textures.
Uses generative AI diffusion models
Creates new layer
Gives 3 options (you can generate more)
Original Photo by Margerretta from Pexels: https://www.pexels.com/photo/people-walking-on-pedestrian-line-on-street-548084/
In this post, you’ll learn about Photoshop’s AI-assisted tools — features that don’t generate entire images from text, but help you do parts of an editing workflow more efficiently. These tools help you perform complex editing tasks—such as selecting subjects, removing unwanted objects, or intelligently filling backgrounds—more quickly and accurately. As you use them, keep in mind that AI is a tool, not a replacement. Your creative judgment still guides how you combine and refine the results.
Device vs Cloud Processing: Choosing Your Mode
Many AI-assisted tools offer a choice between device (just using your computer) processing and cloud (Adobe data center) processing.
Device mode processes AI features on your own computer, which can be slower or less precise, but reduces reliance on internet and external servers.
Cloud mode typically produces more accurate, polished results (especially for complex edges or textures) but requires internet access and involves sending data to Adobe’s servers (though Adobe claims not to store user image data permanently).
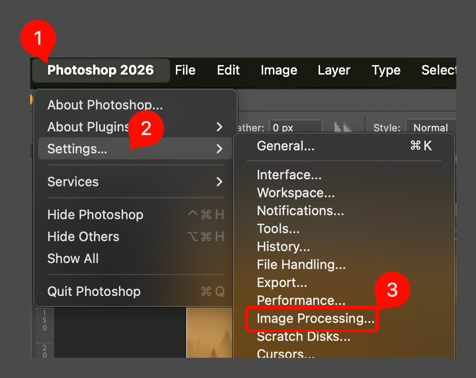
Preference Setting:
Open Image Processing
[macOS] Go to Photoshop > Settings > Image Processing
[Windows] Go to Edit > Preferences > Image Processing
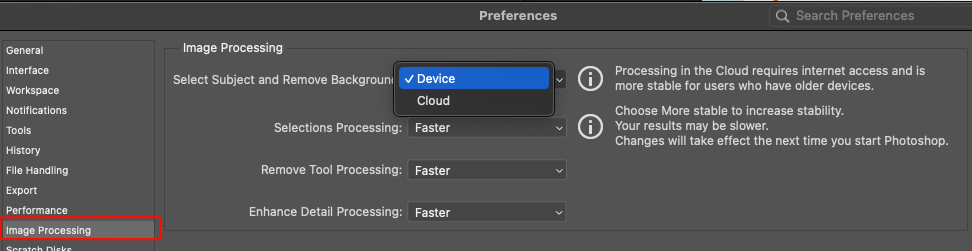
The Image Processing settings will open and you have the following choices:
For Select SubjectandRemove Background, Toggle Device or Cloud
You can also choose whether to use Faster or More Stable processing for
Selections Processing
Remove Tool Processing
Enhance Detail Processing
Faster uses less energy and processing power.
Why this matters: the choice of device vs cloud allows you to choose when you are using generative AI for some tasks and gives you some control over benefits and risks such as the need for large data centers, energy use, privacy, or dependence on internet.
When possible, test both modes so you can see differences for yourself.
Some tools do not have an option to process locally.
List of AI-Assisted Tools
Below is a bulleted list of key AI-assisted tools available in Photoshop (non full-prompt generation). Each includes what it does and whether local/cloud processing is available.
Select Subject (Sky, Focus Area, Background)
What it does: Automatically detects and selects the main subject in your image.
Local / Cloud: Configurable (Local or Device).
Access: When a Layer is selected, available in the Quick Actions panel by clicking the Select Subject button
You can also choose Select → Subject from the main menu. This is also how you can select sky or focus area:
Select → Sky: uses AI to determine what is sky and selects that
Select → Focus Area: automatically selects the in-focus areas of the image. Works best on images with narrow focal range (shallow depth of field).
NOTE: to select the background, you can
Select → Subject
then with the subject still selected,
Select → Inverse
Select Subject + Mask
Very often, if you are using select subject, you want to remove everything else. To do that you can use a mask after you select the subject.
Select → Subject
then with the subject still selected,
Click on the Mask icon (white rectangle with black dot in the middle)
Remember that you can modify the mask after you create it. Masks are non-destructive and editable.
Remove Background
What it does: Creates a layer mask to remove the background from a photo automatically.
Local / Cloud: Configurable (Local or Device).
Access: When a Layer is selected, available in the Quick Actions panel by clicking the Remove Background button
Content-Aware Fill
What it does: Removes unwanted objects or fills selected areas by sampling nearby pixels and blending them seamlessly.
Local / Cloud: Local (algorithmic, not generative).
Access: Requires an active selection. Go to Edit → Content-Aware Fill… or right-click a selection and choose Fill → Content-Aware.
Remove Tool
What it does: Brush-based AI tool that removes objects as you paint over them. Photoshop fills in the surrounding area automatically.
Local / Cloud: Cloud only.
Access: Available in the Toolbar (nested under the Healing Brush tools). You normally have to click and hold on the Spot Healing Brush to select it.
Generative Fill
What it does: Uses Generative AI to add, remove, or replace parts of an image based on a text prompt.
Local / Cloud: Cloud only.
Access: Requires an active selection. Appears in the Contextual Task Bar or via Edit → Generative Fill.
NOTE: There are two ways to use Generative Fill.
Unprompted fill
Prompted fill
Unprompted fill: use this If you want to extend an image to change its aspect ratio (like making the image taller than it is). Prompted fill: use this to add an element to the image (like putting a hot air baloon in the sky).
At this stage in our work, we will use use the Unprompted Fill method.
Steps to use Unprompted Fill:
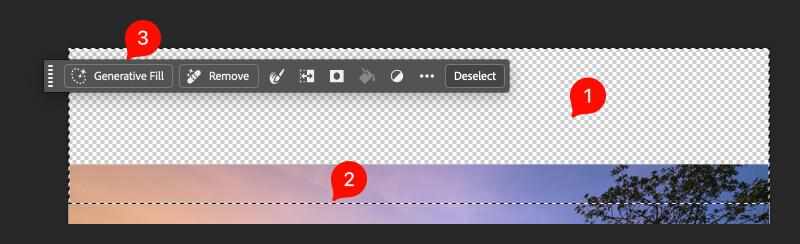
Adjust your canvas or the image so that there is empty space in which to add the generation.
Choose a selection tool. Rectangual marquee is easiest for changing image dimensions. Then, make a selection that includes some of the existing image and some of the empty space.
Click Generative Fill in the Contextual task bar.
Do NOT enter a prompt
Click generate
Generative Expand
What it does: Extends the canvas and generates new content in the expanded area to match the existing image.
Local / Cloud: Cloud only.
Access: Use the Crop Tool, drag the canvas larger, then choose Generative Expand in the contextual bar.
Note
When using this tool, you are changing the entire canvas size. If you just want to expand a single layer of the image without changing the canvas size, use the Generative Fill method shown above.
Harmonize
What it does: Uses generative AI to automatically match the color, lighting, tone, and overall atmosphere of a selected layer to the surrounding image, helping composites look more realistic and visually cohesive. A new layer will be created that has the original layer plus additional pixels added by AI to harmonize with the background.
Local / Cloud: Cloud only
Access: Select the layer you want to blend into the scene. In the Contextual Task Bar (or Properties panel), choose Harmonize. Photoshop generates adjusted variations that match the surrounding environment.
Notes
Do you selecting and masking before you Harmonize.
Harmonize makes a new layer. You may want to hide the original layer.
Because Harmonize adds pixels to the image you usually can not reposition the Harmonized layer without it looking wierd. To reposition, delete the harmonized layer, then move the original layer and harmonize again.
Neural Filters
What it does: Applies AI-based effects such as style transfer, skin smoothing, colorization, or depth blur.
Local / Cloud: Depends on the filter (some run locally, others require cloud processing).
Access: Filter → Neural Filters from the main menu opens the filter library panel.
Note that not all neural filters are pre-installed. Some of them require download and installation before you can use them. This is relateively simple and the interface will direct you on what to do.