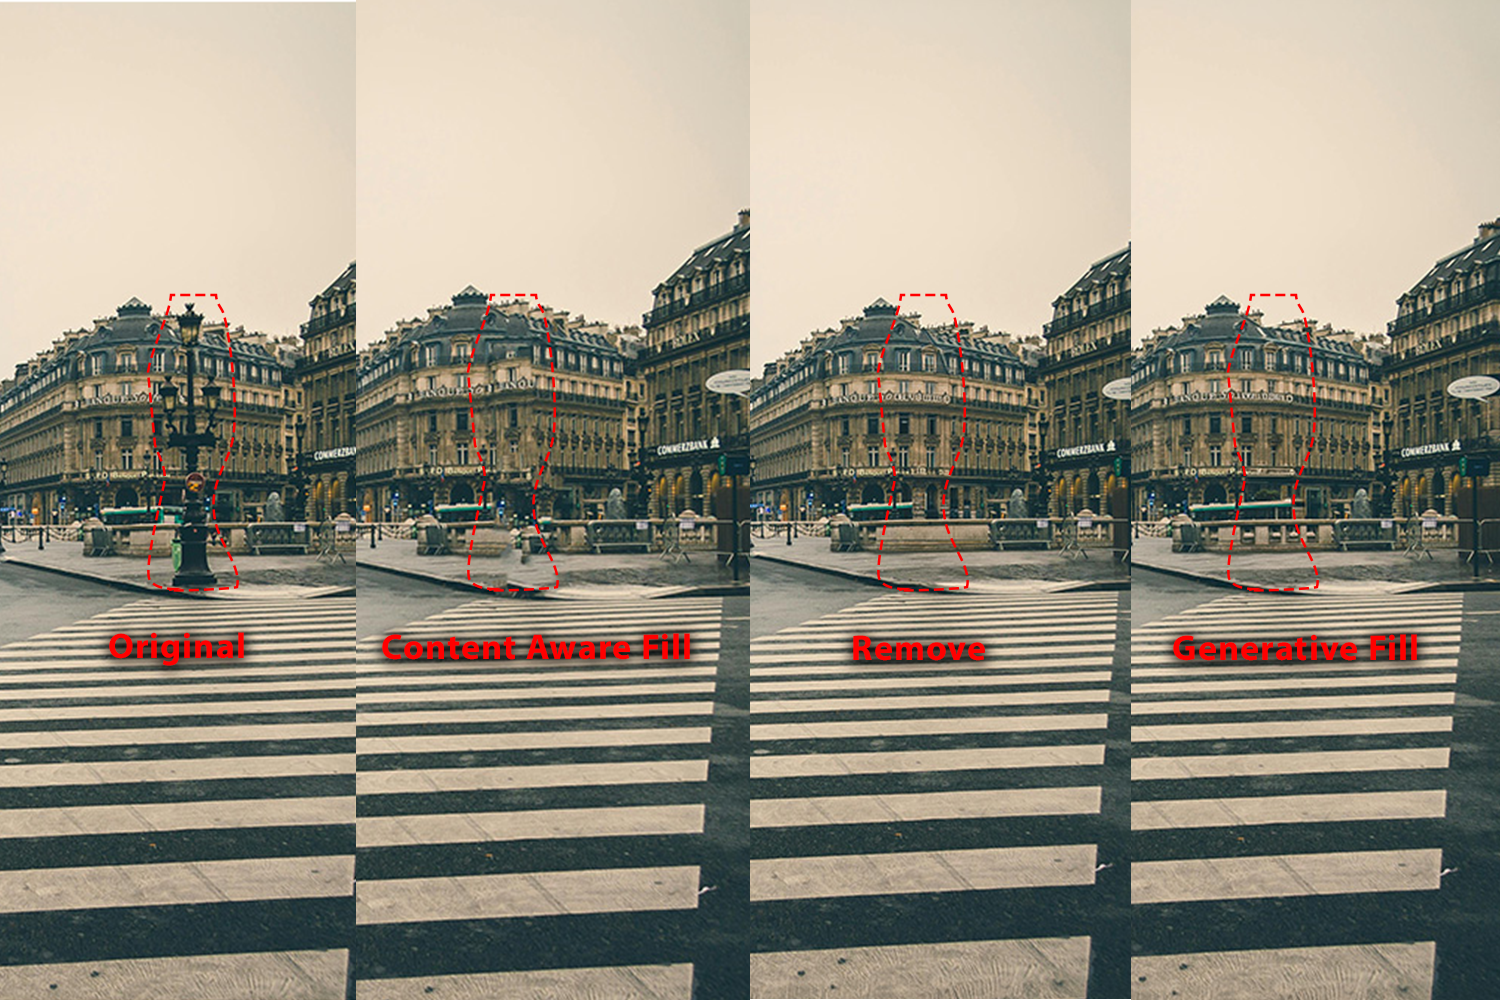
There are a few different tools that allow you to remove objects, items people etc from images. They each have different uses and do or don’t use generative AI.
Removing Objects from Images
Content-aware Fill. Fill in the space left by removed people or objects with matching pixels. By analyzing the surrounding area, the algorithm can generate a natural-looking result.
USE: (1)select what you want to remove then (2) Edit > Content Aware Fill
Try changing the Sampling Area Options and Fill Settings to see what works best for your image
You can have it output to 1) Current Layer, New Layer, or Duplicate Layer
NOTES
good for areas with patterns and textures (grass, clouds, road).
Not as good for specific objects and images with small irreguar objects and shadows.
does NOT use generative AI
try first to reduce your impact from generative AI.
works well on higher resolution images
Remove Tool. This lets you paint over objects to remove them. Generative AI will fill in based on image context.
USE: (1) Choose the Remove Tool, then (2) brush over the thing you want to remove.
NOTES
good for quick touch-ups, removing things like powerlines and small objects.
Uses generative AI but more to help reconstruction than completely generating.
Creates new layer with generated pixels
Generative Fill. You make a selection and then photoshop fills it in. Without a prompt it will take context from other parts of the image. With a prompt it will add what you prompt into the image
USE: (1) Select what you want to remove, (2) Click Generative Fill from the Quick Selection bar, (3) Do not enter in any prompt and Click Generate.
NOTES
Good for extending large parts of the image (we used it to sky and grass to an image), removing large items, extending textures.
Uses generative AI diffusion models
Creates new layer
Gives 3 options (you can generate more)
Original Photo by Margerretta from Pexels: https://www.pexels.com/photo/people-walking-on-pedestrian-line-on-street-548084/
In this post, you’ll learn about Photoshop’s AI-assisted tools — features that don’t generate entire images from text, but help you do parts of an editing workflow more efficiently. These tools help you perform complex editing tasks—such as selecting subjects, removing unwanted objects, or intelligently filling backgrounds—more quickly and accurately. As you use them, keep in mind that AI is a tool, not a replacement. Your creative judgment still guides how you combine and refine the results.
Device vs Cloud Processing: Choosing Your Mode
Many AI-assisted tools offer a choice between device (just using your computer) processing and cloud (Adobe data center) processing.
Device mode processes AI features on your own computer, which can be slower or less precise, but reduces reliance on internet and external servers.
Cloud mode typically produces more accurate, polished results (especially for complex edges or textures) but requires internet access and involves sending data to Adobe’s servers (though Adobe claims not to store user image data permanently).
Preference Setting:
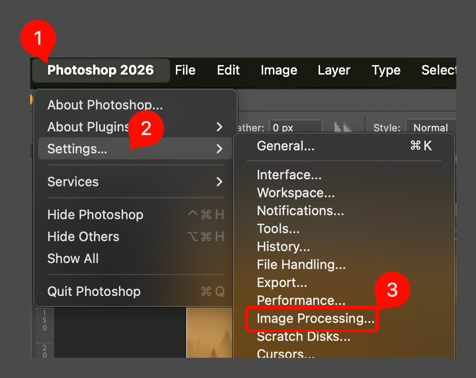
Open Image Processing
[macOS] Go to Photoshop > Settings > Image Processing
[Windows] Go to Edit > Preferences > Image Processing
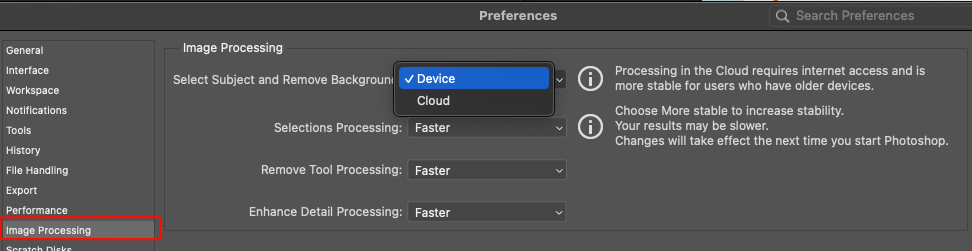
The Image Processing settings will open and you have the following choices:
For Select SubjectandRemove Background, Toggle Device or Cloud
You can also choose whether to use Faster or More Stable processing for
Selections Processing
Remove Tool Processing
Enhance Detail Processing
Faster uses less energy and processing power.
Why this matters: the choice of device vs cloud allows you to choose when you are using generative AI for some tasks and gives you some control over benefits and risks such as the need for large data centers, energy use, privacy, or dependence on internet.
When possible, test both modes so you can see differences for yourself.
Some tools do not have an option to process locally.
List of AI-Assisted Tools
Below is a bulleted list of key AI-assisted tools available in Photoshop (non full-prompt generation). Each includes what it does and whether local/cloud processing is available.
Select Subject (Sky, Focus Area, Background)
What it does: Automatically detects and selects the main subject in your image.
Local / Cloud: Configurable (Local or Device).
Access: When a Layer is selected, available in the Quick Actions panel by clicking the Select Subject button
You can also choose Select → Subject from the main menu. This is also how you can select sky or focus area:
Select → Sky: uses AI to determine what is sky and selects that
Select → Focus Area: automatically selects the in-focus areas of the image. Works best on images with narrow focal range (shallow depth of field).
NOTE: to select the background, you can
Select → Subject
then with the subject still selected,
Select → Inverse
Select Subject + Mask
Very often, if you are using select subject, you want to remove everything else. To do that you can use a mask after you select the subject.
Select → Subject
then with the subject still selected,
Click on the Mask icon (white rectangle with black dot in the middle)
Remember that you can modify the mask after you create it. Masks are non-destructive and editable.
Remove Background
What it does: Creates a layer mask to remove the background from a photo automatically.
Local / Cloud: Configurable (Local or Device).
Access: When a Layer is selected, available in the Quick Actions panel by clicking the Remove Background button
Content-Aware Fill
What it does: Removes unwanted objects or fills selected areas by sampling nearby pixels and blending them seamlessly.
Local / Cloud: Local (algorithmic, not generative).
Access: Requires an active selection. Go to Edit → Content-Aware Fill… or right-click a selection and choose Fill → Content-Aware.
Remove Tool
What it does: Brush-based AI tool that removes objects as you paint over them. Photoshop fills in the surrounding area automatically.
Local / Cloud: Cloud only.
Access: Available in the Toolbar (nested under the Healing Brush tools). You normally have to click and hold on the Spot Healing Brush to select it.
Generative Fill
What it does: Uses Generative AI to add, remove, or replace parts of an image based on a text prompt.
Local / Cloud: Cloud only.
Access: Requires an active selection. Appears in the Contextual Task Bar or via Edit → Generative Fill.
NOTE: There are two ways to use Generative Fill.
Unprompted fill
Prompted fill
Unprompted fill: use this If you want to extend an image to change its aspect ratio (like making the image taller than it is). Prompted fill: use this to add an element to the image (like putting a hot air baloon in the sky).
At this stage in our work, we will use use the Unprompted Fill method.
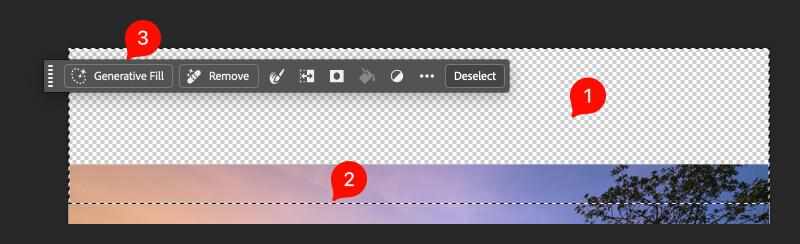
Steps to use Unprompted Fill:
Adjust your canvas or the image so that there is empty space in which to add the generation.
Choose a selection tool. Rectangual marquee is easiest for changing image dimensions. Then, make a selection that includes some of the existing image and some of the empty space.
Click Generative Fill in the Contextual task bar.
Do NOT enter a prompt
Click generate
Generative Expand
What it does: Extends the canvas and generates new content in the expanded area to match the existing image.
Local / Cloud: Cloud only.
Access: Use the Crop Tool, drag the canvas larger, then choose Generative Expand in the contextual bar.
Note
When using this tool, you are changing the entire canvas size. If you just want to expand a single layer of the image without changing the canvas size, use the Generative Fill method shown above.
Harmonize
What it does: Uses generative AI to automatically match the color, lighting, tone, and overall atmosphere of a selected layer to the surrounding image, helping composites look more realistic and visually cohesive. A new layer will be created that has the original layer plus additional pixels added by AI to harmonize with the background.
Local / Cloud: Cloud only
Access: Select the layer you want to blend into the scene. In the Contextual Task Bar (or Properties panel), choose Harmonize. Photoshop generates adjusted variations that match the surrounding environment.
Notes
Do you selecting and masking before you Harmonize.
Harmonize makes a new layer. You may want to hide the original layer.
Because Harmonize adds pixels to the image you usually can not reposition the Harmonized layer without it looking wierd. To reposition, delete the harmonized layer, then move the original layer and harmonize again.
Neural Filters
What it does: Applies AI-based effects such as style transfer, skin smoothing, colorization, or depth blur.
Local / Cloud: Depends on the filter (some run locally, others require cloud processing).
Access: Filter → Neural Filters from the main menu opens the filter library panel.
Note that not all neural filters are pre-installed. Some of them require download and installation before you can use them. This is relateively simple and the interface will direct you on what to do.
This guide will help you craft strong text prompts for creating and editing images with Adobe Firefly and Photoshop’s Generative Fill.
Both use the same underlying idea — a diffusion model trained to create or modify images based on text descriptions — but the way you interact with them differs.
Note that the instructions and concepts used to prompt Firefly can also be used in other chat-to-image interfaces like those provided by Copilot, Gemini and chatGPT. All of those tools required sign-in. You can sign in with your CUNY credentials to Copilot.
🔹 Part 1: One Shot Prompts
Firefly is Adobe’s web-based generative image tool.
In this method, you enter a text prompt, and the system generates full images based on your description.
Make sure you’re signed in (CUNYFirst credentials) so you can save outputs and more.
Firefly is Adobe’s web-based generative image tool. Other image generation tools are similar especially in the prompting structure shown below. You can use these lessons in other tools.
How Firefly Understands Prompts
Firefly reads your words as a set of visual instructions — nouns describe subjects, adjectives set style and tone, and context defines relationships.
For example:
“A realistic portrait of a woman wearing headphones, sitting in a recording studio lit by blue and orange neon light.”
If you do not provide enough information, it will not ask you for more information but rather construct the image based on relationships and associations it has stored in its model. So, the less guidance you give the model, the more your image will look like the average of whatever nouns you put in the prompt. The “average” depends on the training data of the model and includes whatever biases or lack of information was present.
To help avoid that and make your images truer to the idea in your head and more unique, follow the prompting structure outlined next.
Prompting Structure
Firefly works best when your prompts include:
Subject – What’s the main focus? (e.g., a mountain cabin, a city street at night)
Details – What defines it? (e.g., surrounded by trees, neon reflections, misty atmosphere)
Style or Medium – How should it look? (e.g., digital painting, cinematic photo, watercolor)
Lighting and Mood – Optional but adds realism (e.g., golden hour, dramatic shadows, foggy morning)
Camera or Composition – Optional (e.g., wide shot, macro, aerial view)
Here are two images, one with a less detailed prompt and one with more detail:
AI generated image by Nano Banana 2 on 2026.03.08. Prompt: A woman walking a golden retriever dog in a park.
AI generated image by Nano Banana 2 on 2026.03.08. A woman walking a dog. Both dressed in steampunk attire. They are walking down a London street with other walkers, vehicles and shops in fictitious advanced steampunk era. It is late in day, just before golden hour. Cinematic style, medium shot with medium depth of field focused on the woman and dog.
Note that the same prompt can give different results in different models and sometimes they use past history (as done above with similar women, doc and positioning). Here is the same prompt (#2) in ChatGPT:
Example Prompts
“An old lighthouse on a rocky coast, crashing waves and sea spray, dramatic clouds overhead, oil painting, stormy lighting, wide landscape composition.”
“A digital illustration of a futuristic city skyline at sunset with flying cars and glowing signs.”
Firefly Prompting Tips
Be specific but concise — aim for clarity, not long sentences.
Start simple, then add details gradually.
Use descriptive adjectives (realistic, cinematic, moody, painterly, symmetrical).
Try style keywords like studio lighting, watercolor, macro lens, low angle.
Use negative prompts (if available) to exclude things: “without text overlay,” “no people.”
Tip: Think of the prompt as your creative direction to an assistant — clear, visual, and intentional.
Here are 2 examples showing style changes:
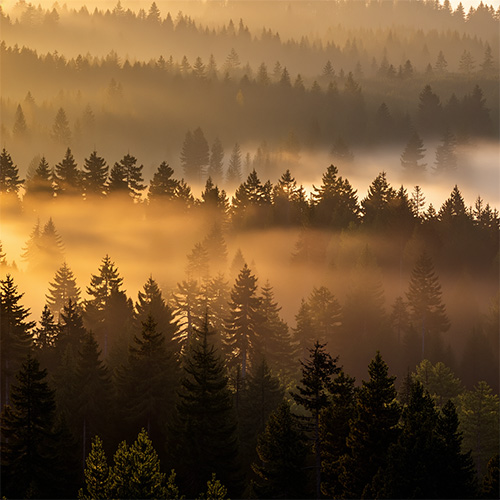
AI generated by ChatGPT 2026.03.08. Prompt: A small house beside a lake, pine trees reflected in the water, realistic photograph, sunrise lighting, wide shot.AI generated by ChatGPT 2026.03.08. Prompt: A small house beside a lake, pine trees reflected in the water, pixel art, early morning mood, side view.
🔹 Part 2: Prompting for Photoshop’s Generative Fill
Photoshop’s Generative Fill lets you use prompts to add, replace, or remove content within an image or blank document.
It’s not about generating the entire scene at once — instead, you build it piece by piece.
The Workflow
Start with a Blank Canvas
Create a new Photoshop document (e.g., 1000×1000 px).
Choose a transparent background color.
Select the Canvas
Use the Rectangular Marquee Tool to select the whole area.
Go to the Contextual Task Bar → Generative Fill.
Generate the Background
Enter a detailed prompt for your background.
Example:
“A misty forest at dawn with golden light filtering through tall pine trees.”
Click Generate and review the results. Choose one that works best.
Single Prompt. Generated by AI in Photoshop with Firefly Fill and Expand model on 2026.03.08
Add New Elements
Use the Marquee or Lasso tool to create a smaller selection in the area where you want to add an object.
Go to Generative Fill again and write a prompt for that item.
Example:
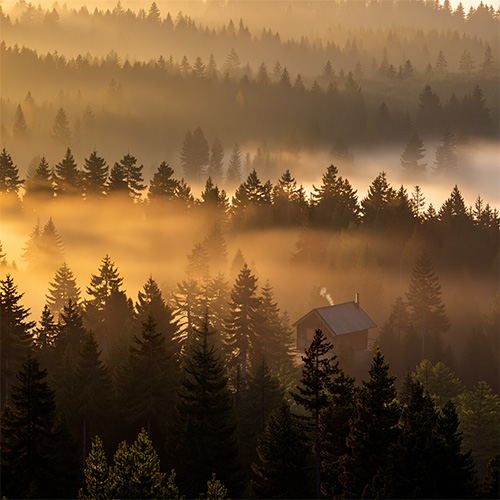
“A wooden cabin sitting in a clearing with smoke rising from the chimney.”
2 prompts (forest background, cabin). Generated by AI in Photoshop with Firefly Fill and Expand model on 2026.03.08
Photoshop fills the selected area, blending it with your existing background.
Refine and Build
Repeat the process for additional elements — a person, a building, an animal, or a vehicle.
Adjust selections for scale and composition.
Try variations if something doesn’t blend well.
“an alien space ship hovering and inspecting the ground”
3 prompts (forest background, cabin, flying saucer). Generated by AI in Photoshop with Firefly Fill and Expand model on 2026.03.08
Prompting Tips for Generative Fill
Describe context, not just objects:
“A red umbrella on a rainy street with reflections” works better than “umbrella.”
Think spatially: mention background, foreground, lighting, and distance.
Use multiple smaller prompts instead of one large prompt.
Photoshop’s AI blends local selections more effectively than trying to generate everything at once.
Experiment: run the same prompt multiple times — results will differ each time.
Avoid clutter: too many objects or unrelated styles in one prompt can confuse the model.
Comparing Firefly and Photoshop
Feature
Adobe Firefly
Photoshop Generative Fill
Purpose
Create entire images from text
Edit or build images piece by piece
Best For
Starting from scratch
Adding, replacing, or refining
Prompt Style
One complete description
Multiple focused prompts
Output Control
Global (whole image)
Local (selected regions)
Use Case Example
Generate a cinematic desert landscape.
Add a hiker on the left side of the desert scene.
🔍 Key Takeaways
Both Firefly and Photoshop use diffusion models that generate images by gradually removing noise guided by your prompt.
Firefly is ideal for creating — start with words and make a full image.
Photoshop is ideal for compositing — use text prompts and selections to build up an image in layers.
Always review the output critically: consider realism, coherence, and ethical use (licensing, representation, and transparency).
✅ Practice Challenge combining the two
This is optional
Use a chat-based tool (Firefly, Copilot, Gemini) to generate a full background image.
remember to save your prompt in the Project Description Document
Import it into Photoshop and use Selection and Generative Fill to add 2–3 new elements that match your composition.
Save your .psd in the project folder. Save the exported jpg in the Output files folder.
Adobe has a number of tutorials to help you you learn how to use Photoshop (and other Adobe products). Generally speaking there are three types of tutorials:
Hands-on [HoT]: These tutorials are integrated into Photoshop.
When you view them on the web they have a Begin tutorial in Photoshop button that will open photoshop with a learn pane open. Click Start tutorial and it will create a Photoshop file and guide you through what to do directly in the Photoshop interface using blue callout boxes and the Learn pane.
Video [Video]: these tutorials have a video that you can watch and follow along. Sometimes there are files you can download, sometimes you just use your own file.
Web Page [Web]: These tutorials are web pages that use text and images. You read through and follow the steps. Sometimes there are files to download and use to follow along.
Below are links to tutorials grouped by the kind of action you want to perform and notation if they are Hands-on, Video or Web Page tutorials.
Generative AI-Assisted Tools: these tools use Gen AI to expand an image by drawing new pixels
Generative expand with the Crop tool. The Crop tool only works when making the entire canvas larger or different aspect ratio. If you want to expand a single layer, use Generative Fill
Generative Fill. you can use this technique to expand a single layer of an existing image.This is useful if you have a layer that is not as big as your canvas and you would like to add to it to make it bigger.
From Text to Pixels: How Generative AI Creates Images
When you use generative AI to make an image, you’re working with a system that has been trained to recognize and rebuild visual patterns — not just to draw, but to recreate structure from noise.
In text generation, the AI predicts the next word in a sequence based on patterns it has learned. For images, the data is pixels — millions of color values that form shapes, textures, and lighting patterns. The model learns from billions of training images, each converted into numbers that describe how pixels relate to each other. Over time, it builds statistical “maps” of what things like trees, faces, or clouds tend to look like.
The Diffusion Process: Learning to Remove Noise
During training, the model is given an image and taught to add random noise until the image becomes pure static. Then it learns the reverse process — how to take that noisy image and gradually remove the noise to recover the original picture.
By repeating this millions of times, the model learns a general rule:
Starting with random noise, here’s how to remove the noise in a way that reveals something that looks like the images the model has been trained on.
Human Input: Beyond the Data
It’s important to understand that creating these models isn’t just about the billions of images. People are essential at every step. Initially, vast datasets of images are gathered. Human labelers often categorize these images and write descriptive captions – detailed text descriptions of what’s in the image (e.g., “a golden retriever playing fetch in a park”). These captions become crucial for connecting the visual content with language. Furthermore, AI trainers are employed to fine-tune the models, evaluating their output and adjusting the training process. Even seemingly simple tasks like verifying that images are not duplicates or that they are safe for public display require human oversight. Finally, platforms like reCAPTCHA (or similar systems) often utilize human interaction to help distinguish real images from automatically generated ones, improving data quality.
When you generate a new image, the AI starts with noise and applies that learned denoising process — guided by your text prompt. Each step removes a bit more noise, revealing colors and shapes that match your description. It doesn’t “copy” any one training image; instead, it uses what it has learned about visual structure to create a new combination. However, without the images it was trained on, the model could not be made.
“X-Y plot of algorithmically-generated AI art of European-style castle in Japan demonstrating DDIM diffusion steps” by Benlisquare is licensed under CC BY-SA 4.0.
Prompting and Iteration
Your prompt gives the AI a direction — it turns words into a kind of “map” that influences what it reveals during denoising. The quality of the prompt directly impacts the quality of the image.
Ethical Considerations: Thinking Critically About AI Image Generation
AI image generation is a powerful technology with significant ethical implications. To use AI ethically, it’s crucial to understand these implications, both in how the AI is trained and in how it’s used.
1. Bias in Training Data: AI learns from the data it’s fed. The massive datasets used to train image generation models are compiled from the internet, and the internet reflects existing societal biases. This means AI can also use and even amplify harmful stereotypes related to gender, race, age, ability, religion and more. For example, a prompt including “CEO” might disproportionately generate images of men in suits, reinforcing a biased perception of leadership. The humans involved in curating and labeling these datasets, as well as those who provide feedback to train the AI to avoid certain outputs (a process called human-in-the-loop reinforcement learning), also bring their own biases into the loop. Even seemingly neutral captions can subtly reinforce stereotypes.
2. Copyright and Ownership: The images used to train these models are often copyrighted. While AI doesn’t “copy” images directly, there’s ongoing debate about whether the generated images infringe on the copyrights of the original artists. The legal landscape is still changing, and it’s important to be aware of the potential copyright implications of using AI-generated images. Think about how a prompt referencing a specific artist’s style raises these issues.
While there are potential copyright issues with how models are trained, at the current time, images generated by AI re not copyrightable. This means that if you’re doing work that you or a client wants to copyright, you should not use AI generated images.
3.Misuse and Potential Harm: AI image generation can be misused to create deepfakes, spread misinformation, or generate harmful content. It’s essential to consider the potential impact of your creations and to use this technology responsibly.
For example on the social media platform X, the Grok AI allowed people to edit photos other users had posted including allowing people other than the original poster to change photos so people wore revealing clothing. This caused public controversy including bans in certain countries and investigations by the State of California and the United Kingdom.
Nnon-consensual, sexually explicit material is never appropriate and there are many other types of images that could be inappropriate including generating images that could be used to impersonate someone or to create false narratives. Think about the implications of the images you create with generative AI.
4.Transparency and Accountability: It’s important to be transparent about the fact that an image was AI-generated. This helps to avoid misleading viewers and promotes accountability. Consider adding a disclaimer when sharing AI-generated images, especially if they could be misinterpreted as real.
Your image project will be to create three versions of a collage or composite image. This post and our class disucssion are designed to help you understand these types of images so that you can choose your subject matter for your project.
Collage Image
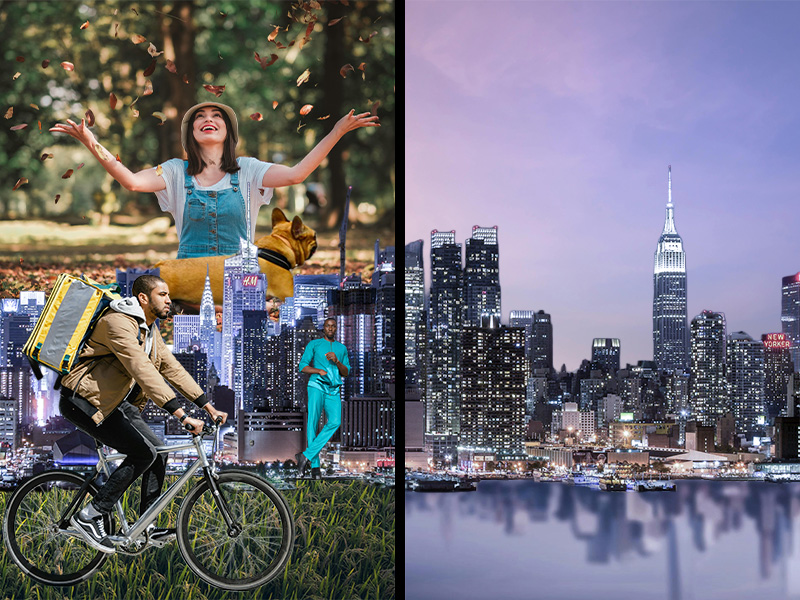
Definition: A collage image is a visual composition created by assembling multiple, often disparate, elements—photographs, illustrations, text, textures, or other materials—onto a single surface or digital layer. Traditionally created using physical materials adhered to a backing, collage can also be digitally produced by layering and combining images within software like Photoshop. The emphasis in a collage is often on the juxtaposition of these elements to create a new, unified whole that conveys a particular meaning, mood, or aesthetic.
Key Characteristics:
Assemblage: Primarily defined by the combination of distinct elements.
Juxtaposition: Elements are often placed in unexpected or contrasting relationships. These relationships and the impression they leave on the viewer are often key to why the technique is used.
Unified Whole: Despite disparate parts, the final image aims for a sense of coherence.
Historically Significant: Rooted in 20th-century art movements (Cubism, Surrealism, Pop Art).
This video is about a show “Multiplicity: Blackness in Contemporary American Collage” that appeared in the Phillips Collection in Washington D.C. in 2024.
Composite Image
Definition: A composite image is a photograph or digital artwork created by digitally combining multiple photographs or image elements into a single, unified scene. Unlike a collage, which often emphasizes the distinctness of its components, a composite image strives for a seamless integration of its elements, often with the goal of creating a realistic or fantastical scene that could not be captured in a single photograph.
Key Characteristics:
Integration: Elements are blended to appear as a cohesive scene.
Realism/Fantasy: Often aims to create a believable or imaginative scenario.
Seamlessness: Attention is given to lighting, perspective, and color matching to minimize visual cues revealing the image’s construction.
Modern Technique: Frequently used in advertising, photo manipulation, and digital art.
This video shows photographer Jeff Chien-Hsing Liao who combines multiple photos of a location into one photo in a realistic way.
Distinguishing the Terms
A collage can be a composite, but a composite isn’t necessarily a collage. The key difference lies in the intent and the visual outcome. In a collage the individual elements are important and their placement together says something new. In a composite image the goal is to hide the different origins of the image and create a new image that looks like it was an original. The differences in the images and when you use the terms can be subtle. More important than whether you get it “right” every time is that you think about the image, the meaning it’s meant to convey and your methods of making it.
When you use an image on a web site, you must obey copyright law and only use images you have an explicit right to use. So, searching Google Images is NOT the way to find them (unless you take additional steps shown below).
What You Can Use
The general rule of thumb is:
Only use images where a specific license has been given to the image allowing you to use it.
If you can’t find a license on the site where you see the image, don’t use the image.
Here are some places and ways you can find images that you can use (often without paying money):
Creative Commons
This is actually a set of licenses, most of which are designed to allow you to use media (they can apply to other media) but that also come with restrictions like:
Attribution: you must credit the original author.
Share-alike: If you modify the image to create your own work (derivative) then you also have to share your creation with a CC license.
Non-commercial: you can’t make money off your use of the image.
Most stock sites charge you money for the right to use their photos. when working on a professional production with a budget this is a great place to go and can get you relatively cheap images (less than paying for a photoshoot) that are high quality and fairly compensate the photographers.
Sometimes there is not a budget, like on your class projects. These are sites with stock photography where either all or some are licensed to allow for use for free.
Each of these sites have their own license for images and sometimes also have Creative Commons licensed images. When giving credit, look to see if there is a CC license and if not, you can write down Pexels License, or Unsplash License or Pixabay License depending on the site where you downloaded the image.
Public Domain
When an image is in the public domain it means it is free from all copyright restrictions and you are able to use it however you want. Still, it’s best to credit the creator if the person is known. This is similar to the CC0 license.
Unsplash has partnered with some of the above institutions and more to provide pictures through their platform. Read more here, and see some of the collections below:
Click the Usage Rights drop down and select one of the “Labeled for …” options
Double check that there is a Creative Commons license on the page where the image is located. Some images are listed incorrectly.
Use Common Sense: sometimes people will upload an image they did not create to a site like Flickr and add a CC license to the image. This is not legal and does not give you the right to use the image. Look at other images by the creator and see if it seems probable that they created it.