If you use the Brightspace gradebook, you’ll probably want students to be able to see their final grades at the end of the semester. If you did not automatically “release” the final grades when you first set up your gradebook, there are a few steps you’ll need to take to make the final grades available to students.
Click on any step below to view detailed instructions.
1. Decide whether you want students to see the calculated final grade or adjusted final grade
The Calculated Final Grade is based on the points and/or weights you assigned to the columns. The Adjusted Final Grade allows you to make manual changes to the final calculated grade, overriding the default grading formula. Note: If you select final adjusted grade, you will be required to manually enter an adjusted grade for every student, even if the “adjusted” grade is the same as the calculated grade. By default, the adjusted final grade column appears at the far right of the gradebook.
2. Check your gradebook settings
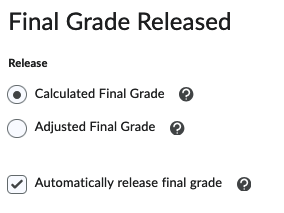
Go to Grades (Assessment->Grades in the default BMCC course navbar) and then click Settings in the upper-right corner. You will now see the grade settings interface, which has three tabs. Click on the right-most tab, Calculation Options. Scroll down to the Final Grade Released section and select the option that matches what you decided in step 1 above (either Calcuated Final Grade or Adjusted Final Grade). Make sure that Automatically release final grade is checked.
When you are done, scroll down to the bottom and click Save and then Close to leave settings.
3. Check if students can see their final grades
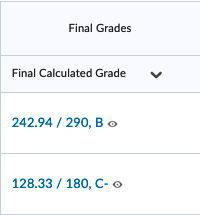
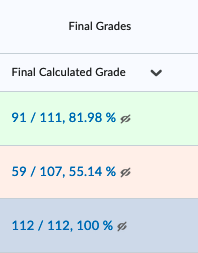
Now go to the Enter Grades tab (the left-most tab under Grades). Look at the grades in the column you want to display to students (either Final Calculated Grade or Adjusted Final Grade) to see if there are open-eye icons next to the grades. If you see open-eye icons (left image below), you are done – students should see their final grades. If you see closed-eye icons (right image below), go to the next step.
4. Manually “release” the final grade column
If you saw a closed-eye icon in the previous step, you will need to manually “release” the final grade column to make it visible to students. Make sure you are in the Enter Grades area (the left-most tab under Grades). Click the down-arrow next to the grade column you selected in step 1 (either Final Calculated Grade or Adjusted Final Grade) and click Enter Grades.
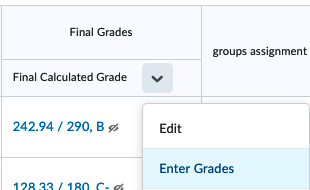
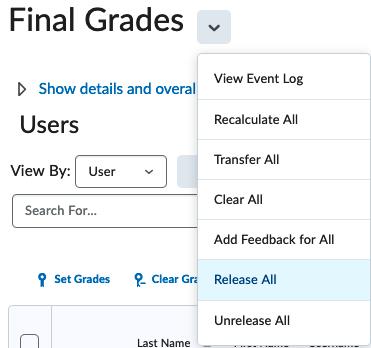
You should now see a new screen with the title Final Grades. Click the down-arrow next to Final Grades and select Release All. Click Yes in confirmation window, then click the Save and Close button (lower left part of the screen) and confirm again. Repeat step 3 to confirm that you now see an open eye icon next to the final grade column. Students should now be able to view their final grades.
